
Nginx四层负载均衡概述
2019-08-29 08:59:14来源:博客园 阅读 ()

Nginx四层负载均衡概述
目录
- Nginx四层负载均衡概述
- 什么是负载均衡
- 负载均衡应用场景
- 四层,七层集群架构
- 四层负载均衡总结
- Nginx如何配置四层负载均衡
- nginx四层负载均衡端口转发
Nginx四层负载均衡概述
什么是负载均衡
四层负载均衡是基于传输层协议包来封装的(如:TCP/IP),那我们前面使用到的七层是指的应用层,他的组装在四层的基础之上,无论四层还是七层都是指的OSI网络模型。
负载均衡应用场景
1、四层+七层来做负载均衡,四层可以保证七层的负载均衡的高可用性;如:nginx就无法保证自己的服务高可用,需要依赖LVS或者keepalive。
2、如:tcp协议的负载均衡,有些请求是TCP协议的(mysql、ssh),或者说这些请求只需要使用四层进行端口的转发就可以了,所以使用四层负载均衡。
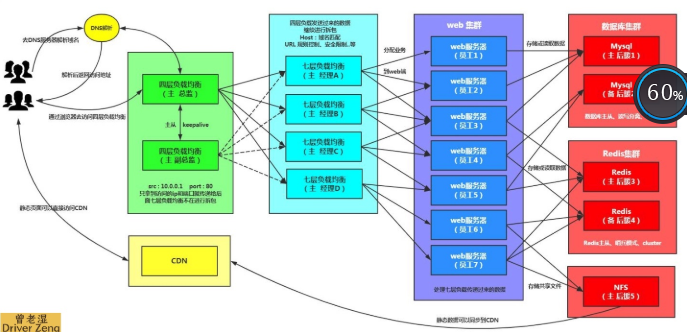
四层,七层集群架构
四层负载均衡总结
1、四层负载均衡仅能转发TCP/IP协议、UDP协议、通常用来转发端口,如:tcp/22、udp/53;
2、四层负载均衡可以用来解决七层负载均衡端口限制问题;(七层负载均衡最大使用65535个端口号)
3、四层负载均衡可以解决七层负载均衡高可用问题;(多台后端七层负载均衡能同事的使用)
4、四层的转发效率比七层的高得多,但仅支持tcp/ip协议,不支持http和https协议;
5、通常大并发场景通常会选择使用在七层负载前面增加四层负载均衡。
Nginx如何配置四层负载均衡
1、通过访问负载均衡的5555端口,实际是后端的web01的22端口在提供服务;
2、通过访问负载均衡的6666端口,实际是后端的mysql的3306端口在提供服务。
先配置两台lb负载均衡
[root@lb02 ~]# cat /etc/yum.repos.d/nginx.repo
[nginx-stable]
name=nginx stable repo
baseurl=http://nginx.org/packages/centos/7/$basearch/
gpgcheck=0
enabled=1
gpgkey=https://nginx.org/keys/nginx_signing.key

#在lb02上安装nginx
[root@lb02 yum.repos.d]# yum install -y nginx

#在lb02上同步lb01的所有nginx相关配置
[root@lb02 ~]# scp -r root@172.16.1.5:/etc/nginx /etc/


#启动nginx
[root@lb02 conf.d]# nginx -t
nginx: the configuration file /etc/nginx/nginx.conf syntax is ok
nginx: configuration file /etc/nginx/nginx.conf test is successful
[root@lb02 conf.d]# systemctl enable nginx
Created symlink from /etc/systemd/system/multi-user.target.wants/nginx.service to /usr/lib/systemd/system/nginx.service.
[root@lb02 conf.d]# nginx
1.创建存放四层负载均衡配置文件的目录
[root@lb02 ~]# vim /etc/nginx/nginx.conf
events {
        ....
}
include /etc/nginx/conf.c/*.conf;
http {
        .....
}

[root@lb02 ~]# mkdir /etc/nginx/conf.c
2.配置四层负载均衡
[root@lb02 conf.c]# cat lb_domain.conf
stream {
    upstream lb {
            server 172.16.1.5:80 weight=5 max_fails=3 fail_timeout=30s;
            server 172.16.1.6:80 weight=5 max_fails=3 fail_timeout=30s;
    }

    server {
            listen 80;
            proxy_connect_timeout 3s;
            proxy_timeout 3s;
            proxy_pass lb;
    }
}
[root@web03 conf.c]# nginx -t
nginx: the configuration file /etc/nginx/nginx.conf syntax is ok
nginx: configuration file /etc/nginx/nginx.conf test is successful
[root@web03 conf.c]# nginx -s reload

#配置本机hosts解析后浏览器访问并查看nginx日志
3.四层负载均衡开启日志
#四层负载均衡是没有access的日志的,因为在nginx.conf的配置中,access的日志格式是配置在http下的,而四层复杂均衡配置实在http以外的;

#如果需要日志则需要配置在stream下面
[root@lb01 conf.c]# cat lb_domain.conf
stream {
    log_format  proxy '$remote_addr $remote_port - [$time_local] $status $protocol '
                  '"$upstream_addr" "$upstream_bytes_sent" "$upstream_connect_time"' ;
    access_log /var/log/nginx/proxy.log proxy;
    upstream lb {
            server 172.16.1.5:80 weight=5 max_fails=3 fail_timeout=30s;
            server 172.16.1.6:80 weight=5 max_fails=3 fail_timeout=30s;
    }

    server {
            listen 80;
            proxy_connect_timeout 3s;
            proxy_timeout 3s;
            proxy_pass lb;
    }
}
nginx四层负载均衡端口转发
1.使用nginx四层负载均衡实现tcp的转发
请求负载均衡 5555    --->     172.16.1.7:22;
请求负载均衡 6666    --->     172.16.1.51:3306;
2.配置nginx四层负载均衡实现tcp的转发
[root@lb4-01 ~]# cat /etc/nginx/conf.c/lb_domain.conf
stream {
    log_format  proxy '$remote_addr $remote_port - [$time_local] $status $protocol '
                      '"$upstream_addr" "$upstream_bytes_sent" "$upstream_connect_time"' ;
    access_log /var/log/nginx/proxy.log proxy;

#定义转发ssh的22端口
    upstream ssh_7 {
            server 10.0.0.7:22;
    }
#定义转发mysql的3306端口
    upstream mysql_51 {
            server 10.0.0.51:3306;
    }
    server {
            listen 5555;
            proxy_connect_timeout 3s;
            proxy_timeout 300s;
            proxy_pass ssh_7;
    }

    server {
            listen 6666;
            proxy_connect_timeout 3s;
            proxy_timeout 3s;
            proxy_pass mysql_51;
    }
}
原文链接:https://www.cnblogs.com/1naonao/p/11425827.html
如有疑问请与原作者联系
标签:
版权申明:本站文章部分自网络,如有侵权,请联系:west999com@outlook.com
特别注意:本站所有转载文章言论不代表本站观点,本站所提供的摄影照片,插画,设计作品,如需使用,请与原作者联系,版权归原作者所有

- keepalived 实现LVS负载均衡高可用集群(一) 2020-06-04
- 附020.Nginx-ingress部署及使用 2020-06-02
- LVS负载分担(NAT模式)基础搭建 2020-06-01
- Nginx + Docker 多阶段构建的部署学习 2020-05-25
- 万字长文!一次性弄懂 Nginx 处理 HTTP 请求的 11 个阶段 2020-05-21
IDC资讯: 主机资讯 注册资讯 托管资讯 vps资讯 网站建设
网站运营: 建站经验 策划盈利 搜索优化 网站推广 免费资源
网络编程: Asp.Net编程 Asp编程 Php编程 Xml编程 Access Mssql Mysql 其它
服务器技术: Web服务器 Ftp服务器 Mail服务器 Dns服务器 安全防护
软件技巧: 其它软件 Word Excel Powerpoint Ghost Vista QQ空间 QQ FlashGet 迅雷
网页制作: FrontPages Dreamweaver Javascript css photoshop fireworks Flash
