
Nginx入门
2018-06-18 00:38:19来源:未知 阅读 ()

一、什么是Nginx
二、关于高性能网站分析
四、Nginx优点
五、Nginx安装
./nginx -s reload (重启)
./nginx-s stop (关闭)
./nginx-s reopen (重新打开日志文件)
./nginx -c filename (为nginx指定一个配置文件,来代替缺省的)
./nginx -t (不运行,仅仅测试配置文件语法正确性)
./nginx -v (显示nginx版本号)
五、关于nginx配置文件
#user nobody;
#开启进程数 <=CPU数
worker_processes 1;
#错误日志保存位置
#error_log logs/error.log;
#error_log logs/error.log notice;
#error_log logs/error.log info;
#进程号保存文件
#pid logs/nginx.pid;
#每个进程最大连接数(最大连接=连接数x进程数)每个worker允许同时产生多少个链接,默认1024
events {
worker_connections 1024;
}
http {
#文件扩展名与文件类型映射表
include mime.types;
#默认文件类型
default_type application/octet-stream;
#日志文件输出格式 这个位置相于全局设置
#log_format main '$remote_addr - $remote_user [$time_local] "$request" '
# '$status $body_bytes_sent "$http_referer" '
# '"$http_user_agent" "$http_x_forwarded_for"';
#请求日志保存位置
#access_log logs/access.log main;
#打开发送文件
sendfile on;
#tcp_nopush on;
#keepalive_timeout 0;
#连接超时时间
keepalive_timeout 65;
#打开gzip压缩
#gzip on;
server {
#监听端口,默认是80端口
listen 80;
#监听域名
server_name localhost;
#charset koi8-r;
#nginx访问日志放在logs/host.access.log下,并且使用main格式(还可以自定义格式)
#access_log logs/host.access.log main;
#如果没有location更明确的匹配访问路径的话,访问请求都会被该location处理。
location / {
#root指定nginx的根目录为/usr/local/nginx/html
root html;
#默认访问文件,欢迎页先去html目录下找index.html,如果找不到再去找index.htm
index index.html index.htm;
}
#error_page 404 /404.html;
# redirect server error pages to the static page /50x.html
#
#错误页面及其返回地址,错误码为500、502、503、504都会返回50.html错误页面。
error_page 500 502 503 504 /50x.html;
#location后面是"="的话,说明是精确匹配
location = /50x.html {
root html;
}
# proxy the PHP scripts to Apache listening on 127.0.0.1:80
#
#location ~ \.php$ {
# proxy_pass http://127.0.0.1;
#}
# pass the PHP scripts to FastCGI server listening on 127.0.0.1:9000
#
#location ~ \.php$ {
# root html;
# fastcgi_pass 127.0.0.1:9000;
# fastcgi_index index.php;
# fastcgi_param SCRIPT_FILENAME /scripts$fastcgi_script_name;
# include fastcgi_params;
#}
# deny access to .htaccess files, if Apache's document root
# concurs with nginx's one
#
#location ~ /\.ht {
# deny all;
#}
}
# another virtual host using mix of IP-, name-, and port-based configuration
#
#server {
# listen 8000;
# listen somename:8080;
# server_name somename alias another.alias;
# location / {
# root html;
# index index.html index.htm;
# }
#}
# HTTPS server
#
#server {
# listen 443 ssl;
# server_name localhost;
# ssl_certificate cert.pem;
# ssl_certificate_key cert.key;
# ssl_session_cache shared:SSL:1m;
# ssl_session_timeout 5m;
# ssl_ciphers HIGH:!aNULL:!MD5;
# ssl_prefer_server_ciphers on;
# location / {
# root html;
# index index.html index.htm;
# }
#}
}
六、实战
1、自定义域名跳转
1) 在nginx.conf中配置server模块
#自定义
     server {
        listen      520 ;     #监听端口号
        server_name  yiling.com;  #自定义服务器域名
        location / {
            root   yiling.com;  #指定跳转资源所在目录,此目录相对于nginx根目录
            index  index.html index.htm;  #指定访问的默认资源,当没有指定资源时,就访问默认页面
        }
}
2) 在nginx目录中新建一个文件夹命名为yiling.com文件夹,并新建一个index.html文件,自定义内容
3) 此时如果在window环境中访问域名yiling.com:520,会访问不到,因为window主机无法识别域名,需要在C:\Windows\System32\drivers\etc\目录下编辑hosts文件配置域名
192.168.174.128 yiling.com
4) 访问域名,如果成功跳转指定页面显示内容,说明配置成功
2、关于nginx日志文件
在nginx配置文件中有记录日志的配置,默认情况下是屏蔽的,如果需要打印日志可以将它打开,日志文件是用来记录每次访问域名时记录访问的状态
1) vim nginx.conf,将log_format注释去掉,此是记录日志的格式
log_format  main  '$remote_addr - $remote_user [$time_local] "$request" '
                      '$status $body_bytes_sent "$http_referer" '
                      '"$http_user_agent" "$http_x_forwarded_for"';
其中:main是指该日志全局配置名,当需要时只要引用其名即可;remote_addr 是指客户端地址;remote_user是指客户端用户名称;time_local是指访问时间和时区;request是指请求的URI和http协议;status是指http状态;body_bytes_sent是指发送客户端的内容;http_referer是指url跳转来源;http_user_agent是指用户终端浏览器等信息
2) 引用日志
     server {
        listen      520 ;
        server_name  yiling.com;
        location / {
            root   yiling.com;
            index  index.html index.htm;
        }
           access_log  logs/yiling.access.log  main;//这里引用了main,每次访问指定域名时会在logs文件下自动生成yiling.access.log文件,文件名可以自定义
}
3) 重启nginx
ps -ef | grep nginx -s reload
4) 此时查看nginx/logs文件中会生成yiling.access.log文件
 tail -n 100 -f nginx/logs/yiling.access.log
#显示filename最后20行。把某个档案文件的最后几行显示到终端上
3、nginx日志文件切割
分析:每次访问nginx,都会生成日志,不定时清理会越来越大,此时需要配置日志文件切割
1) 在nginx/sbin下新建一个log.sh文件,编写脚本文件
#/bin/sh
BASE_DIR=/usr/local/nginx      #脚本所在文件
BASE_FILE_NAME=yiling.com.access.log  #日志打印指定文件

CURRENT_PATH=$BASE_DIR/logs   #日志所在目录
BAK_PATH=$BASE_DIR/datalogs   #拷贝日志所在目录

CURRENT_FILE=$CURRENT_PATH/$BASE_FILE_NAME
BAK_TIME=`/bin/date -d yesterday +%Y%m%d%H%M`    //手动将昨天的日志进行备份
BAK_FILE=$BAK_PATH/$BAK_TIME-$BASE_FILE_NAME
echo $BAK_FILE
#备份之前先把nginx关闭
$BASE_DIR/sbin/nginx -s stop
#将生成的日志文件移动到usr/local/nginx/datalogs/时间-yiling.com.access.log
mv $CURRENT_FILE $BAK_FILE   #删除原来文件
#重启nginx
$BASE_DIR/sbin/nginx
2) 给log.sh赋予权限
chmod 777 log.sh
3) 写一个脚本定时执行脚本文件
#每天凌晨两点备份前一天的日志
#* 2 * * * sh /usr/local/nginx/sbin/log.sh
#为了测试方便,我们暂且设置成每分钟执行一次备份
*/1 * * * * sh /usr/local/nginx/sbin/log.sh
4) 此时查看datalogs文件,会新备份的日志
4、nginx_location配置
1) 通过正则表达模糊匹配指定访问资源
注意:/表示精确匹配;~表示正则匹配
 #自定义
     server {
        listen      520 ;
        server_name  yiling.com;
       #location / {
        location ~ test {     #~与test之间有空格
            root   yiling.com;
            index  index.html index.htm;   #注意当域名中指定访问文件,默认访问的资源将不被访问
        }
           access_log  logs/yiling.access.log  main;
}
2) 在yiling.com文件夹下新建一个html文件,用于指定访问的资源,命名以test开头,如testfile.html
3) 访问 http://yiling.com:520/testfile.html,即可访问到testfile.html文件内容
5、模仿添加黑名单:当window主机访问指定资源时,跳转到401
1) 配置server模块
#自定义
     server {
        listen      520 ;
        server_name  yiling.com;
       #location / {
        location ~ test {
           ##重写语法 if return(条件),这里是模仿添加黑名单
          if ($remote_addr = 192.168.174.1) { #这是nginx远程地址,非真实ip
                return 401;
            }
            root   yiling.com;
            index  index.html index.htm;
        }
           access_log  logs/yiling.access.log  main;
}
2) 此时访问http://yiling.com:520/test123.html,因为匹配到的请求域名为指定黑名单域名,会报401

可以通过使用rewrite指令在请求处理期间多次修改请求URI,该指令具有一个可选参数和两个必需参数。 第一个(必需)参数是请求URI必须匹配的正则表达式。 第二个参数是用于替换匹配URI的URI。 可选的第三个参数是可以停止进一步重写指令的处理或发送重定向(代码301或302)的标志。
模拟域名分析,通过指定的请求前缀跳转到指定的页面
1) 配置server模块
#前缀名为goods
location /goods {
                ##进一步分析请求域名goods后面为1-5为数字,rewrite是对url进行重写,即重定向
                rewrite "goods-(\d{1,5})\.html" /goods-ctrl.html;
                root yiling.com;
                index index.html;
        }
           access_log  logs/yiling.access.log  main;
}
2) 在yiling.com文件下创建goods-ctr.html,自定义内容
3) 访问 http://yiling.com:520/goods-9110.html
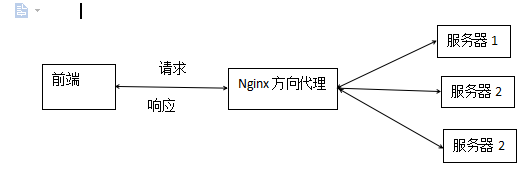
7、nginx反向代理
相关知识点:
nginx反向代理proxy与负载均衡upstream
配置反向代理proxy:proxy_pass url地址
配置负载均衡upstream :upstream
注意:反向代理之后获取客户端IP地址为nginx服务器地址,这里需要nginx进行forward,设置真实IP地址
proxy_set_header X-real-ip $remote_addr;
1) 配置nginx反向代理
1.1) 配置反向代理,实现动静分离
环境分析:当请求域名以.jsp结尾时,自动跳转到tomcat下指定的jsp中
1.1.1)配置server模块
server {
        listen       80;
        server_name  localhost;
       #配置反向代理tomcat服务器;拦截.jsp结尾的请求转向到tomcat
       location ~ \.jsp$ {
            proxy_pass http://192.168.174.128:8080;
        }
           }
1.1.2) 在tomcat的 tomcat/webapps/ROOT目录下建立一个test.jsp
  <body>
            <h1>TestPage!!</h1>
              Nginx server ip: <%=request.getRemoteAddr()%>
          </body>
</html>
1.1.3) 启动tomcat
1.1.4) 此时访问域名:http://192.168.174.128:80/test.jsp,如果成功跳转到tomcat下的test.jsp,说明配置成功
此时是先进入nginx服务器,通过正则匹配跳转到tomcat下 的test.jsp,返回的地址是nginx转发的地址
若想返回请求地址,需要配置
对于nginx.conf下server模块
 location ~ \.jsp$ {
       #设置客户端真实ip地址
        proxy_set_header x-real-ip $remote_addr;
        proxy_pass http://192.168.174.128:8080;
    }
对于tomcat下的jsp
<h1>反向代理!</h1>
  Remote  ip: <%=request.getHeader("X-real-ip")%></br>
  Nginx server ip: <%=request.getRemoteAddr()%>
  </body>
2) nginx负载均衡
2.1) 配置nginx.conf下server模块
 #配置nginx负载均衡
    #weight分配权重(进入概率) max_fails:最大失败连接数:超过2次失效;fail_timeout:超时时间
    upstream myapp {
        server 192.168.174.130:8080 weight=1 max_fails=2 fail_timeout=30s;
        server 192.168.174.133:8080 weight=1 max_fails=2 fail_timeout=30s;
     }
    server {
        listen       80;
        server_name  localhost;

        #charset koi8-r;

       #access_log  logs/host.access.log  main;

        location / {
            proxy_set_header x-real-ip $remote_addr;
            proxy_pass http://myapp;
            root   html;
            index  index.html index.htm;
        }
}
2.2) 将tomcat下的test.jsp拷贝到另一台linux centos环境中,利用scp命令
[root@bogon ROOT]# scp test.jsp 192.168.174.133:/usr/java
2.3) 开启两台tomcat
2.4) 访问域名http://192.168.174.128/test.jsp ,如果每刷新一次,分别显示的两个不同的jsp,说明配置成功
七、关于nginx高可用值keepalived
1、什么是高可用:
通常来描述一个系统经过专门的设计,从而减少停工时间,而保持其服务的高度可用性。通俗的讲,就是当一台机器挂失后,会有一台后备机替代它运作,不影响整个系统工作。而nginx+keepalived+tomcat可实现负载均衡高可用。
2、为什么要用keepalived

环境分析:此时模拟用户请求经过nginx反向代理后选择指定的tomcat调用数据库抽取数据,确实实现负载均衡,降低了只有一台服务器时的压力,但是如果当这台唯一的nginx服务器挂失时,整个系统则会进入瘫痪状态。此时需要keepalived配置虚拟IP配合主备nginx实现高可用集群。

3、关于keepalived
1、基于VRRP协议,路由器和操作系统层面上的协议,虚拟路由器动态转移IP
2、需要配置:有主备(master/backup)两个角色,可以配置多种定期监控实现应用的高可用
3、启动:keepalived命令直接自定配置文件启动,生产环境设置为自启动
4、keepalived下载安装
1) 下载相关组件
     yum -y install openssl-devel
     yum -y install libnl libnl-devel
     yum install -y libnfnetlink-devel
2) 下载keepalived
[root@bogon java]#wget http://www.keepalived.org/software/keepalived-1.4.5.tar.gz
3) 解压并安装
    [root@bogon java]#tar -xvf keepalived-1.4.4.tar.gz
    [root@bogon java]#cd keepalived-1.4.4
    [root@bogon java]#./configure --prefix=/usr/local/keepalived --sysconf=/etc
    [root@bogon java]#make && make install
5、实战
要实现nginx+keepalived+tomcat高可用负载均衡,需要以下环境需求
两台tomcat、启动两台nginx、启动两台keepalived
1)更改tomcat默认欢迎页,最好能够标识两台标识tomcat服务器所在网段
2) 配置Master节点和BackUp的upstream和server模块,他们内容是一致的
http {
 upstream tomcat {
    server 192.168.174.133:8080 weight=1;
    server 192.168.43.128:8080 weight=1;
    }
 server {
        listen 80;
        location / {
              proxy_pass http://tomcat;
proxy_set_header x-real-ip $remote_addr;
        }
    }
3) 配置keepalived脚本信息
在Master节点和slave节点的/etc/keepalived目录下
    [root@localhost keepalived]# pwd
    /etc/keepalived
1、新建监控脚本nginx_monitor,此脚本文件用来监控nginx状态,当nginx挂失,输出日志
    #!/bin/bash

    # shell脚本 如果nginx进程存在,则认为没有问题
    if [ "$(ps -ef | grep "nginx: master process"| grep -v grep )" == "" ]
      then
        # 输出日志
        echo "dongnao.tony#############no nginx" >> /var/log/messages
        exit 1
      else
        # 一切正常
        exit 0
    fi
2、分别在master和backup当前/etc/keepalived目录下建立keepalived主机配置和keepalived备机配置
配置master与backup两个角色承当主与从,从的角色就是当主挂失后用来代替主的配置
主机:keepalived-nginx-master.conf
主要配置点为网卡接口配置和虚拟IP设置,其中网卡根据ifconfig进行查看,虚拟IP虽然自己设定,但是需要和自己网段保持一致
  # 定义一个名为nginx_monitor的脚本
  vrrp_script nginx_monitor {
       # 监控nginx的脚本存放地址
       script "/etc/keepalived/nginx_monitor.sh"
       # 每隔1秒执行一次
       interval 1
  }

  # 定义一个vrrp示例
  vrrp_instance VI_1 {
    state MASTER    #(主机为MASTER,备用机为BACKUP)
    interface enp0  #(HA监测网卡接口)

    virtual_router_id 61 #(主、备机的virtual_router_id必须相同)
    priority 90 #(主、备机取不同的优先级,主机值较大,备份机值较小,值越大优先级越高)
    advert_int 1 #(VRRP Multicast广播周期秒数)

    track_script {
        nginx_monitor #(监控脚本名称)
    }
    virtual_ipaddress {
            192.168.174.127 #(VRRP HA虚拟IP)
    }
}
备机:keepalived-nginx-backup.conf
  # 定义一个名为nginx_monitor的脚本
  vrrp_script nginx_monitor {
     # 监控nginx的脚本存放地址
     script "/etc/keepalived/nginx_monitor.sh"
     # 每隔1秒执行一次
     interval 1
  }

  # 定义一个vrrp示例
  vrrp_instance VI_1 {
    state MASTER    #(主机为MASTER,备用机为BACKUP)
    interface enp0  #(HA监测网卡接口)

    virtual_router_id 61 #(主、备机的virtual_router_id必须相同)
    priority 80 #(主、备机取不同的优先级,主机值较大,备份机值较小,值越大优先级越高)
    advert_int 1 #(VRRP Multicast广播周期秒数)

    track_script {
        nginx_monitor #(监控脚本名称)
    }
    virtual_ipaddress {
            192.168.174.132 #(VRRP HA虚拟IP)
      }
  }
3、执行监控脚本
[root@localhost keepalived]#./nginx_monitor.sh
此时分别另外启动一台终端用来查看打印的日志信息
tail -f /var/log/message #-f是不断的输出message内的内容,类似于while(true)循环
如果此时关闭nginx,便会打印出日志信息“dongnao.tony#############no nginx”
4、启动keepalived
    # 启动master主机
    /usr/local/keepalived/sbin/keepalived -f /etc/keepalived/keepalived-nginx-master.conf
    # 启动backup备机
    /usr/local/keepalived/sbin/keepalived -f /etc/keepalived/keepalived-nginx-backup.conf
5、检验
此时可以通过虚拟IP分别访问到当对应的tomcat,如果主机挂失,并不会影响到访问,因为此时访问到的是备机
八、关于nginx优化
关于优化问题,除了对于硬件上的要求,其他就是开发者对软件合理应用调配了,nginx优化无非就是对其配置文件nginx.conf进行配置。
1、worker_process
其定义了nginx对外提供了web服务时的worder进程数,将其设置为可用的CPU内核数可达到优化的目的
2、worker_connect
其是events模块的,其设置是可由有一个worker进程同时打开的最大连接数,其设置视情况而定,可偏高,但是不建议设置的过高
3、sendfile
可以让sendfile()发挥作用。sendfile()可以在磁盘和TCP socket之间互相拷贝数据(或任意两个文件描述符)。Pre-sendfile是传送数据之前在用户空间申请数据缓冲区。之后用read()将数据从文件拷贝到这个缓冲区,write()将缓冲区数据写入网络。sendfile()是立即将数据从磁盘读到OS缓存。因为这种拷贝是在内核完成的,sendfile()要比组合read()和write()以及打开关闭丢弃缓冲更加有效
4、tcp_nopush
默认情况下是关闭的。此设置是指定一个数据 包里所有发送头文件,而不是一个个发送
5、error_log
设置nginx是否将存储访问日志。关闭可让读取磁盘IO操作更快
6、keepalive_timeout
给客户端分配keep-alive连接超时时间。默认是关闭的。如果使用它最好设置低点
7、gzip
告诉nginx采用gzip压缩形式发送。默认关闭。开启能减少发送的数据量
标签:
版权申明:本站文章部分自网络,如有侵权,请联系:west999com@outlook.com
特别注意:本站所有转载文章言论不代表本站观点,本站所提供的摄影照片,插画,设计作品,如需使用,请与原作者联系,版权归原作者所有

- 5月到6月程序员到底经历了和什么,工资狂跌***元,你是否也 2020-06-10
- logstash系列-入门整理 2020-06-10
- 为什么阿里巴巴Java开发手册中不允许魔法值出现在代码中? 2020-06-09
- Java 入门教程 2020-06-09
- 计算机基础到底是哪些基础?为什么很重要! 2020-06-08
IDC资讯: 主机资讯 注册资讯 托管资讯 vps资讯 网站建设
网站运营: 建站经验 策划盈利 搜索优化 网站推广 免费资源
网络编程: Asp.Net编程 Asp编程 Php编程 Xml编程 Access Mssql Mysql 其它
服务器技术: Web服务器 Ftp服务器 Mail服务器 Dns服务器 安全防护
软件技巧: 其它软件 Word Excel Powerpoint Ghost Vista QQ空间 QQ FlashGet 迅雷
网页制作: FrontPages Dreamweaver Javascript css photoshop fireworks Flash
