
SpringBoot启动流程
2019-09-08 09:48:27来源:博客园 阅读 ()

SpringBoot启动流程
1.SpringBoot项目启动方式:
- 在IDE中启动SpringBoot主类(XXXApplication)中的main方法
- 使用mvn spring-boot:run命令启动
- 打成jar包之后使用java -jar xxx.jar运行
- 打成war包之后放在web容器中运行
这是一篇一年多前写的博客,使用的源码版本是1.5.x。当时发布在CSDN,现在同步到其他平台,虽然SpringBoot这个版本帝刷的很快,但是2.x版本的启动流程并没有怎么变化,一样可供参考。
2.SpringBoot启动流程主要分为三步:
第一部分:SpringApplication初始化模块,配置一些基本的环境变量,资源,监听器,构造器;
第二部分:实现了应用具体的启动方案,包括流程的监听模块,加载配置环境模块以及创建上下文环境模块
第三部分:自动化配置模块,这个模块是实现SpringBoot的自动配置
SpringBoot程序的主入口就是标注了@SpringBootApplication注解的类,该类中有一个main方法,在main方法中调用SpringApplication的run()方法,这个run()方法来启动整个程序
@SpringBootApplication
public class CrmWebApiApplication extends SpringBootServletInitializer {

    public static void main(String[] args) {
        SpringApplication.run(CrmWebApiApplication.class, args);
    }

}
下面是@SpringBootApplication注解的头部源码
@Target(ElementType.TYPE)
@Retention(RetentionPolicy.RUNTIME)
@Documented
@Inherited
@SpringBootConfiguration
@EnableAutoConfiguration
@ComponentScan(excludeFilters = {
        @Filter(type = FilterType.CUSTOM, classes = TypeExcludeFilter.class),
        @Filter(type = FilterType.CUSTOM, classes = AutoConfigurationExcludeFilter.class) })
public @interface SpringBootApplication {
这是一个组合注解,其中标注的注解主要有以下作用
@EnableAutoConfiguration: 开启SpringBoot自动配置,在程序启动时会自动加载SpringBoot的默认配置,如果有对一些参数进行配置,则会在程序启动时或调用时进行追加或者覆盖
@SpringBootConfiguration: 这个注解和@Configuration注解的作用一样,用来表示被标注的类是一个配置类,会将被标注的类中一个或多个被@Bean注解修饰的方法添加到Spring容器中,实例的名字默认是方法名
@ComponentScan: 包扫描注解,默认扫描主类包路径下的类
进入run()方法后的代码如下:
/**
     * Static helper that can be used to run a {@link SpringApplication} from the
     * specified sources using default settings and user supplied arguments.
     * @param sources the sources to load
     * @param args the application arguments (usually passed from a Java main method)
     * @return the running {@link ApplicationContext}
     */
    public static ConfigurableApplicationContext run(Object[] sources, String[] args) {
        return new SpringApplication(sources).run(args);
    }
这里会创建一个SpringApplication类的实例,进入SpringApplication类中可以看到构造方法里调用了一个initialize(sources)方法
/**
     * Create a new {@link SpringApplication} instance. The application context will load
     * beans from the specified sources (see {@link SpringApplication class-level}
     * documentation for details. The instance can be customized before calling
     * {@link #run(String...)}.
     * @param sources the bean sources
     * @see #run(Object, String[])
     * @see #SpringApplication(ResourceLoader, Object...)
     */
    public SpringApplication(Object... sources) {
        initialize(sources);
    }
Initialize(sources)方法源码如下:
@SuppressWarnings({ "unchecked", "rawtypes" })
private void initialize(Object[] sources) {
    if (sources != null && sources.length > 0) {
        //将sources设置到SpringApplication类的source属性中,这时的source值只有主类
        this.sources.addAll(Arrays.asList(sources));
    }
    //判断是不是web程序,
    this.webEnvironment = deduceWebEnvironment();
    //从spring.factories文件中找出key为ApplicationContextInitializer的类进行实例化,然后设置到SpringApplciation类的initializers属性中,这个过程也是找出所有的应用程序初始化器
    setInitializers((Collection) getSpringFactoriesInstances( ApplicationContextInitializer.class));
    //从spring.factories文件中找出key为ApplicationListener的类并实例化后设置到SpringApplication的listeners属性中。这个过程就是找出所有的应用程序事件监听器
    setListeners((Collection) getSpringFactoriesInstances(ApplicationListener.class));
    //找出main类,也就是SpringBoot项目的主类
    this.mainApplicationClass = deduceMainApplicationClass();
}
2.1 run方法完整代码
执行完初始化之后回到run()方法中,完整代码如下:
/**
* Run the Spring application, creating and refreshing a new
* {@link ApplicationContext}.
* @param args the application arguments (usually passed from a Java main method)
* @return a running {@link ApplicationContext}
*/
public ConfigurableApplicationContext run(String... args) {
  StopWatch stopWatch = new StopWatch();
  stopWatch.start();
  ConfigurableApplicationContext context = null;
  FailureAnalyzers analyzers = null;
  configureHeadlessProperty();
   //创建应用监听器
  SpringApplicationRunListeners listeners = getRunListeners(args);
  //开始监听
  listeners.starting();

  try {
     ApplicationArguments applicationArguments = new DefaultApplicationArguments(args);
     //加载SpringBoot配置环境ConfigurableEnvironment,见2.2配置ConfigurableEnvironment
     ConfigurableEnvironment environment = prepareEnvironment(listeners,applicationArguments);
     //打印banner
     Banner printedBanner = printBanner(environment);
     //创建应用程序上下文,见2.3 创建应用程序上下文
     context = createApplicationContext();
     analyzers = new FailureAnalyzers(context);
     prepareContext(context, environment, listeners, applicationArguments,printedBanner);
     refreshContext(context);
     afterRefresh(context, applicationArguments);
     listeners.finished(context, null);
     stopWatch.stop();
     if (this.logStartupInfo) {
      new StartupInfoLogger(this.mainApplicationClass)
            .logStarted(getApplicationLog(), stopWatch);
     }
     return context;
   }catch (Throwable ex) {
     handleRunFailure(context, listeners, analyzers, ex);
     throw new IllegalStateException(ex);
   }
}
2.2 配置ConfigurableEnvironment
加载SpringBoot配置环境ConfigurableEnvironment流程如下:
private ConfigurableEnvironment prepareEnvironment(
            SpringApplicationRunListeners listeners,
            ApplicationArguments applicationArguments) {
        // Create and configure the environment
        ConfigurableEnvironment environment = getOrCreateEnvironment();
        configureEnvironment(environment, applicationArguments.getSourceArgs());
        listeners.environmentPrepared(environment);
        if (!this.webEnvironment) {
            environment = new EnvironmentConverter(getClassLoader())
                    .convertToStandardEnvironmentIfNecessary(environment);
        }
        return environment;
    }
在加载配置环境的过程中会判断是否是web容器启动,如果是容器启动会加载StandardServletEnvironment
private ConfigurableEnvironment getOrCreateEnvironment() {
        if (this.environment != null) {
            return this.environment;
        }
        if (this.webEnvironment) {
            return new StandardServletEnvironment();
        }
        return new StandardEnvironment();
    }
StandardServletEnvironment类的继承关系如下,StandardServletEnvironment
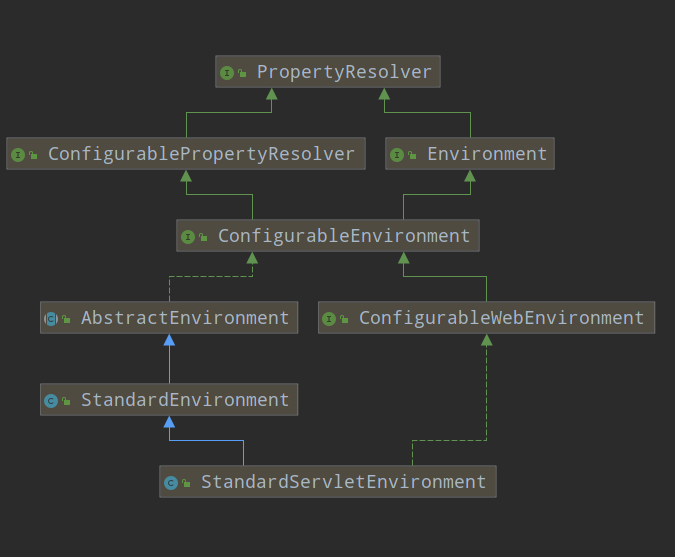
PropertyResolver接口是用于解析任何基础源的属性的接口,在加载完配置之后会将配置环境加入到监听器对象SpringApplicationRunListeners中。
2.3 创建应用程序上下文
然后会创建应用上下文对象,具体代码如下:
protected ConfigurableApplicationContext createApplicationContext() {
        Class<?> contextClass = this.applicationContextClass;
        if (contextClass == null) {
            try {
                contextClass = Class.forName(this.webEnvironment
                        ? DEFAULT_WEB_CONTEXT_CLASS : DEFAULT_CONTEXT_CLASS);
            }
            catch (ClassNotFoundException ex) {
                throw new IllegalStateException(
                        "Unable create a default ApplicationContext, "
                                + "please specify an ApplicationContextClass",
                        ex);
            }
        }
        return (ConfigurableApplicationContext) BeanUtils.instantiate(contextClass);
    }
方法会先显式的获取应用上下文对象,如果对象为空,再加载默认的环境配置,通过是否是webEnvironment进行判断,默认选择的是AnnotationConfigApplicationContext(注解上下文,通过扫秒注解来加载bean),然后通过BeanUtils来实例化应用上下文对象然后返回,ConfigurableApplicationContext类继承关系如下:
这里推荐一下我的另一篇博客,不太懂ConfigurableApplicationContext的可以去看一下,https://juejin.im/post/5d72055f5188256bab4c0b6d

回到run()方法中,会调用prepareContext()方法将environment, listeners,applicationArguments, printedBanner等组件与上下文对象进行关联
private void prepareContext(ConfigurableApplicationContext context,
            ConfigurableEnvironment environment, SpringApplicationRunListeners listeners,
            ApplicationArguments applicationArguments, Banner printedBanner) {
        context.setEnvironment(environment);
        postProcessApplicationContext(context);
        applyInitializers(context);
        listeners.contextPrepared(context);
        if (this.logStartupInfo) {
            logStartupInfo(context.getParent() == null);
            logStartupProfileInfo(context);
        }

        // Add boot specific singleton beans
        context.getBeanFactory().registerSingleton("springApplicationArguments",
                applicationArguments);
        if (printedBanner != null) {
            context.getBeanFactory().registerSingleton("springBootBanner", printedBanner);
        }

        // Load the sources
        Set<Object> sources = getSources();
        Assert.notEmpty(sources, "Sources must not be empty");
        load(context, sources.toArray(new Object[sources.size()]));
        listeners.contextLoaded(context);
    }
然后会调用refreshContext()方法,实际调用org.springframework.context.support.AbstractApplicationContext.refresh()内的相关方法。这个方法里会进行redis,mybatis等的自动配置,包括spring.factories的加载,bean的实例化,BenFactoryPostProcessor接口的执行,BeanPostProcessor接口的执行,条件注解的解析,国际化功能的初始化等。
refreshContext()方法执行完毕之后会执行afterRefresh方法,当run()方法执行完之后Spring容器也就初始化完毕了
protected void afterRefresh(ConfigurableApplicationContext context,
            ApplicationArguments args) {
        callRunners(context, args);
    }

    private void callRunners(ApplicationContext context, ApplicationArguments args) {
        List<Object> runners = new ArrayList<Object>();
        runners.addAll(context.getBeansOfType(ApplicationRunner.class).values());
        runners.addAll(context.getBeansOfType(CommandLineRunner.class).values());
        AnnotationAwareOrderComparator.sort(runners);
        for (Object runner : new LinkedHashSet<Object>(runners)) {
            if (runner instanceof ApplicationRunner) {
                callRunner((ApplicationRunner) runner, args);
            }
            if (runner instanceof CommandLineRunner) {
                callRunner((CommandLineRunner) runner, args);
            }
        }
    }

    private void callRunner(ApplicationRunner runner, ApplicationArguments args) {
        try {
            (runner).run(args);
        }
        catch (Exception ex) {
            throw new IllegalStateException("Failed to execute ApplicationRunner", ex);
        }
    }

    private void callRunner(CommandLineRunner runner, ApplicationArguments args) {
        try {
            (runner).run(args.getSourceArgs());
        }
        catch (Exception ex) {
            throw new IllegalStateException("Failed to execute CommandLineRunner", ex);
        }
    }
原文链接:https://www.cnblogs.com/ttlx/p/11475263.html
如有疑问请与原作者联系
标签:
版权申明:本站文章部分自网络,如有侵权,请联系:west999com@outlook.com
特别注意:本站所有转载文章言论不代表本站观点,本站所提供的摄影照片,插画,设计作品,如需使用,请与原作者联系,版权归原作者所有

- springboot2配置JavaMelody与springMVC配置JavaMelody 2020-06-11
- Java学习之第二天 2020-06-11
- SpringBoot 2.3 整合最新版 ShardingJdbc + Druid + MyBatis 2020-06-11
- 掌握SpringBoot-2.3的容器探针:实战篇 2020-06-11
- nacos~配置中心功能~springboot的支持 2020-06-10
IDC资讯: 主机资讯 注册资讯 托管资讯 vps资讯 网站建设
网站运营: 建站经验 策划盈利 搜索优化 网站推广 免费资源
网络编程: Asp.Net编程 Asp编程 Php编程 Xml编程 Access Mssql Mysql 其它
服务器技术: Web服务器 Ftp服务器 Mail服务器 Dns服务器 安全防护
软件技巧: 其它软件 Word Excel Powerpoint Ghost Vista QQ空间 QQ FlashGet 迅雷
网页制作: FrontPages Dreamweaver Javascript css photoshop fireworks Flash
