
Spring Boot 2 读取配置文件
2019-09-30 06:49:24来源:博客园 阅读 ()
 Spring Boot 2 读取配置文件
开发环境:IntelliJ IDEA 2019.2.2
Spring Boot版本:2.1.8
新建一个名称为demo的Spring Boot项目。
一、默认配置文件
Spring Boot会读取名称application.properties(yml)的配置文件。
如果有多个同名文件,默认情况下,按照下面顺序读取:
(1)项目根目录的config目录
(2)项目根目录
(3)项目classpath下的config目录
(4)项目classpath根目录
如果同一个配置项出现在多份配置文件中,后面读取的值不会覆盖前面的。
测试:
在项目的4个位置各建立application.properties,内容如下:
(1)config/application.properties
test = config/application.properties
test1 = test1
(2)application.properties
test = application.properties
test2 = test2
(3)src/main/resources/config/application.properties
test = src/main/resources/config/application.properties
test3 = test3
(4)src/main/resources/application.properties
test = src/main/resources/application.properties
test4 = test4
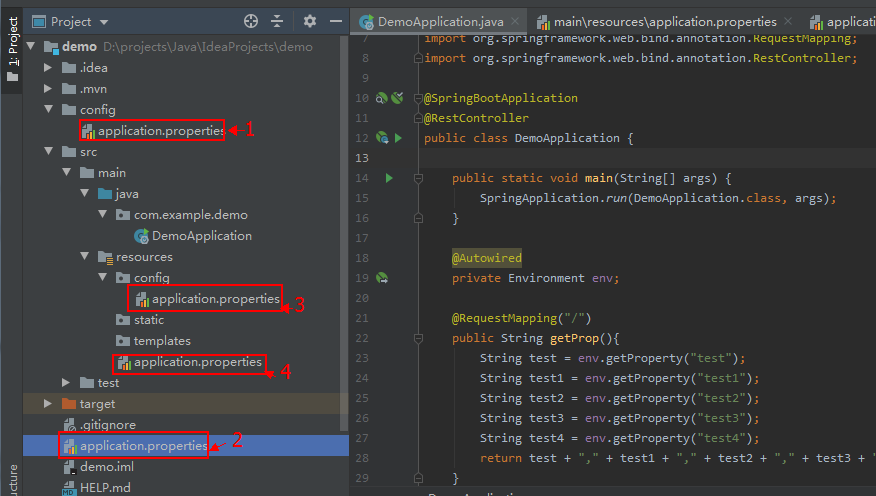
修改默认生成的启动类 DemoApplication.java 代码:
package com.example.demo;

import org.springframework.beans.factory.annotation.Autowired;
import org.springframework.boot.SpringApplication;
import org.springframework.boot.autoconfigure.SpringBootApplication;
import org.springframework.core.env.Environment;
import org.springframework.web.bind.annotation.RequestMapping;
import org.springframework.web.bind.annotation.RestController;

@SpringBootApplication
@RestController
public class DemoApplication {

    public static void main(String[] args) {
        SpringApplication.run(DemoApplication.class, args);
    }

    @Autowired
    private Environment env;

    @RequestMapping("/")
    public String getProp(){
        String test = env.getProperty("test");
        String test1 = env.getProperty("test1");
        String test2 = env.getProperty("test2");
        String test3 = env.getProperty("test3");
        String test4 = env.getProperty("test4");
        return test + "," + test1 + "," + test2 + "," + test3 + "," + test4;
    }
}
访问 http://localhost:8080/
输出:config/application.properties,test1,test2,test3,test4
二、指定配置文件
读取指定的配置文件,不使用默认的application.properties。
测试:
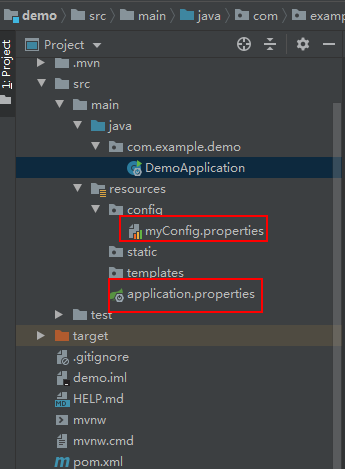
(1)src/main/resources/application.properties 内容:
test1 = application.properties
(2)在项目的src/main/resources新建目录config,新建配置文件myConfig.properties,内容:
test2= myConfig.properties
修改默认生成的启动类 DemoApplication.java 代码:
package com.example.demo;

import org.springframework.beans.factory.annotation.Autowired;
import org.springframework.boot.SpringApplication;
import org.springframework.boot.autoconfigure.SpringBootApplication;
import org.springframework.boot.builder.SpringApplicationBuilder;
import org.springframework.core.env.Environment;
import org.springframework.web.bind.annotation.RequestMapping;
import org.springframework.web.bind.annotation.RestController;

@SpringBootApplication
@RestController
public class DemoApplication {

    public static void main(String[] args) {
        //SpringApplication.run(DemoApplication.class, args);
        new SpringApplicationBuilder(DemoApplication.class).properties(
                "spring.config.location=classpath:/config/myConfig.properties"
        ).run(args);
    }

    @Autowired
    private Environment env;

    @RequestMapping("/")
    public String getProp(){
        String test1 = env.getProperty("test1");
        String test2 = env.getProperty("test2");
        return test1 + "," + test2;
    }
}
访问 http://localhost:8080/
输出:null,myConfig.properties
可见application.properties已读取不到,成功读取到配置文件myConfig.properties。
也可以使用spring.config.name指定配置文件的名称,如下面代码指定了myConfig,Spring Boot会到classpath下寻找myConfig.properties(yml)。
    public static void main(String[] args) {
        //SpringApplication.run(DemoApplication.class, args);
        /*new SpringApplicationBuilder(DemoApplication.class).properties(
                "spring.config.location=classpath:/config/myConfig.properties"
        ).run(args);*/
        new SpringApplicationBuilder(DemoApplication.class).properties(
                "spring.config.name=myConfig").run(args);
    }
三、使用profile指定配置
使用profile可以根据特定的环境来激活不同的配置。
src/main/resources/application.yml 内容如下:
spring:
  profiles: mysql
jdbc:
  driver:
    com.mysql.jdbc.Driver
---
spring:
  profiles: oracle
jdbc:
  driver:
    oracle.jdbc.driver.OracleDriver
修改默认生成的启动类 DemoApplication.java 代码:
package com.example.demo;

import org.springframework.beans.factory.annotation.Autowired;
import org.springframework.boot.SpringApplication;
import org.springframework.boot.autoconfigure.SpringBootApplication;
import org.springframework.boot.builder.SpringApplicationBuilder;
import org.springframework.core.env.Environment;
import org.springframework.web.bind.annotation.RequestMapping;
import org.springframework.web.bind.annotation.RestController;

import java.util.Scanner;

@SpringBootApplication
@RestController
public class DemoApplication {

    public static void main(String[] args) {
        //SpringApplication.run(DemoApplication.class, args);

        Scanner scan = new Scanner(System.in);
        String profile = scan.nextLine();
        new SpringApplicationBuilder(DemoApplication.class).properties(
                "spring.config.location=classpath:/application.yml"
        ).profiles(profile).run(args);
    }

    @Autowired
    private Environment env;

    @RequestMapping("/")
    public String getProp(){
        String res = env.getProperty("jdbc.driver");
        return res;
    }
}
在IDEA中点击Run按钮后,在控制台先敲回车再输入oracle,
访问 http://localhost:8080/ 输出:oracle.jdbc.driver.OracleDriver
重新Run,在控制台先敲回车再输入mysql,
访问 http://localhost:8080/ 输出:com.mysql.jdbc.Driver
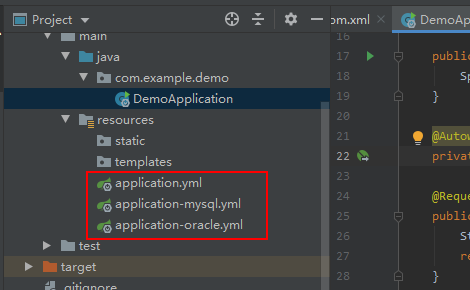
还可以通过不同配置文件的名称来设置profile,创建下面3个文件。
(1)src/main/resources/application.yml 内容:
spring:
  profiles:
    active: oracle
(2)src/main/resources/application-mysql.yml 内容:
jdbc:
  driver:
    com.mysql.jdbc.Driver
(3)src/main/resources/application-oracle.yml 内容:
jdbc:
  driver:
    oracle.jdbc.driver.OracleDriver
修改默认生成的启动类 DemoApplication.java 代码:
package com.example.demo;

import org.springframework.beans.factory.annotation.Autowired;
import org.springframework.boot.SpringApplication;
import org.springframework.boot.autoconfigure.SpringBootApplication;
import org.springframework.boot.builder.SpringApplicationBuilder;
import org.springframework.core.env.Environment;
import org.springframework.web.bind.annotation.RequestMapping;
import org.springframework.web.bind.annotation.RestController;

import java.util.Scanner;

@SpringBootApplication
@RestController
public class DemoApplication {

    public static void main(String[] args) {
        SpringApplication.run(DemoApplication.class, args);
    }

    @Autowired
    private Environment env;

    @RequestMapping("/")
    public String getProp(){
        String res = env.getProperty("jdbc.driver");
        return res;
    }
}
访问 http://localhost:8080/ 输出:oracle.jdbc.driver.OracleDriver
原文链接:https://www.cnblogs.com/gdjlc/p/11575743.html
如有疑问请与原作者联系
标签:
版权申明:本站文章部分自网络,如有侵权,请联系:west999com@outlook.com
特别注意:本站所有转载文章言论不代表本站观点,本站所提供的摄影照片,插画,设计作品,如需使用,请与原作者联系,版权归原作者所有

上一篇:浅谈JVM
下一篇:SpringBoot整合SSM
- Spring系列.ApplicationContext接口 2020-06-11
- springboot2配置JavaMelody与springMVC配置JavaMelody 2020-06-11
- 给你一份超详细 Spring Boot 知识清单 2020-06-11
- SpringBoot 2.3 整合最新版 ShardingJdbc + Druid + MyBatis 2020-06-11
- 掌握SpringBoot-2.3的容器探针:实战篇 2020-06-11
IDC资讯: 主机资讯 注册资讯 托管资讯 vps资讯 网站建设
网站运营: 建站经验 策划盈利 搜索优化 网站推广 免费资源
网络编程: Asp.Net编程 Asp编程 Php编程 Xml编程 Access Mssql Mysql 其它
服务器技术: Web服务器 Ftp服务器 Mail服务器 Dns服务器 安全防护
软件技巧: 其它软件 Word Excel Powerpoint Ghost Vista QQ空间 QQ FlashGet 迅雷
网页制作: FrontPages Dreamweaver Javascript css photoshop fireworks Flash
