
SpringBoot整合SSM
2019-09-30 06:49:34来源:博客园 阅读 ()

SpringBoot整合SSM
其实更准确来说,是整合了MyyBatis。
1. 创建工程
这里我们推荐使用官方提供的springboot工具,我觉得这个其实听方便的。

需要依赖了可以再去加。需要注意的一点是,约定优于配置,这个看自己去理解了。
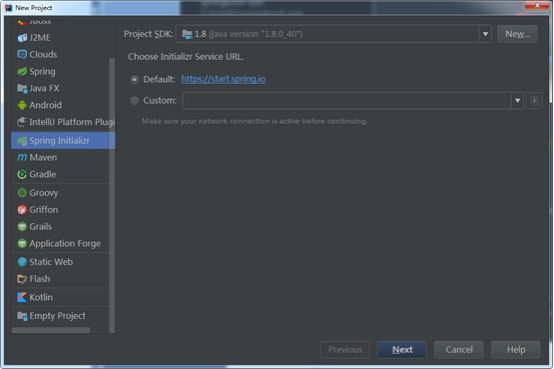
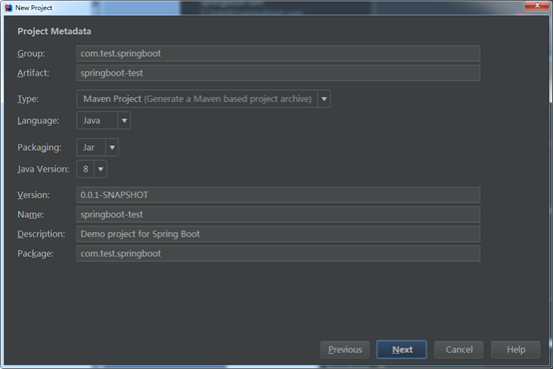
别的IDE像Eclipse、idea都是可以通过springboot插件实现和上面类似的方式第一种方式。至于怎么安装,详情见百度。
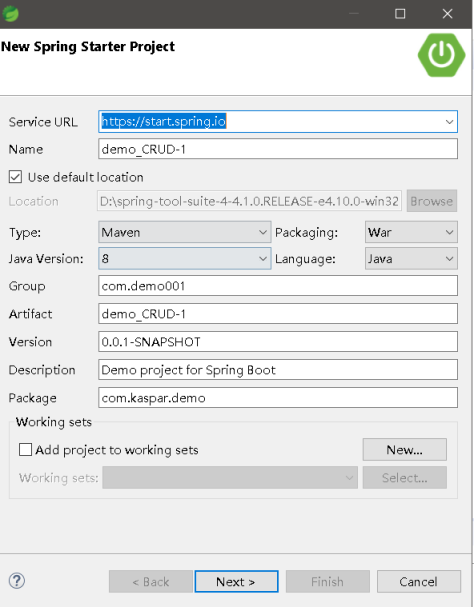
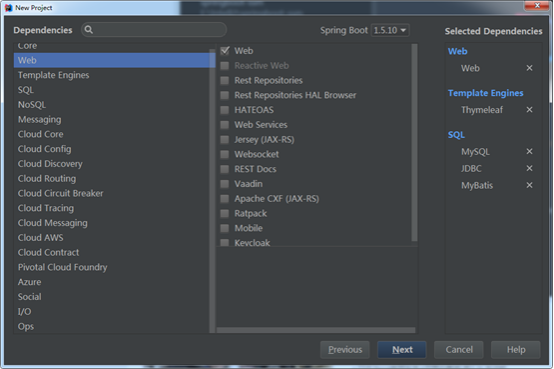
下面以idea为例,提供示例:
使用idea可以快速创建SpringBoot的工程
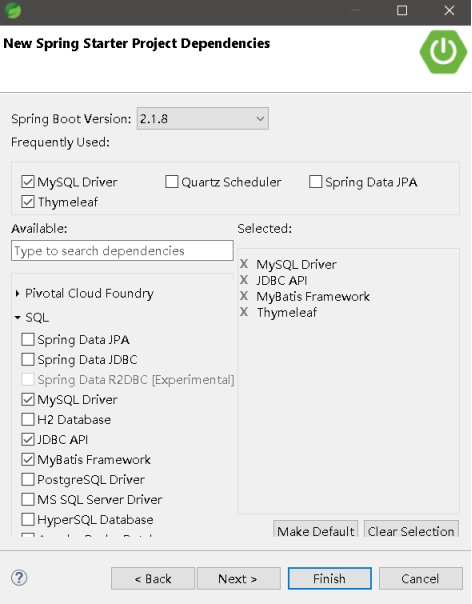
这里选择常用的类库,SpringBoot将各种框架类库都进行了封装,可以减少pom文件中的引用配置:
搞清楚差别,我们同样可以手动修改整合,不过既然有了项目构建框架,我们也实属没必要烧头发了。下面来对比下差别。
比如Spring和Mybatis整合的时候,传统Spring项目中需要引入:
|
1 2 3 4 5 6 7 8 9 10 |
<dependency> <groupId>org.mybatis</groupId> <artifactId>mybatis</artifactId> <version>3.4.1</version> </dependency> <dependency> <groupId>org.mybatis</groupId> <artifactId>mybatis-spring</artifactId> <version>1.3.1</version> </dependency> |
而在SpringBoot中引入的是:
|
1 2 3 4 5 |
<dependency> <groupId>org.mybatis.spring.boot</groupId> <artifactId>mybatis-spring-boot-starter</artifactId> <version>1.3.1</version> </dependency> |
可以看到这个类库中除了mybatis和mybatis-spring之外,还有spring-boot的东西。

完整的pom.xml如下:
<parent>
<groupId>org.springframework.boot</groupId>
<artifactId>spring-boot-starter-parent</artifactId>
<version>1.5.10.RELEASE</version>
<relativePath/> <!-- lookup parent from repository -->
</parent>
<properties>
<project.build.sourceEncoding>UTF-8</project.build.sourceEncoding>
<project.reporting.outputEncoding>UTF-8</project.reporting.outputEncoding>
<java.version>1.8</java.version>
</properties>
<dependencies>
<dependency>
<groupId>org.springframework.boot</groupId>
<artifactId>spring-boot-starter-jdbc</artifactId>
</dependency>
<dependency>
<groupId>org.springframework.boot</groupId>
<artifactId>spring-boot-starter-web</artifactId>
</dependency>
<dependency>
<groupId>org.springframework.boot</groupId>
<artifactId>spring-boot-starter-aop</artifactId>
</dependency>
<dependency>
<groupId>org.mybatis.spring.boot</groupId>
<artifactId>mybatis-spring-boot-starter</artifactId>
<version>1.3.1</version>
</dependency>
<dependency>
<groupId>org.springframework.boot</groupId>
<artifactId>spring-boot-starter-tomcat</artifactId>
<scope>provided</scope>
</dependency>
<dependency>
<groupId>mysql</groupId>
<artifactId>mysql-connector-java</artifactId>
<scope>runtime</scope>
</dependency>
<dependency>
<groupId>org.springframework.boot</groupId>
<artifactId>spring-boot-starter-test</artifactId>
<scope>test</scope>
</dependency>
<!--使用jsp页面-->
<dependency>
<groupId>org.apache.tomcat.embed</groupId>
<artifactId>tomcat-embed-jasper</artifactId>
</dependency>
<dependency>
<groupId>jstl</groupId>
<artifactId>jstl</artifactId>
<version>1.2</version>
</dependency>
</dependencies>
<build>
<finalName>boot</finalName>
<plugins>
<plugin>
<groupId>org.springframework.boot</groupId>
<artifactId>spring-boot-maven-plugin</artifactId>
</plugin>
</plugins>
<resources>
<resource>
<directory>src/main/java</directory>
<includes>
<include>**/*.xml</include>
</includes>
</resource>
<resource>
<directory>src/main/resources</directory>
<includes>
<include>**/*.xml</include>
<include>**/*.properties</include>
</includes>
</resource>
</resources>
</build>
完整的工程路径如下:

2. 实体类和DAO
|
1 2 3 4 5 6 |
public class Dept { private Integer id; private String name;
//getter/setter方法略 } |
|
|
1 2 3 4 5 6 7 8 |
public interface DeptDAO { //查询列表,演示使用传统的mapper映射文件 List<Dept> getDeltList(); //插入,演示使用注解编写sql,省略xml配置 @Insert("insert into DEPT(NAME) values(#{name})") @Options(useGeneratedKeys = true, keyProperty = "id", keyColumn = "ID") void addDept(String name); } |
|
DeptMapper.xml
|
<?xml version="1.0" encoding="UTF-8"?> <!DOCTYPE mapper PUBLIC "-//mybatis.org//DTD Mapper 3.0//EN" "http://mybatis.org/dtd/mybatis-3-mapper.dtd" > <mapper namespace="com.test.springboot.ssm.dao.DeptDAO">
<resultMap id="deptMap" type="Dept"> <id property="id" column="ID"/> <result property="name" column="NAME"/> </resultMap>
<select id="getDeltList" resultMap="deptMap"> select ID,NAME from DEPT </select> </mapper> |
3.Service
|
1 2 3 4 |
public interface DeptService { List<Dept> getDeltList(); void addDept(String name); } |
@Service
public class DeptServiceImpl implements DeptService {
@Autowired
private DeptDAO deptDAO;
@Override
public List<Dept> getDeltList() {
return deptDAO.getDeltList();
}
@Override
public void addDept(String name) {
deptDAO.addDept(name);
}
}
4. Controller和页面
@Controller
public class DeptController {
@Autowired
private DeptService deptService;
@RequestMapping("list.html")
public ModelAndView list() {
List<Dept> deptList = deptService.getDeltList();
return new ModelAndView("list", "deptList", deptList);
}
@RequestMapping("add.html")
public String add(String name) {
deptService.addDept(name);
//添加成功后重定向到列表页
return "redirect:list.html";
}
}
add.jsp
|
1 2 3 4 |
<form action="/add.html" method="post"> 部门名:<input type="text" name="name"/><br/> <input type="submit" value="add"/> </form> |
list.jsp
|
1 2 3 |
<c:forEach items="${deptList}" var="dept"> ${dept.id}-${dept.name}<br/> </c:forEach> |
5.启动类
到目前为止,项目与传统的spring没有任何区别。
传统spring项目中需要增加下面两个配置文件,而SpringBoot中没有配置文件:
传统Spring项目中有以下文件:
spring-config.xml
<?xml version="1.0" encoding="UTF-8"?>
<beans xmlns="http://www.springframework.org/schema/beans"
xmlns:xsi="http://www.w3.org/2001/XMLSchema-instance"
xmlns:aop="http://www.springframework.org/schema/aop"
xmlns:context="http://www.springframework.org/schema/context"
xmlns:tx="http://www.springframework.org/schema/tx"
xsi:schemaLocation="http://www.springframework.org/schema/beans http://www.springframework.org/schema/beans/spring-beans.xsd
http://www.springframework.org/schema/context
http://www.springframework.org/schema/context/spring-context-4.2.xsd
http://www.springframework.org/schema/tx http://www.springframework.org/schema/tx/spring-tx-4.0.xsd
http://www.springframework.org/schema/aop http://www.springframework.org/schema/aop/spring-aop-4.0.xsd">
<!--扫描@Service注解-->
<context:component-scan base-package="com.test.springboot.ssm.service">
<context:include-filter type="annotation" expression="org.springframework.stereotype.Service"/>
</context:component-scan>
<!--读取配置文件-->
<context:property-placeholder location="classpath:db.properties" ignore-unresolvable="true"/>
<!--从配置文件中获取数据源-->
<bean id="dataSource" class="org.springframework.jdbc.datasource.DriverManagerDataSource">
<property name="driverClassName" value="${jdbc.driver}"/>
<property name="url" value="${jdbc.url}"/>
<property name="username" value="${jdbc.username}"/>
<property name="password" value="${jdbc.password}"/>
</bean>
<!--spring管理session工厂-->
<bean id="sqlSessionFactory" class="org.mybatis.spring.SqlSessionFactoryBean">
<property name="dataSource" ref="dataSource"/>
<property name="mapperLocations" value="classpath:com/test/springboot/ssm/dao/mapper/*.xml"/>
<!--配置实体类别名别名-->
<property name="typeAliasesPackage" value="com.test.springboot.ssm.pojo"/>
</bean>
<!--扫描所有mybatis的dao接口,生成代理实现类-->
<bean class="org.mybatis.spring.mapper.MapperScannerConfigurer">
<property name="basePackage" value="com.test.springboot.ssm.dao"/>
</bean>
<!-- 配置事务管理器 -->
<bean id="transactionManager"
class="org.springframework.jdbc.datasource.DataSourceTransactionManager">
<property name="dataSource" ref="dataSource"/>
</bean>
<!--事务增强-->
<tx:advice id="txAdvice" transaction-manager="transactionManager">
<tx:attributes>
<!-- 传播行为,匹配的是方法名 -->
<tx:method name="add*" rollback-for="Exception"/>
<tx:method name="delete*" rollback-for="Exception"/>
<tx:method name="update*" rollback-for="Exception"/>
<tx:method name="get*" propagation="SUPPORTS" read-only="true"/>
<tx:method name="do*" rollback-for="Exception"/>
</tx:attributes>
</tx:advice>
<!-- 通过AOP配置提供事务增强,让service包下所有Bean的所有方法拥有事务 -->
<aop:config>
<aop:pointcut id="serviceMethod"
expression="execution(* com.test.springboot.ssm..*(..))"/>
<aop:advisor pointcut-ref="serviceMethod" advice-ref="txAdvice"/>
</aop:config>
</beans>
springMVC-servlet.xml
<?xml version="1.0" encoding="UTF-8"?>
<beans xmlns="http://www.springframework.org/schema/beans"
xmlns:xsi="http://www.w3.org/2001/XMLSchema-instance"
xmlns:context="http://www.springframework.org/schema/context"
xmlns:mvc="http://www.springframework.org/schema/mvc"
xsi:schemaLocation="
http://www.springframework.org/schema/beans http://www.springframework.org/schema/beans/spring-beans-4.2.xsd
http://www.springframework.org/schema/context http://www.springframework.org/schema/context/spring-context-4.2.xsd
http://www.springframework.org/schema/mvc http://www.springframework.org/schema/mvc/spring-mvc-4.2.xsd">
<mvc:annotation-driven/>
<!--扫描Controller所在的包-->
<context:component-scan base-package="com.ssm.blog.controller">
<context:include-filter type="annotation" expression="org.springframework.stereotype.Controller"/>
</context:component-scan>
<!-- 配置视图解析器-->
<bean class="org.springframework.web.servlet.view.InternalResourceViewResolver">
<property name="prefix" value="/"></property><!--前缀-->
<property name="suffix" value=".jsp"></property><!--后缀-->
</bean>
</beans>
web.xml
<?xml version="1.0" encoding="UTF-8"?>
<web-app xmlns="http://java.sun.com/xml/ns/javaee"
xmlns:xsi="http://www.w3.org/2001/XMLSchema-instance"
xsi:schemaLocation="http://java.sun.com/xml/ns/javaee
http://java.sun.com/xml/ns/javaee/web-app_3_0.xsd"
version="3.0">
<context-param>
<param-name>contextConfigLocation</param-name>
<param-value>classpath:spring-config.xml</param-value>
</context-param>
<!--配置listener,在启动Web容器的时候加载Spring的配置-->
<listener>
<listener-class>org.springframework.web.context.ContextLoaderListener</listener-class>
</listener>
<filter>
<filter-name>CharacterEncodingFilter</filter-name>
<filter-class>org.springframework.web.filter.CharacterEncodingFilter</filter-class>
<init-param>
<param-name>encoding</param-name>
<param-value>UTF-8</param-value>
</init-param>
<init-param>
<param-name>forceEncoding</param-name>
<param-value>true</param-value>
</init-param>
</filter>
<filter-mapping>
<filter-name>CharacterEncodingFilter</filter-name>
<url-pattern>/*</url-pattern>
</filter-mapping>
<!--配置DispatcherServlet -->
<servlet>
<servlet-name>springMVC</servlet-name>
<servlet-class>org.springframework.web.servlet.DispatcherServlet</servlet-class>
</servlet>
<servlet-mapping>
<servlet-name>springMVC</servlet-name>
<url-pattern>*.html</url-pattern>
</servlet-mapping>
</web-app>
而SpringBoot中不需要这三个配置文件,写一个启动类,运行main方法即可:
@SpringBootApplication
@EnableTransactionManagement//开启事务管理
@ComponentScan("com.test.springboot.ssm")//扫描注解元素
@MapperScan("com.test.springboot.ssm.dao")//Mybatis的DAO所在包
public class SpringbootSsmApplication {
public static void main(String[] args) {
SpringApplication.run(SpringbootSsmApplication.class, args);
}
public static final String transactionExecution = "execution (* com.test.springboot.service..*(..))";
@Autowired
private DataSource dataSource;
//声明式事务
@Bean
public DefaultPointcutAdvisor defaultPointcutAdvisor() {
AspectJExpressionPointcut pointcut = new AspectJExpressionPointcut();
pointcut.setExpression(transactionExecution);
DefaultPointcutAdvisor advisor = new DefaultPointcutAdvisor();
advisor.setPointcut(pointcut);
Properties attributes = new Properties();
attributes.setProperty("get*", "PROPAGATION_REQUIRED,-Exception");
attributes.setProperty("add*", "PROPAGATION_REQUIRED,-Exception");
attributes.setProperty("update*", "PROPAGATION_REQUIRED,-Exception");
attributes.setProperty("delete*", "PROPAGATION_REQUIRED,-Exception");
TransactionInterceptor txAdvice = new TransactionInterceptor(new DataSourceTransactionManager(dataSource), attributes);
advisor.setAdvice(txAdvice);
return advisor;
}
}
数据库等配置信息放到application.properties中
#数据源的基本信息
spring.datasource.url = jdbc:mysql://localhost:3306/test?characterEncoding=utf-8
spring.datasource.username = root
spring.datasource.password =
spring.datasource.driverClassName = com.mysql.jdbc.Driver
#mybatis中mapper文件的路径
mybatis.mapper-locations=classpath*:com/test/springboot/ssm/dao/mappers/*.xml
#起别名。可省略写mybatis的xml中的resultType的全路径
mybatis.type-aliases-package=com.test.springboot.ssm.pojo
#springMVC中的视图信息,响应前缀
spring.mvc.view.prefix=/
# 响应页面默认后缀
spring.mvc.view.suffix=.jsp
#DispatcherServlet中响应的url-pattern
server.sevlet-path=*.html
server.context-path=/boot
#logging.level.root=debug
logging.level.com.test.springboot.ssm.dao=trace
上面的程序只要启动main方法就可以访问了。
另外,如果需要打包发布到tomcat,需要再配置一个ServletInitializer,否则tomcat启动后会出现404。
|
1 2 3 4 5 6 |
public class ServletInitializer extends SpringBootServletInitializer { @Override protected SpringApplicationBuilder configure(SpringApplicationBuilder application) { return application.sources(SpringbootSsmApplication.class); } } |
5. 启动原理解析
任何一个SpringBoot程序都有一个启动类:
|
1 2 3 4 5 6 |
@SpringBootApplication public class StartApplication { public static void main(String[] args) { SpringApplication.run(StartApplication.class, args); } } |
启动类中包含@SpringBootApplication注解和SpringApplication.run()方法
5.1@SpringBootApplication
@SpringBootApplication是一个组合注解,除了基本的原信息标注以外,重要的注解有三个:
@Configuration
@EnableAutoConfiguration
@ComponentScan
如下代码等同于使用@SpringBootApplication注解
|
1 2 3 4 5 6 7 8 |
@Configuration @EnableAutoConfiguration @ComponentScan public class StartApplication { public static void main(String[] args) { SpringApplication.run(StartApplication.class, args); } } |
每次写三个注解比较繁琐,所以使用@SpringBootApplication更方便。
5.1.1 @Configuration
简单的说,SpringBoot中使用一个@Configuration注解的类代替xml配置文件。
如spring-config.xml如下:
|
1 2 3 4 5 6 7 |
<?xml version="1.0" encoding="UTF-8"?> <beans xmlns="http://www.springframework.org/schema/beans" xmlns:xsi="http://www.w3.org/2001/XMLSchema-instance" xsi:schemaLocation="http://www.springframework.org/schema/beans http://www.springframework.org/schema/beans/spring-beans.xsd "> <!--定义bean--> </beans> |
SpringBoot中写成:
|
1 2 3 4 |
import org.springframework.context.annotation.Configuration; @Configuration public class SpringConfig { } |
如果定义一个bean,xml中写成:
|
1 2 3 4 5 6 7 8 |
<bean id="dept" class="com.spring.test.springboot.pojo.Dept"> <property name="id" value="1"/> </bean>
<bean id="employee" class="com.spring.test.springboot.pojo.Employee"> <property name="name" value="tom"/> <property name="dept" ref="dept"/> </bean> |
SpringBoot中写成:
|
1 2 3 4 5 6 7 8 9 10 11 12 13 14 |
@Bean public Dept dept() { Dept dept = new Dept(); dept.setId(1); return dept; }
@Bean public Employee employee() { Employee employee = new Employee(); employee.setName("tom"); employee.setDept(dept());//注入依赖对象直接调用@Bean注解的方法 return employee; } |
SpringBoot中使用@Bean标注一个方法,该方法的方法名将默认成bean的id。注意@Configuration的类要被@ComponentScan扫描到。
5.1.2 @ComponentScan
@ComponentScan 自动扫描并加载符合规则的组件。可以通过basePackages指定要扫描的包。如果不指定赛秒范围,SpringBoot默认会从生命@ComponentScan所在类的包进行扫描。
@ComponentScan(basePackages = "com.spring.test.springboot.controller",includeFilters = {@ComponentScan.Filter(type= FilterType.ANNOTATION,value=Controller.class)})
等同于
<context:component-scan base-package="com.spring.test.springboot.controller">
<context:include-filter type="annotation" expression="org.springframework.stereotype.Controller"/>
</context:component-scan>
5.5.3 @EnableAutoConfiguration
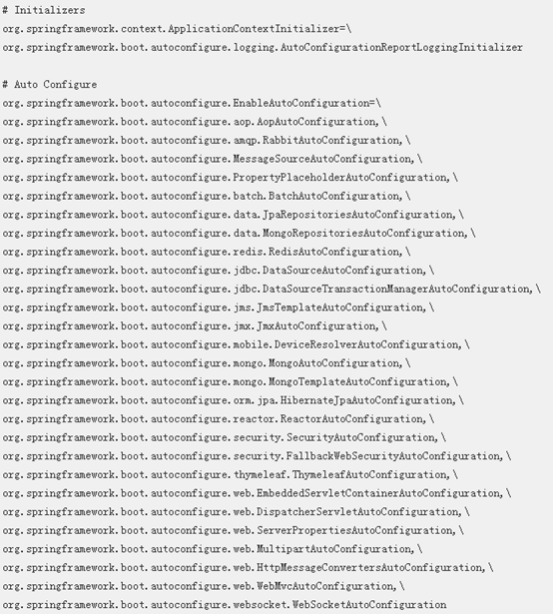
这个注解的作用是将所有符合自动配置条件的bean自动加载到IoC容器。比如我们的项目引入了spring-boot-starter-web依赖,springboot 会自动帮我们配置 tomcat 和 springmvc。@EnableAutoConfigutation中@Import了EnableAutoConfigurationImportSelector,EnableAutoConfigurationImportSelector类使用了Spring Core包的SpringFactoriesLoader类的loadFactoryNamesof()方法。 SpringFactoriesLoader会查询META-INF/spring.factories文件中包含的JAR文件。 当找到spring.factories文件后,SpringFactoriesLoader将查询配置文件命名的属性。spring.factories文件,内容如下:。
5.2 SpringApplication
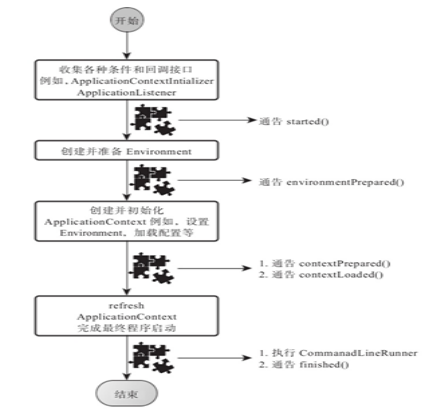
SpringApplication的run方法的实现是我们本次旅程的主要线路,该方法的主要流程大体可以归纳如下:
1) 如果我们使用的是SpringApplication的静态run方法,那么,这个方法里面首先要创建一个SpringApplication对象实例,然后调用这个创建好的SpringApplication的实例方法。在SpringApplication实例初始化的时候,它会提前做几件事情:
a) 根据classpath里面是否存在某个特征类(org.springframework.web.context.ConfigurableWebApplicationContext)来决定是否应该创建一个为Web应用使用的ApplicationContext类型。
b) 使用SpringFactoriesLoader在应用的classpath中查找并加载所有可用的ApplicationContextInitializer。
c) 使用SpringFactoriesLoader在应用的classpath中查找并加载所有可用的ApplicationListener。
d) 推断并设置main方法的定义类。
2) SpringApplication实例初始化完成并且完成设置后,就开始执行run方法的逻辑了,方法执行伊始,首先遍历执行所有通过SpringFactoriesLoader可以查找到并加载的SpringApplicationRunListener。调用它们的started()方法,告诉这些SpringApplicationRunListener,“嘿,SpringBoot应用要开始执行咯!”。
3) 创建并配置当前Spring Boot应用将要使用的Environment(包括配置要使用的PropertySource以及Profile)。
4) 遍历调用所有SpringApplicationRunListener的environmentPrepared()的方法,告诉他们:“当前SpringBoot应用使用的Environment准备好了咯!”。
5) 如果SpringApplication的showBanner属性被设置为true,则打印banner。
6) 根据用户是否明确设置了applicationContextClass类型以及初始化阶段的推断结果,决定该为当前SpringBoot应用创建什么类型的ApplicationContext并创建完成,然后根据条件决定是否添加ShutdownHook,决定是否使用自定义的BeanNameGenerator,决定是否使用自定义的ResourceLoader,当然,最重要的,将之前准备好的Environment设置给创建好的ApplicationContext使用。
7) ApplicationContext创建好之后,SpringApplication会再次借助Spring-FactoriesLoader,查找并加载classpath中所有可用的ApplicationContext-Initializer,然后遍历调用这些ApplicationContextInitializer的initialize(applicationContext)方法来对已经创建好的ApplicationContext进行进一步的处理。
8) 遍历调用所有SpringApplicationRunListener的contextPrepared()方法。
9) 最核心的一步,将之前通过@EnableAutoConfiguration获取的所有配置以及其他形式的IoC容器配置加载到已经准备完毕的ApplicationContext。
10) 遍历调用所有SpringApplicationRunListener的contextLoaded()方法。
11) 调用ApplicationContext的refresh()方法,完成IoC容器可用的最后一道工序。
12) 查找当前ApplicationContext中是否注册有CommandLineRunner,如果有,则遍历执行它们。
13) 正常情况下,遍历执行SpringApplicationRunListener的finished()方法、(如果整个过程出现异常,则依然调用所有SpringApplicationRunListener的finished()方法,只不过这种情况下会将异常信息一并传入处理)
去除事件通知点后,整个流程如下:
6. Thymeleaf
SpringBoot官方不推荐使用JSP,官方推荐使用Thymeleaf。
Thymeleaf是一款用于渲染XML/XHTML/HTML5内容的模板引擎。类似JSP,Velocity,FreeMaker等,它也可以轻易的与Spring MVC等Web框架进行集成作为Web应用的模板引擎。与其它模板引擎相比,Thymeleaf最大的特点是能够直接在浏览器中打开并正确显示模板页面,而不需要启动整个Web应用。
6.1 搭建示例工程
引入thymeleaf的包:
|
1 2 3 4 |
<dependency> <groupId>org.springframework.boot</groupId> <artifactId>spring-boot-starter-thymeleaf</artifactId> </dependency> |
在application.properties文件中配置thymeleaf的视图解析:
|
1 2 3 4 5 6 |
spring.thymeleaf.content-type=text/html spring.thymeleaf.mode =LEGACYHTML5 #开发时关闭缓存,不然没法看到实时页面 spring.thymeleaf.cache=false #配置静态资源路径 spring.mvc.static-path-pattern=/static/** |
controller中的代码和以前的项目一样:
|
1 2 3 4 5 6 |
@RequestMapping("hello") public String helloWorld(Model model) { //向页面传值 model.addAttribute("welcome", "hello thymeleaf"); return "hello"; } |
页面写在/resources/templates下
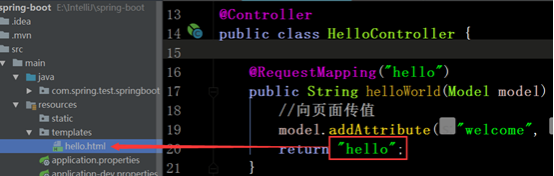
页面hello.html,页面的文件名与controller中方法的返回值一致。注意页面的<html>标签中有一个<html xmlns:th="http://www.thymeleaf.org">
|
1 2 3 4 5 6 7 8 9 10 |
<!DOCTYPE html> <html xmlns:th="http://www.thymeleaf.org"> <head> <meta http-equiv="Content-Type" content="text/html; charset=UTF-8" /> <title>Title</title> </head> <body> <p th:text="${welcome}"></p> </body> </html> |
页面中所有动态的内容都使用“th:”前缀。
并且在thymeleaf的页面中,html语法要求很严格,比如标签必须闭合。如果要在解析时自动进行标签补全,需要引入jar包:
|
1 2 3 4 5 |
<dependency> <groupId>net.sourceforge.nekohtml</groupId> <artifactId>nekohtml</artifactId> <version>1.9.22</version> </dependency> |
6.2 基础语法
spring-boot很多配置都有默认配置,比如默认页面映射路径为
classpath:/templates/*.html
同样静态文件路径为
classpath:/static/
首先页面的<html>标签要改写:
<html xmlns:th="http://www.thymeleaf.org">
6.2.1 获取变量值
thymeleaf通过${变量名.属性名}来获取属性值,这个语法和EL表达式一样。
页面中所有动态的内容都使用“th:”前缀,并且要写在标签中。
<p th:text=${message}>this is tag p</p>
如果直接访问静态页面,会显示“this is tag p”
如果访问动态内容,那么${message}的值会替换掉原来<p>标签中的静态内容。
常见页面操作如下:
|
1 2 3 4 5 6 7 8 9 10 11 12 13 14 15 16 17 18 19 |
@RequestMapping("hello") public String helloWorld(Model model) { //向页面传值,普通文本 model.addAttribute("text", "hello thymeleaf"); //html转义文本 model.addAttribute("htmlText", "<h1>html</h1>"); model.addAttribute("ahref", "test"); List<String> list = new ArrayList<>(); list.add("a"); list.add("b"); model.addAttribute("list", list);
List<Dept> deptList = new ArrayList<>(); deptList.add(new Dept(1, "技术部")); deptList.add(new Dept(2, "测试部")); deptList.add(new Dept(3, "行政部")); model.addAttribute("deptList", deptList); return "hello"; } |
|
1 2 3 4 5 6 7 8 9 10 11 12 13 14 15 16 |
<p th:text="${text}">我是文本</p> <p th:utext="${htmlText}">我是转义文本</p> <p><a th:href="@{{ahref}?pa={text}(ahref=${ahref},text=${text})}">我是a标签</a></p> 我是表格<br/> <table border="1"> <tr th:each="dept:${deptList}"> <td th:text="${dept.id}">id</td> <td th:text="${dept.name}">name</td> </tr> </table> 我是下拉框 <select > <option th:each="dept:${deptList}" th:value="${dept.id}" th:text="${dept.name}" th:selected="${dept.id}==${param.id[0]}"></option> </select><br/> <input th:value="${text}"> <script th:src="@{static/test.js}" type="text/javascript"></script> |
6.2.2 条件判断
|
1 |
<div th:if="${ahref == 'test'}">xxxxxxx</div> |
原文链接:https://www.cnblogs.com/kaspar/p/11577056.html
如有疑问请与原作者联系
标签:
版权申明:本站文章部分自网络,如有侵权,请联系:west999com@outlook.com
特别注意:本站所有转载文章言论不代表本站观点,本站所提供的摄影照片,插画,设计作品,如需使用,请与原作者联系,版权归原作者所有

- springboot2配置JavaMelody与springMVC配置JavaMelody 2020-06-11
- SpringBoot 2.3 整合最新版 ShardingJdbc + Druid + MyBatis 2020-06-11
- 掌握SpringBoot-2.3的容器探针:实战篇 2020-06-11
- nacos~配置中心功能~springboot的支持 2020-06-10
- SpringBoot + Vue + ElementUI 实现后台管理系统模板 -- 后 2020-06-10
IDC资讯: 主机资讯 注册资讯 托管资讯 vps资讯 网站建设
网站运营: 建站经验 策划盈利 搜索优化 网站推广 免费资源
网络编程: Asp.Net编程 Asp编程 Php编程 Xml编程 Access Mssql Mysql 其它
服务器技术: Web服务器 Ftp服务器 Mail服务器 Dns服务器 安全防护
软件技巧: 其它软件 Word Excel Powerpoint Ghost Vista QQ空间 QQ FlashGet 迅雷
网页制作: FrontPages Dreamweaver Javascript css photoshop fireworks Flash
