
Spring框架学习笔记(1)――控制反转IOC与依赖…
2019-09-30 06:53:31来源:博客园 阅读 ()

Spring框架学习笔记(1)――控制反转IOC与依赖注入DI
Spring框架的主要作用,就是提供了一个容器,使用该容器就可以创建并管理对象。比如说Dao类等,又或者是具有多依赖关系的类(Student类中包含有Teacher类的成员变量)
Spring有两个核心概念,一个是控制反转(IOC,全称为Inverse of Control),另一个则是面向切面编程(AOP,全称为 Aspect Oriented Program)
Spring 框架是 Java 应用最广的框架,它的成功来源于理念,而不是技术本身,它的理念包括 IoC (Inversion of Control,控制反转) 和 AOP(Aspect Oriented Programming,面向切面编程)
Spring 的根本使命:简化 Java 开发
Spring框架可适用各种Java程序
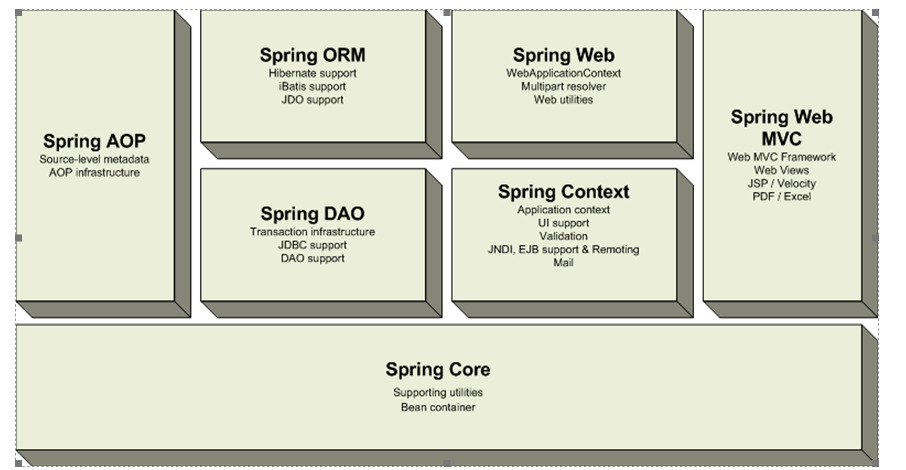
架构组成:
概念介绍
控制反转,从另外一个角度来说,和可以叫做依赖注入(DI,全称为Dependency Injection),之后会说明,这里就大概说个概念。
下面我们通过两个角度来了解控制反转的思想,可能理解上有所出入,仅供参考
代码角度解释
情况1:按照我们普通编程,如果我们想要得到一个对象,就得根据这个类的构造方法,传入合适的参数(资源),我们才能得到这个对象。
但是,有些情况下,这样的操作会使得代码过于冗杂及繁琐(每次需要对象都要使用一次new关键字),而且也不便于资源的管理。
情况2:针对此情况,我们可以考虑创建一个工厂类,来进行优化,之后我们可以调用工厂类的getXX方法,把参数(资源)传入方法,获得需要的对象。
情况3:上面的情况比我们普通编程要好一些,但是,对资源的管理还是有些不方便,所以,这个时候就有了Spring,帮助我们进行资源的管理,Spring也可以看做是一个大工厂,包含了对资源的管理。
控制反转的意思就是说,我们原本是要自己通过new关键字创建的对象(我们控制对象的创建)变为了Spring自动创建对象(Spring控制对象的创建)
现实角度解释:
比如说我们想吃饭,然后自己利用资源(买回来的菜,米)来做饭,吃完饭后还要剩饭剩菜进行处理(放进冰箱或者倒掉),这就是对资源管理,这就是相当于情况1。
我们自己去买菜,买米,交给妈妈或饭店,让妈妈或者饭店为我们做饭,妈妈和饭店就是类似工厂类的角色,但是剩饭剩菜我们是不能管理的(假设妈妈是不让我们插手处理剩饭剩菜,饭店肯定也是不让你插手的),这就是情况2
我们不准备买菜和买米,直接去饭店或者酒店吃饭,吃完饭也不管剩下的菜和饭是怎么处理(由饭店或者酒店处理),这里的饭店和酒店就是相当于Spring的角色,饭店和酒店会对剩饭剩菜处理(资源自动管理),这就是相当于情况3
入门
环境配置
Spring框架jar包比较多,我们可以根据需求来进行选择,下面列出常用的jar包及说明
| 文件名 | 说明 |
|---|---|
| spring-aop.jar | 使用Spring的AOP特性所需要的库 |
| spring-beans.jar | 包含访问配置文件、创建和管理bean以及进行IoC/DI操作相关的所有类 |
| spring-context.jar | 为Spring核心提供了大量扩展 |
| spring-core.jar | Spring的框架的核心库,Spring的各个组件都是要使用到这个包里的类 |
| spring-expression.jar | Spring表达式语言需要的库 |
| spring-test.jar | spring内置的一个单元测试 |
我使用的Maven配置,我这里spring依赖的jar包都是使用最新的,所有的版本直接输入RELEASE就可以了
<dependencies>
        <dependency>
            <groupId>junit</groupId>
            <artifactId>junit</artifactId>
            <version>4.11</version>
            <scope>test</scope>
        </dependency>
        <dependency>
            <groupId>commons-logging</groupId>
            <artifactId>commons-logging</artifactId>
            <version>RELEASE</version>
        </dependency>
        <dependency>
            <groupId>org.springframework</groupId>
            <artifactId>spring-context</artifactId>
            <version>RELEASE</version>
        </dependency>
        <dependency>
            <groupId>org.springframework</groupId>
            <artifactId>spring-test</artifactId>
            <version>RELEASE</version>
        </dependency>
        <dependency>
            <groupId>org.springframework</groupId>
            <artifactId>spring-core</artifactId>
            <version>RELEASE</version>
        </dependency>
        <dependency>
            <groupId>org.springframework</groupId>
            <artifactId>spring-beans</artifactId>
            <version>RELEASE</version>
        </dependency>
        <dependency>
            <groupId>org.springframework</groupId>
            <artifactId>spring-aop</artifactId>
            <version>RELEASE</version>
        </dependency>
        <dependency>
            <groupId>org.springframework</groupId>
            <artifactId>spring-expression</artifactId>
            <version>RELEASE</version>
        </dependency>
    </dependencies>
需求
假设现在需要一个Student类,Student中有学号和姓名,同时,也包括一个Teacher类,我们通过Spring容器来生成对象
实体类
Student.java
public class Student{
    private String sname;
    private String sno;
    private Teacher teacher;
    //省略get/set方法
}
Teacher.java
public class Teacher{
    private String tname;
    private String tno;
    //省略get/set方法
}
spring配置文件
由于使用的是maven,所以,这些xml配置文件放在resources文件夹中,maven之后会自动地把这些配置文件放在合适的位置
spring配置文件的名字可以任意取
spring-config.xml
<?xml version="1.0" encoding="UTF-8"?>
<beans xmlns="http://www.springframework.org/schema/beans"
       xmlns:xsi="http://www.w3.org/2001/XMLSchema-instance"
       xsi:schemaLocation="http://www.springframework.org/schema/beans http://www.springframework.org/schema/beans/spring-beans.xsd">
    <!--这里相当于创建了一个对象,并通过set方法给该对象设置了各属性的数值 -->
    <bean class="com.wan.Teacher" id="teacher1">
        <property name="tname" value="张三"/>
        <property name="tno" value="t001"/>
    </bean>

    <bean class="com.wan.Student" id="student">
        <!--ref属性后面的数值是上面Teacher对象的id属性 -->
        <property name="teacher" ref="teacher1"/>
        <property name="sname" value="李四"/>
        <property name="sno" value="s001"/>
    </bean>
</beans>
获得对象
ClassPathXmlApplicationContext context = new ClassPathXmlApplicationContext("spring-config.xml");
//这里的参数student就是上面的配置文件Student对象的id,需要强转
Student s = (Student) context.getBean("student");
分析与补充
简单地分析一下上面的例子,spring容器会自动调用实体类的构造方法,生成一个student对象,然后通过set方法,把xml定义的属性值设置到对象中去。
之后,通过spring容器来获得一个student对象
配置文件补充知识
bean标签
| 属性/子标签 | 说明 |
|---|---|
| id | 唯一标识符, 用来代表唯一的bean |
| class | 对象的类型(包名+类名) |
| property | bean标签的子标签,对象的一个属性 |
property标签
| 属性/子标签 | 说明 |
|---|---|
| name | 属性名(与类中的属性名相同),实际会通过反射调用setXx方法进行属性的设置 |
| value | 属性值,用于给简单类型赋值,简单类型(int,double,string) |
| ref | 属性值,用于给自定义类型赋值,比如说上面我们Student中包含有一个Teacher类的属性,引用的是另外一个bean的id |
PS:如果类中有一个属性的类型是某个接口,也是使用ref属性,引用实现了此接口的类的bean的id
依赖注入DI
介绍
依赖注入和控制反转都是同一个概念,只是从不同的角度看
我们从Student类来看,Student类中有几个属性,我们是通过spring的配置文件,把属性值(资源)注入到Student对象中,这就叫依赖注入
依赖注入的三种方式
1.settter设值注入
这种方法本质上是通过反射来调用对象的setXx方法来进行设值,Spring首先通过实体类的无参构造方法来new了一个对象,然后再通过对象的set方法来进行设值。
所以,使用此方法的前提是保证实体类中存在有无参的构造方法和对应属性的set方法(可以不同遵循Java Bean规范)
<property name="属性名" value="属性值"></property>

<property name="属性名" ref="引用对象的id"></property>
2. 构造器注入
使用这种方法要按照构造方法的参数顺序
<bean id="teacher" class="com.wan.Teacher">
    <constructor-arg value="t001"></constructor-arg>
    <!-- <constructor-arg value="t001"></constructor-arg> -->
</bean>
如果不想按照顺序,可以使用index属性
<bean id="teacher" class="com.wan.Teacher">
    <!-- 指定第一个参数的数值 -->
    <constructor-arg index="1" value="t001"></constructor-arg>
</bean>
如果有两个构造方法,都是只有两个参数,但是,参数的类型不同,可以使用type属性
<bean id="teacher" class="com.wan.Teacher">
    <constructor-arg index="1" value="t001" type="int"></constructor-arg>
    <constructor-arg index="1" value="t001" type="java.lang.String"></constructor-arg>
</bean>
使用自定义数据,也是和之前使用ref属性
<bean id="teacher" class="com.wan.Teacher">
    <constructor-arg index="1" ref="teacher1"></constructor-arg>
</bean>
3. p命名空间注入
使用这种方法可以更加的方便,可以不变使用property标签,而是使用p:属性名或者p:属性名-ref
使用之前,得在spring的配置文件添加
xmlns:p="http://www.springframework.org/schema/p"<bean id="teacher" class="com.wan.Student" p:sno="001" p:teacher-ref="teacher1">
</bean>注入各种数据类型的属性
之前使用的是value属性,还可以使用value标签,使用type定义类型
<property name="属性名">
    <value type="java.util.String"></value>
</property>xml文件中,<和&都是特殊符号,得通过特别的方式输入
有两种方法,一个是使用xml预定义的实体引用,二是使用<![CDATA[ ]]>
value标签,可以使用上面说的的两种方法,而value属性,只能使用xml预定义的实体引用
& -> &
< -> <
<null/> 设置为null
<!-- value标签 -->
<property name="属性名">
<value type="java.util.String"><![CDATA[张&三]]></value>
<value type="java.util.String">张&三</value>
</property>
<!--value属性 -->
<property name="属性名" value="张&三" />
集合类型
集合可以使用list、map、set标签
| 类型 | 标签 |
|---|---|
| List或数组 | 外层使用list标签,内层用value或ref |
| Set | 外层使用set标签,内层用value或ref |
| Map | 外层使用map,中间层使用entry,最里层使用key和value标签 |
| Properties资源文件 | 外层使用props,子标签为prop |
<properties name="list">
    <list>
        <value>数值</value>
        <ref bean="引用bean的id"><ref>
    </list>
</properties>

<properties name="map">
    <entry>
        <key>
            <value>数值</value>
            或
            <ref bean="引用bean的id"><ref>
        </key>
        <value></value>
        <ref bean="引用bean的id"><ref>
    </entry>
</properties>

<!-- 相当于在properties资源文件有个 option=2 的配置 -->
<props>
    <prop key="option">2</prop>
</props>
PS:记得value和ref两个标签用来赋值就可以了,value给基本类型赋值,ref给自定义类型赋值
例子:
MyArray.java
package com.wan;

import java.util.List;

/**
 * @author StarsOne
 * @date Create in  2019/9/24 0024 15:54
 * @description
 */
public class MyArray {
    List<String> lines;
    List<Teacher> teachers;

    public List<String> getLines() {
        return lines;
    }

    public void setLines(List<String> lines) {
        this.lines = lines;
    }

    public List<Teacher> getTeachers() {
        return teachers;
    }

    public void setTeachers(List<Teacher> teachers) {
        this.teachers = teachers;
    }

}
spring的xml配置文件:
<bean class="com.wan.Teacher" id="teacher1">
    <property name="tno" value="001"/>
    <property name="tname" value="张三"/>
</bean>
<bean class="com.wan.Teacher" id="teacher2">
    <property name="tno" value="001"/>
    <property name="tname" value="张三"/>
</bean>

<bean id="array1" class="com.wan.MyArray">
    <property name="lines">
        <list>
            <value>第一行</value>
            <value>第二行</value>
        </list>
    </property>
    <property name="teachers">
        <list>
            <ref bean="teacher1"/>
            <ref bean="teacher2"/>
        </list>
    </property>
</bean>
测试:
lassPathXmlApplicationContext context = new ClassPathXmlApplicationContext("spring-config.xml");
MyArray myarray = (MyArray) context.getBean("array1");
List<String> lines = myarray.getLines();
List<Teacher> teachers = myarray.getTeachers();
for (String line : lines) {
    System.out.println(line);
}
for (Teacher teacher : teachers) {
    System.out.println(teacher.toString());
}
自动装配
和Mybatis一样,spring也有约定优于配置,只要符合约定,spring就会自动帮我们完成的上面的注入属性值操作。
我们可以通过属性名、属性类型或者构造器实现自动装配
自动装配只适用于对象类型(引用类型,ref)
byName>byType>constructor
我们之前的Student类中包含有一个Teacher类属性
<!-- 注意这个id与Student中的Teacher属性名一致 -->
<bean id="teacher" class="com.wan.Teacher">
...
</bean>

<bean id="student" class="com.wan.Student" autowise="byName">
</bean>
一般大项目不推荐适用自动装配,会影响程序的可读性
参考链接:Spring 自动装配
bean的作用域
| 作用域 | 描述 |
|---|---|
| singleton | 在spring IoC容器仅存在一个Bean实例,Bean以单例方式存在,默认值 |
| prototype | 每次从容器中调用Bean时,都返回一个新的实例,即每次调用getBean()时,相当于执行newXxxBean() |
| request | 每次HTTP请求都会创建一个新的Bean,该作用域仅适用于WebApplicationContext环境 |
| session | 同一个HTTP Session共享一个Bean,不同Session使用不同的Bean,仅适用于WebApplicationContext环境 |
| global-session | 一般用于Portlet应用环境,该运用域仅适用于WebApplicationContext环境 |
参考链接:Spring Bean 作用域
注解方式
使用@Controller,@Service、@Repository、@Component等注解标识类(Bean),之后配置xml的context:component-scan标签自动扫描
| 注解 | 范围 |
|---|---|
| @Component | 通用 |
| @Controller | 用于标注Controller层的类(某个具体的Servlet) |
| @Repository | 用于标注Dao层的类 |
| @Service | 用于标注Services层的类 |
一般推荐使用细化后的注解,也就是后面三种,使用的方法都是一样的,参考下面的一个简单例子
@Component("student1")
public class Student{
    @Value("001")
    private String sno;
}

<!-- 相当于下面的配置 -->
<bean id="student1" class="com.wan.Student">
    <property name="sno" value="001"/>
</bean>
使用的时候要在spring的那个配置文件添加下面的代码
<beans xmlns:context="http://www.springframework.org/schema/context"
       xsi:schemaLocation="http://www.springframework.org/schema/beans http://www.springframework.org/schema/beans/spring-beans.xsd
        http://www.springframework.org/schema/context http://www.springframework.org/schema/context/spring-context.xsd">

    <!-- 自动扫描某个包 -->
    <context:component-scan base-package="com.wan">
    </context:component-scan>
</beans>注意,配置文件需要添加属性xmlns:context="http://www.springframework.org/schema/context
xsi:schemaLocation属性里面要有个http://www.springframework.org/schema/context/spring-context.xsd
不然就会报错“通配符的匹配很全面, 但无法找到元素 'context:component-scan' 的声明。”
使用的话和之前一样
ClassPathXmlApplicationContext context = new ClassPathXmlApplicationContext("spring-config.xml");
Student student = (Student) context.getBean("student1");
原文链接:https://www.cnblogs.com/kexing/p/11581066.html
如有疑问请与原作者联系
标签:
版权申明:本站文章部分自网络,如有侵权,请联系:west999com@outlook.com
特别注意:本站所有转载文章言论不代表本站观点,本站所提供的摄影照片,插画,设计作品,如需使用,请与原作者联系,版权归原作者所有

上一篇:图解Java常用数据结构
- Spring系列.ApplicationContext接口 2020-06-11
- Java--反射(框架设计的灵魂)案例 2020-06-11
- springboot2配置JavaMelody与springMVC配置JavaMelody 2020-06-11
- 学习Java 8 Stream Api (4) - Stream 终端操作之 collect 2020-06-11
- Java--反射(框架设计的灵魂) 2020-06-11
IDC资讯: 主机资讯 注册资讯 托管资讯 vps资讯 网站建设
网站运营: 建站经验 策划盈利 搜索优化 网站推广 免费资源
网络编程: Asp.Net编程 Asp编程 Php编程 Xml编程 Access Mssql Mysql 其它
服务器技术: Web服务器 Ftp服务器 Mail服务器 Dns服务器 安全防护
软件技巧: 其它软件 Word Excel Powerpoint Ghost Vista QQ空间 QQ FlashGet 迅雷
网页制作: FrontPages Dreamweaver Javascript css photoshop fireworks Flash
