
java发送邮件(一)
2019-10-16 08:15:38来源:博客园 阅读 ()

java发送邮件(一)
今天来记录一下如何使用java来发送邮件
背景
之前项目有个需求,当产品出现故障时会把情况上送给服务器,服务器发送邮件将故障产品的位置以及故障信息等告知维修人员。发送邮件的接口不是我负责的,但是有兴趣了解一下
正文
首先看一下实现的步骤,然后在讲讲有可能遇到的问题
1.引入javax.mail依赖,我用的是springboot,所以依赖是这样引的
<dependency>
    <groupId>org.springframework.boot</groupId>
    <artifactId>spring-boot-starter-mail</artifactId>
</dependency>
没用springboot框架的,自己去找一下
2.构建邮件基本信息类
package com.example.demo.comment.sendemail;

import java.util.Properties;

/**
 * 发送邮件需要使用的基本信息
 *
 * @author 860118060
 */
public class MailSenderInfo {
    /**
     * 发送邮件的服务器的IP和端口
     */
    private String mailServerHost;
    private String mailServerPort = "25";
    /**
     * 邮件发送者的地址
     */
    private String fromAddress;
    /**
     * 邮件接收者的地址
     */
    private String toAddress;
    /**
     * 登陆邮件发送服务器的用户名和密码
     */
    private String userName;
    private String password;
    /**
     * 是否需要身份验证
     */
    private boolean validate = false;
    /**
     * 邮件主题
     */
    private String subject;
    /**
     * 邮件的文本内容
     */
    private String content;
    /**
     * 邮件附件的文件名
     */
    private String[] attachFileNames;

    /**
     * 获得邮件会话属性
     */
    public Properties getProperties() {
        Properties p = new Properties();
        p.put("mail.smtp.host", this.mailServerHost);
        p.put("mail.smtp.port", this.mailServerPort);
        p.put("mail.smtp.auth", validate ? "true" : "false");
        return p;
    }

    public String getMailServerHost() {
        return mailServerHost;
    }

    public void setMailServerHost(String mailServerHost) {
        this.mailServerHost = mailServerHost;
    }

    public String getMailServerPort() {
        return mailServerPort;
    }

    public void setMailServerPort(String mailServerPort) {
        this.mailServerPort = mailServerPort;
    }

    public boolean isValidate() {
        return validate;
    }

    public void setValidate(boolean validate) {
        this.validate = validate;
    }

    public String[] getAttachFileNames() {
        return attachFileNames;
    }

    public void setAttachFileNames(String[] fileNames) {
        this.attachFileNames = fileNames;
    }

    public String getFromAddress() {
        return fromAddress;
    }

    public void setFromAddress(String fromAddress) {
        this.fromAddress = fromAddress;
    }

    public String getPassword() {
        return password;
    }

    public void setPassword(String password) {
        this.password = password;
    }

    public String getToAddress() {
        return toAddress;
    }

    public void setToAddress(String toAddress) {
        this.toAddress = toAddress;
    }

    public String getUserName() {
        return userName;
    }

    public void setUserName(String userName) {
        this.userName = userName;
    }

    public String getSubject() {
        return subject;
    }

    public void setSubject(String subject) {
        this.subject = subject;
    }

    public String getContent() {
        return content;
    }

    public void setContent(String textContent) {
        this.content = textContent;
    }
}
3.构建邮件发送器
package com.example.demo.comment.sendemail;
import java.util.Date;
import java.util.Properties;
import javax.mail.Address;
import javax.mail.BodyPart;
import javax.mail.Message;
import javax.mail.MessagingException;
import javax.mail.Multipart;
import javax.mail.Session;
import javax.mail.Transport;
import javax.mail.internet.InternetAddress;
import javax.mail.internet.MimeBodyPart;
import javax.mail.internet.MimeMessage;
import javax.mail.internet.MimeMultipart;

/**
 * 简单邮件(不带附件的邮件)发送器
 */
public class SimpleMailSender  {
    /**
     * 以文本格式发送邮件
     * @param mailInfo 待发送的邮件的信息
     */
    public static boolean sendTextMail(MailSenderInfo mailInfo) {
        // 判断是否需要身份认证
        MyAuthenticator authenticator = null;
        Properties pro = mailInfo.getProperties();
        if (mailInfo.isValidate()) {
            // 如果需要身份认证,则创建一个密码验证器
            authenticator = new MyAuthenticator(mailInfo.getUserName(), mailInfo.getPassword());
        }
        // 根据邮件会话属性和密码验证器构造一个发送邮件的session
        Session sendMailSession = Session.getDefaultInstance(pro,authenticator);
        try {
            // 根据session创建一个邮件消息
            Message mailMessage = new MimeMessage(sendMailSession);
            // 创建邮件发送者地址
            Address from = new InternetAddress(mailInfo.getFromAddress());
            // 设置邮件消息的发送者
            mailMessage.setFrom(from);
            // 创建邮件的接收者地址,并设置到邮件消息中
            Address to = new InternetAddress(mailInfo.getToAddress());
            mailMessage.setRecipient(Message.RecipientType.TO,to);
            // 设置邮件消息的主题
            mailMessage.setSubject(mailInfo.getSubject());
            // 设置邮件消息发送的时间
            mailMessage.setSentDate(new Date());
            // 设置邮件消息的主要内容
            String mailContent = mailInfo.getContent();
            mailMessage.setText(mailContent);
            // 发送邮件
            Transport.send(mailMessage);
            return true;
        } catch (MessagingException ex) {
            ex.printStackTrace();
        }
        return false;
    }

    /**
     * 以HTML格式发送邮件
     * @param mailInfo 待发送的邮件信息
     */
    public static boolean sendHtmlMail(MailSenderInfo mailInfo){
        // 判断是否需要身份认证
        MyAuthenticator authenticator = null;
        Properties pro = mailInfo.getProperties();
        //如果需要身份认证,则创建一个密码验证器
        if (mailInfo.isValidate()) {
            authenticator = new MyAuthenticator(mailInfo.getUserName(), mailInfo.getPassword());
        }
        // 根据邮件会话属性和密码验证器构造一个发送邮件的session
        Session sendMailSession = Session.getDefaultInstance(pro,authenticator);
        try {
            // 根据session创建一个邮件消息
            Message mailMessage = new MimeMessage(sendMailSession);
            // 创建邮件发送者地址
            Address from = new InternetAddress(mailInfo.getFromAddress());
            // 设置邮件消息的发送者
            mailMessage.setFrom(from);
            // 创建邮件的接收者地址,并设置到邮件消息中
            Address to = new InternetAddress(mailInfo.getToAddress());
            // Message.RecipientType.TO属性表示接收者的类型为TO
            mailMessage.setRecipient(Message.RecipientType.TO,to);
            // 设置邮件消息的主题
            mailMessage.setSubject(mailInfo.getSubject());
            // 设置邮件消息发送的时间
            mailMessage.setSentDate(new Date());
            // MiniMultipart类是一个容器类,包含MimeBodyPart类型的对象
            Multipart mainPart = new MimeMultipart();
            // 创建一个包含HTML内容的MimeBodyPart
            BodyPart html = new MimeBodyPart();
            // 设置HTML内容
            html.setContent(mailInfo.getContent(), "text/html; charset=utf-8");
            mainPart.addBodyPart(html);
            // 将MiniMultipart对象设置为邮件内容
            mailMessage.setContent(mainPart);
            // 发送邮件
            Transport.send(mailMessage);
            return true;
        } catch (MessagingException ex) {
            ex.printStackTrace();
        }
        return false;
    }
}
4.构建密码验证器
package com.example.demo.comment.sendemail;
import javax.mail.*;

/**
 * @author 860118060
 */
public class MyAuthenticator extends Authenticator{
    String userName=null;
    String password=null;

    public MyAuthenticator(){
    }
    public MyAuthenticator(String username, String password) {
        this.userName = username;
        this.password = password;
    }

    @Override
    protected PasswordAuthentication getPasswordAuthentication(){
        return new PasswordAuthentication(userName, password);
    }
}
至此准备工作都完成了,下面看一下如何调用吧
5.调用Demo
package com.example.demo.comment.sendemail;
public class SendEmailDemo {
public static void main(String[] args){
//这个类主要是设置邮件
MailSenderInfo mailInfo = new MailSenderInfo();
mailInfo.setMailServerHost("smtp.163.com");
mailInfo.setMailServerPort("25");
mailInfo.setValidate(true);
// 发送方邮箱
mailInfo.setUserName("xxxxxxxx@163.com");
// 发送方邮箱密码
mailInfo.setPassword("xxxxxxxx");
// 发送方邮箱
mailInfo.setFromAddress("xxxxxxxx@163.com");
// 接收方邮箱
mailInfo.setToAddress("xxxxxxxx@qq.com");
// 邮件标题
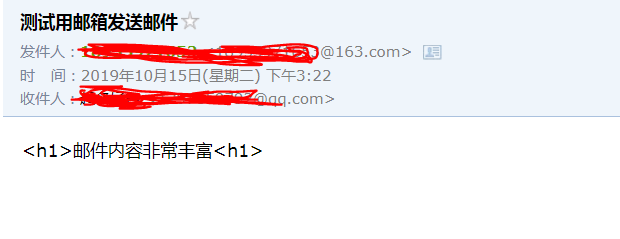
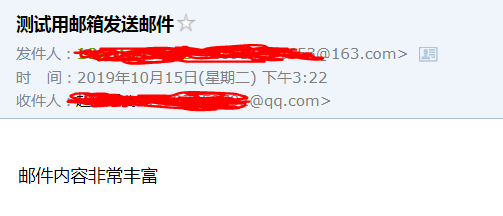
mailInfo.setSubject("测试用邮箱发送邮件");
// 邮件内容
mailInfo.setContent("<h1>邮件内容非常丰富<h1>");
//发送文体格式
SimpleMailSender.sendTextMail(mailInfo);
//发送html格式
SimpleMailSender.sendHtmlMail(mailInfo);
}
}这里有两种邮件发送格式
问题与总结
如果不出意外的话应该成功发送出两封邮件了,但是凡事都有万一,下面分析一下哪些问题会导致失败呢?
1.mailInfo.setMailServerHost("smtp.163.com");与mailInfo.setFromAddress("xxxxxxxx@163.com");这两句话。即如果你使用163smtp服务器,那么发送邮件地址就必须用163的邮箱,如果不的话,是不会发送成功的。
2.不要使用你刚刚注册过的邮箱在程序中发邮件,如果你的163邮箱是刚注册不久,那你就不要使用“smtp.163.com”。因为你发不出去。刚注册的邮箱是不会给你这种权限的,也就是你不能通过验证。要使用你经常用的邮箱,而且时间比较长的
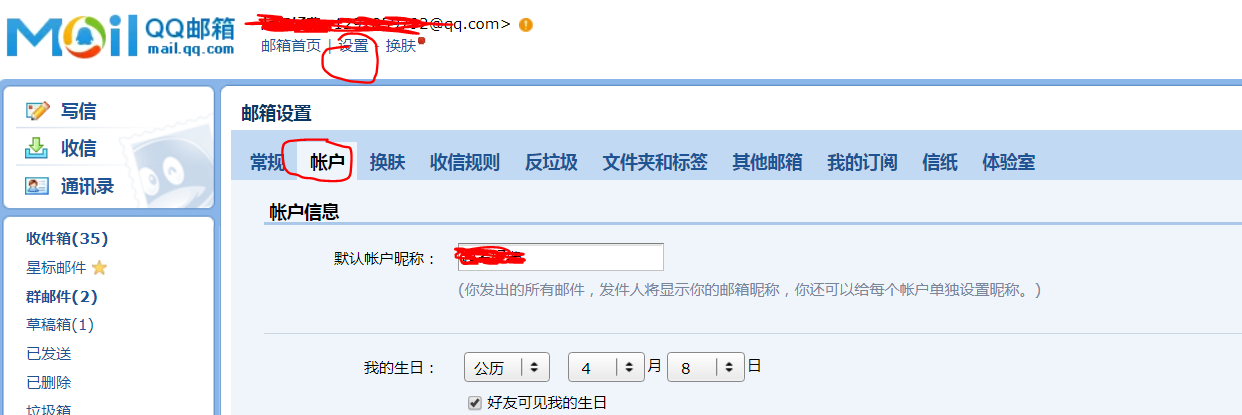
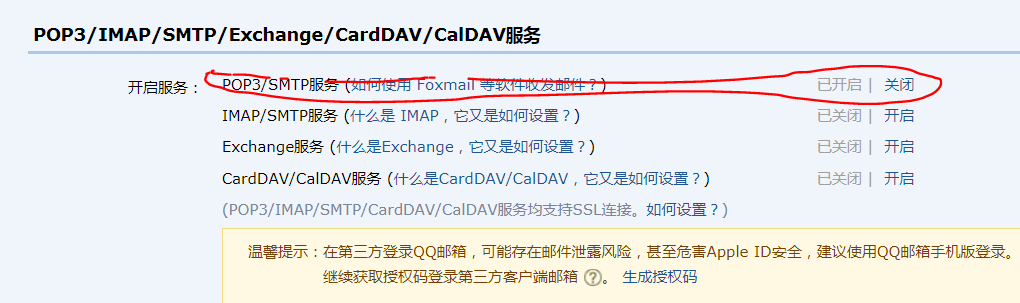
3.qq邮箱作为发送方是有可能需要授权验证的。
授权如下:
在设置里面找到账户,往下拉找到并按照提示开启授权,然后将得到的授权码作为邮箱密码,即可成功发送邮件
最后顺便附上常用邮箱:
常用的邮箱服务器(SMTP、POP3)地址、端口
sina.com:
POP3服务器地址:pop3.sina.com.cn(端口:110) SMTP服务器地址:smtp.sina.com.cn(端口:25)
sinaVIP:
POP3服务器:pop3.vip.sina.com (端口:110) SMTP服务器:smtp.vip.sina.com (端口:25)
sohu.com:
POP3服务器地址:pop3.sohu.com(端口:110) SMTP服务器地址:smtp.sohu.com(端口:25)
126邮箱:
POP3服务器地址:pop.126.com(端口:110) SMTP服务器地址:smtp.126.com(端口:25)
139邮箱:
POP3服务器地址:POP.139.com(端口:110) SMTP服务器地址:SMTP.139.com(端口:25)
163.com:
POP3服务器地址:pop.163.com(端口:110) SMTP服务器地址:smtp.163.com(端口:25)
QQ邮箱
POP3服务器地址:pop.qq.com(端口:110)
SMTP服务器地址:smtp.qq.com (端口:25)
QQ企业邮箱
POP3服务器地址:pop.exmail.qq.com (SSL启用 端口:995) SMTP服务器地址:smtp.exmail.qq.com(SSL启用 端口:587/465)
yahoo.com:
POP3服务器地址:pop.mail.yahoo.com SMTP服务器地址:smtp.mail.yahoo.com
yahoo.com.cn:
POP3服务器地址:pop.mail.yahoo.com.cn(端口:995) SMTP服务器地址:smtp.mail.yahoo.com.cn(端口:587
HotMail
POP3服务器地址:pop3.live.com (端口:995) SMTP服务器地址:smtp.live.com (端口:587)
gmail(google.com)
POP3服务器地址:pop.gmail.com(SSL启用 端口:995) SMTP服务器地址:smtp.gmail.com(SSL启用 端口:587)
263.net:
POP3服务器地址:pop3.263.net(端口:110) SMTP服务器地址:smtp.263.net(端口:25)
263.net.cn:
POP3服务器地址:pop.263.net.cn(端口:110) SMTP服务器地址:smtp.263.net.cn(端口:25)
x263.net:
POP3服务器地址:pop.x263.net(端口:110) SMTP服务器地址:smtp.x263.net(端口:25)
21cn.com:
POP3服务器地址:pop.21cn.com(端口:110) SMTP服务器地址:smtp.21cn.com(端口:25)
Foxmail:
POP3服务器地址:POP.foxmail.com(端口:110) SMTP服务器地址:SMTP.foxmail.com(端口:25)
china.com:
POP3服务器地址:pop.china.com(端口:110) SMTP服务器地址:smtp.china.com(端口:25)
tom.com:
POP3服务器地址:pop.tom.com(端口:110) SMTP服务器地址:smtp.tom.com(端口:25)
etang.com:
POP3服务器地址:pop.etang.com SMTP服务器地址:smtp.etang.com
在多说一句,本文档不属于教程,只是对自己学习的记录,大家可以参考一下,如果有什么错误欢迎指出
有时间在看看怎么在邮件中添加附件并分享出来
本次学习主要参考:https://www.cnblogs.com/kiwifly/p/4435867.html
原文链接:https://www.cnblogs.com/hao-yu/p/11678567.html
如有疑问请与原作者联系
标签:
版权申明:本站文章部分自网络,如有侵权,请联系:west999com@outlook.com
特别注意:本站所有转载文章言论不代表本站观点,本站所提供的摄影照片,插画,设计作品,如需使用,请与原作者联系,版权归原作者所有

上一篇:n-map安装实操
- 国外程序员整理的Java资源大全(全部是干货) 2020-06-12
- 2020年深圳中国平安各部门Java中级面试真题合集(附答案) 2020-06-11
- 2020年java就业前景 2020-06-11
- 04.Java基础语法 2020-06-11
- Java--反射(框架设计的灵魂)案例 2020-06-11
IDC资讯: 主机资讯 注册资讯 托管资讯 vps资讯 网站建设
网站运营: 建站经验 策划盈利 搜索优化 网站推广 免费资源
网络编程: Asp.Net编程 Asp编程 Php编程 Xml编程 Access Mssql Mysql 其它
服务器技术: Web服务器 Ftp服务器 Mail服务器 Dns服务器 安全防护
软件技巧: 其它软件 Word Excel Powerpoint Ghost Vista QQ空间 QQ FlashGet 迅雷
网页制作: FrontPages Dreamweaver Javascript css photoshop fireworks Flash
