
Spring Boot Security 入门―内存用户验证
2019-11-09 16:05:40来源:博客园 阅读 ()

Spring Boot Security 入门―内存用户验证
简介
作为 Spring 全家桶组件之一,Spring Security 是一个提供安全机制的组件,它主要解决两个问题:
- 认证:验证用户名和密码;
- 授权:对于不同的 URL 权限不一样,只有当认证的用户拥有某个 URL 的需要的权限时才能访问。
Spring Security 底层使用的是过滤器,针对 URL 进行的拦截,对应到 Java 中也就是类; 因此被称为粗粒度授权验证,就是验证 URL ,当前用户是否有这个 URL 的权限。
入门
创建项目
使用 Idea 创建 Spring Boot 项目,勾选需要的组件:
- Spring Web
- Spring Security
或者创建项目后添加依赖:
<dependency>
    <groupId>org.springframework.boot</groupId>
    <artifactId>spring-boot-starter-security</artifactId>
</dependency>
<dependency>
    <groupId>org.springframework.boot</groupId>
    <artifactId>spring-boot-starter-web</artifactId>
</dependency>
这里使用的是 JSP 作为模板,有关如何在 Spring Boot 中使用 JSP 作为模板请访问:https://www.cnblogs.com/cloudfloating/p/11787222.html
WebSecurityConfig
package top.cloudli.demo.security;

import org.springframework.context.annotation.Configuration;
import org.springframework.security.config.annotation.authentication.builders.AuthenticationManagerBuilder;
import org.springframework.security.config.annotation.method.configuration.EnableGlobalMethodSecurity;
import org.springframework.security.config.annotation.web.builders.HttpSecurity;
import org.springframework.security.config.annotation.web.configuration.EnableWebSecurity;
import org.springframework.security.config.annotation.web.configuration.WebSecurityConfigurerAdapter;
import org.springframework.security.crypto.bcrypt.BCryptPasswordEncoder;
import org.springframework.security.crypto.password.PasswordEncoder;

@Configuration
@EnableWebSecurity
@EnableGlobalMethodSecurity(prePostEnabled=true)
public class SecurityConfig extends WebSecurityConfigurerAdapter {
    @Override
    protected void configure(AuthenticationManagerBuilder auth) throws Exception {
        PasswordEncoder encoder = new BCryptPasswordEncoder();

        auth.inMemoryAuthentication()
                .passwordEncoder(encoder)
                .withUser("root")
                .password(encoder.encode("root@123456"))
                .roles("ROOT", "USER")
                .and()
                .withUser("user")
                .password(encoder.encode("user@123456"))
                .roles("USER");
    }

    @Override
    protected void configure(HttpSecurity http) throws Exception {
        http.authorizeRequests()
                .antMatchers("/css/**")
                .permitAll()        // css 不用验证
                .anyRequest()
                .authenticated()    // 其它页面全部需要验证
                .and()
                .formLogin()        // 使用默认登录页面
                .and()
                .exceptionHandling()
                .accessDeniedPage("/401")   // 无权限时跳转的页面
                .and()
                .logout();
    }
}@EnableWebSecurity注解启用验证;@EnableGlobalMethodSecurity(prePostEnabled=true)注解允许我们在控制器的方法中使用@PreAuthorize实现权限分割。
此处创建了两个用户并保存在内存中,分别是拥有 ROOT 和 USER 权限的 root 用户和仅拥有 USER 权限的 user 用户。
fromLogin() 方法可以接着调用 loginPage() 指定一个自定义登录页面,这里使用的是默认登录页面。
编写页面
1.index.jsp,所有通过验证的用户都可以访问:
<%--
  任何通过验证的用户都能访问的页面
--%>
<%@ page contentType="text/html;charset=UTF-8" language="java" %>
<html>
<head>
    <title>Spring Security Demo Application</title>
    <link rel="stylesheet" type="text/css" href="css/style.css">
</head>
<body>
<div class="content">
    <h1>Spring Security In Memory Authentication</h1>
    <h2>这是被保护的页面(ROLE_USER)。</h2>
</div>
</body>
</html>
2.root.jsp,只有拥有 ROOT 权限的用户能访问:
<%--
  需要 ROLE_ROOT 才能访问的页面
--%>
<%@ page contentType="text/html;charset=UTF-8" language="java" %>
<html>
<head>
    <title>Root Page</title>
    <link rel="stylesheet" type="text/css" href="css/style.css">
</head>
<body>
<div class="content">
    <h1>Root Page</h1>
    <h2>你正在访问受保护的页面(ROLE_ROOT)。</h2>
</div>
</body>
</html>
3.401.jsp,没有权限时跳转的页面:
<%--
  权限不够时跳转的页面
--%>
<%@ page contentType="text/html;charset=UTF-8" language="java" %>
<html>
<head>
    <title>401 Unauthorized</title>
    <link rel="stylesheet" type="text/css" href="css/style.css">
</head>
<body class="error">
<div class="content">
    <h1>401 Unauthorized!</h1>
    <h2>你没有权限访问此页面。</h2>
</div>
</body>
</html>
控制器
package top.cloudli.demo.controller;

import org.springframework.security.access.prepost.PreAuthorize;
import org.springframework.stereotype.Controller;
import org.springframework.web.bind.annotation.GetMapping;

@Controller
public class DemoController {

    @PreAuthorize("hasAnyAuthority('ROLE_USER')")
    @GetMapping("/")
    public String index() {
        return "index";
    }

    @PreAuthorize("hasAnyAuthority('ROLE_ROOT')")
    @GetMapping("/root")
    public String root() {
        return "root";
    }

    @GetMapping("/401")
    public String accessDenied() {
        return "401";
    }
}
@PreAuthorize 注解指定了访问页面所需要的权限,这里的权限要加上 ROLE_ 前缀。
Run
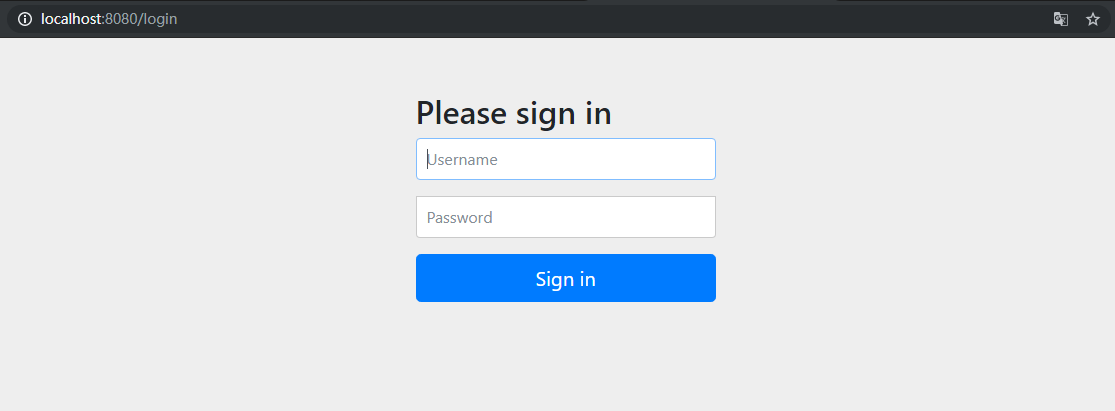
访问 http://localhost:8080/ 将进入登录页面(这里使用的是 Spring Security 的默认登录页面):
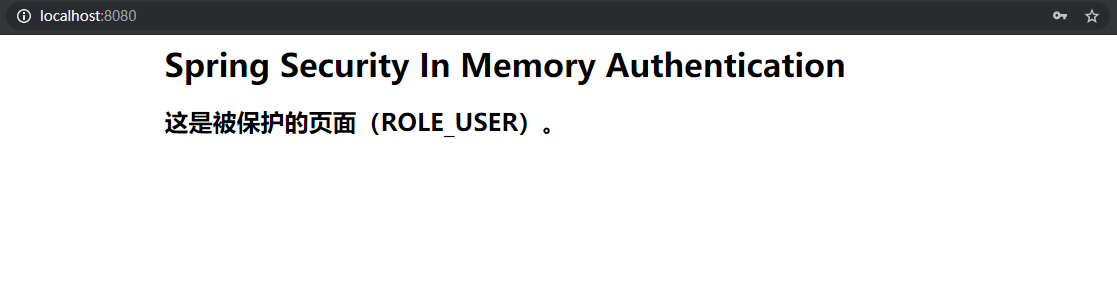
使用刚才创建的内存用户 user 登录后将返回 index 页面:
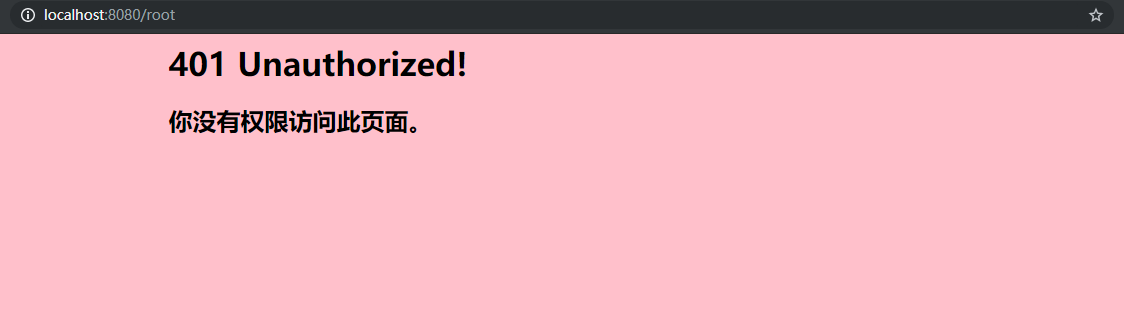
访问 http://localhost:8080/root,由于 user 用户没有 ROLE_ROOT 权限,跳转到 401 页面:
访问 http://localhost:8080/logout 将进入默认登出页面:

这里的登录和登出页面均可以使用自定义页面,只需要在自定义的页面中把数据通过 PSOT 请求提交到 /login 或 /logout 即可完成登录和登出。
原文链接:https://www.cnblogs.com/cloudfloating/p/11826083.html
如有疑问请与原作者联系
标签:
版权申明:本站文章部分自网络,如有侵权,请联系:west999com@outlook.com
特别注意:本站所有转载文章言论不代表本站观点,本站所提供的摄影照片,插画,设计作品,如需使用,请与原作者联系,版权归原作者所有

上一篇:Java IO编程――文件拷贝
下一篇:一起学Spring之Web基础篇
- Spring系列.ApplicationContext接口 2020-06-11
- springboot2配置JavaMelody与springMVC配置JavaMelody 2020-06-11
- 给你一份超详细 Spring Boot 知识清单 2020-06-11
- SpringBoot 2.3 整合最新版 ShardingJdbc + Druid + MyBatis 2020-06-11
- 掌握SpringBoot-2.3的容器探针:实战篇 2020-06-11
IDC资讯: 主机资讯 注册资讯 托管资讯 vps资讯 网站建设
网站运营: 建站经验 策划盈利 搜索优化 网站推广 免费资源
网络编程: Asp.Net编程 Asp编程 Php编程 Xml编程 Access Mssql Mysql 其它
服务器技术: Web服务器 Ftp服务器 Mail服务器 Dns服务器 安全防护
软件技巧: 其它软件 Word Excel Powerpoint Ghost Vista QQ空间 QQ FlashGet 迅雷
网页制作: FrontPages Dreamweaver Javascript css photoshop fireworks Flash
