
Spring IOC容器装配Bean_基于XML配置方式
2019-12-06 16:02:52来源:博客园 阅读 ()

Spring IOC容器装配Bean_基于XML配置方式
开发所需jar包
实例化Bean的四种方式
1.无参数构造器 (最常用)
<?xml version="1.0" encoding="UTF-8"?>
<beans xmlns="http://www.springframework.org/schema/beans"
       xmlns:xsi="http://www.w3.org/2001/XMLSchema-instance"
       xsi:schemaLocation="http://www.springframework.org/schema/beans
        https://www.springframework.org/schema/beans/spring-beans.xsd">

    <!--1.无参构造函数
    在实例化的时候,自动调用默认的构造器,相当于MyBean mybean01 = new MyBean();
    -->
     <!--bean:告诉Spring容器,哪些对象(bean)需要交给Spring容器进行管理
    id/name:该bean的“唯一”标识符
    class:该bean的完整类名(spring容器底层可以使用反射创建对象)
    -->
    <bean id="mybean01" class="com.igeekhome.bean.MyBean"></bean>
</beans>
public class MyBean {
public MyBean() {
System.out.println("MyBean...无参构造函数被调用...");
}
}2.静态工厂方法
 <!--2.静态工厂方法
    MyFactory01.getBean()
    factory-method:指定静态的工厂方法
    -->
    <bean id="mybean02" class="com.igeekhome.bean.MyFactory01" factory-method="getBean"></bean>
public class MyFactory01 {
//静态工厂方法
public static MyBean getBean() {
return new MyBean();
}
}3.实例(非静态)工厂方法
<!--3.非静态工厂方法
    new MyFatory02().getBean
    -->
    <bean id="myfatory" class="com.igeekhome.bean.MyFactory02"></bean>
    <!--
    factory-bean:工厂对象的引用
    factory-method: 工厂方法名称
    -->
    <bean id="mybean03" factory-bean="myfatory" factory-method="getBean"></bean>
public class MyFactory02 {
//非静态工厂方法
public MyBean02 getBean() {
return new MyBean02();
}
}4.FactoryBean方式(底层源码用的多)
<!--4.FactoryBean
    MyFactoryBean:spring会先检查该类是否实现了FactoryBean接口,如果没有实现,则直接创建该对象并添加至容器中
    如果实现了FactoryBean接口,则调用getObject方法,并将该方法返回值对象添加至容器中
    -->
    <bean id="mybean04" class="com.igeekhome.bean.MyFactoryBean"></bean>
//创建工厂对象实现FactoryBean<Bean4>的接口
public class MyFactoryBean implements FactoryBean<MyBean03> {//泛型:你要返回什么类型的对象,泛型就是什么
@Override
public MyBean getObject() throws Exception {
return new MyBean();
}
@Override
public Class<?> getObjectType() {
return MyBean.class;
}
}Bean的作用域
由spring创建的bean对象在什么情况下有效
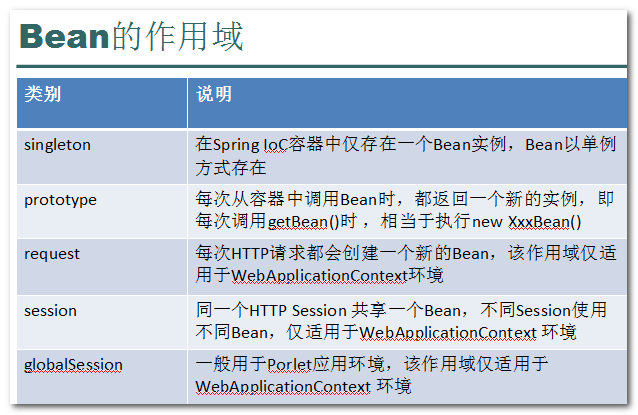
项目开发中通常会使用:singleton 单例、 prototype多例
- Singleton: 在一个spring容器中,对象只有一个实例(默认值)
- Prototype: 在一个spring容器中,存在多个实例,每次getBean 返回一个新的实例
<!--?bean的作用范围
???????scope:配置作用范围的,默认值就是singleton单例
???? -->
<!-- 单例 -->
<!-- <bean id="singletonBean" class="com.igeek.scope.SingletonBean"></bean> 等价于 -->
????<bean id="singletonBean" class="com.igeek.scope.SingletonBean"
    scope="singleton"></bean>

????<!-- 多例 -->
????<bean id="prototypeBean" class="com.igeek.scope.PrototypeBean"
scope="prototype"></bean>
Bean的初始化和销毁方法
通过 init-method属性 指定初始化后的调用方法
通过 destroy-method属性 指定销毁对象前的方法
 <!--
    init-method:指定初始化方法
    destroy-method: 指定销毁触发方法
    -->
    <bean id="lifecycle" class="com.igeekhome.bean.LifeCycleBean" scope="singleton" init-method="initMethod" destroy-method="destroyMethod"></bean>
public class LifeCycleBean {
public LifeCycleBean() {
System.out.println("构造函数...");
}
public void initMethod() {
//...执行初始化操作
System.out.println("init...method...");
}
public void destroyMethod() {
System.out.println("destroy...method...");
}
}销毁方法的执行必须满足两个条件
- 单例(singleton)的bean才会可以手动销毁
- 必须手动关闭容器(调用close的方法)时,才会执行手动销毁的方法
测试初始化和销毁方法:
public class Test03 {
    private ApplicationContext ac = null;
    @Before
    public void before() {
        ac = new ClassPathXmlApplicationContext("applicationContext.xml");
    }
    @Test
    public void method01() {
        LifeCycleBean lifeCycleBean = ac.getBean("lifecycle", LifeCycleBean.class);
        //关闭ioc容器
        ((ClassPathXmlApplicationContext) ac).close();
    }
}
后处理Bean(BeanPostProcessor接口)
后处理Bean也称之为Bean的后处理器,作用是:在Bean初始化的前后,对Bean对象进行增强。它既可以增强一个指定的Bean,也可以增强所有的Bean,底层很多功能(如AOP等)的实现都是基于它的,Spring可以在容器中直接识别调用
////Bean的后处理器:对bean进行增强,可以实现,对所有,或某个bean的初始化进行增强
public class MyBeanPostProcessor implements BeanPostProcessor{
    /*bean实例化之前
       bean:对象
       beanName: bean的id/name
     */
????//初始化时(之前)调用的
????public Object postProcessBeforeInitialization(Object bean, String beanName)throws BeansException {
        //System.out.println(beanName+"在初始化前开始增强了");
???????//如何只增强一个bean
???????if(beanName.equals("lifeCycleBean")){
???????????System.out.println(beanName+"在初始化前开始增强了");
???????}
???????return bean;//放行
????}

????//初始化时(之后)调用
????public Object postProcessAfterInitialization(Object bean, String beanName)throws BeansException {
        //System.out.println(beanName+"在初始化后开始增强了");
???????if(beanName.equals("lifeCycleBean")){
???????????System.out.println(beanName+"在初始化后开始增强了");
???????}
???????return bean;
????}
}
Bean属性的依赖注入(DI)
1.setter方法属性注入
public class Person {
    private int no;
    private String name;
    private boolean status;
    private Car car;

    public Person() {
    }

    public int getNo() {
        return no;
    }

    public void setNo(int no) {
        this.no = no;
    }

    public String getName() {
        return name;
    }

    public void setName(String name) {
        this.name = name;
    }

    public boolean isStatus() {
        return status;
    }

    public void setStatus(boolean status) {
        this.status = status;
    }

    public Car getCar() {
        return car;
    }

    public void setCar(Car car) {
        this.car = car;
    }

    @Override
    public String toString() {
        return "Person{" +
                "no=" + no +
                ", name='" + name + '\'' +
                ", status=" + status +
                ", car=" + car +
                '}';
    }

    public Person(int no, String name, boolean status, Car car) {
        this.no = no;
        this.name = name;
        this.status = status;
        this.car = car;
    }
}

public class Car {
    private String no;
    private String brand;
    private double price;

    public String getNo() {
        return no;
    }

    public void setNo(String no) {
        this.no = no;
    }

    public String getBrand() {
        return brand;
    }

    public void setBrand(String brand) {
        this.brand = brand;
    }

    public double getPrice() {
        return price;
    }

    public void setPrice(double price) {
        this.price = price;
    }

    @Override
    public String toString() {
        return "Car{" +
                "no='" + no + '\'' +
                ", brand='" + brand + '\'' +
                ", price=" + price +
                '}';
    }

    public Car() {
    }

    public Car(String brand, double price) {
        this.brand = brand;
        this.price = price;
    }

    public Car(String no, String brand, double price) {
        this.no = no;
        this.brand = brand;
        this.price = price;
    }
}
<?xml version="1.0" encoding="UTF-8"?>
<beans xmlns="http://www.springframework.org/schema/beans"
xmlns:xsi="http://www.w3.org/2001/XMLSchema-instance"
xsi:schemaLocation="http://www.springframework.org/schema/beans
https://www.springframework.org/schema/beans/spring-beans.xsd">
<bean id="person" class="com.igeekhome.di.Person">
<!--setter注入:前提满足JavaBean规范(提供setter方法)-->
<!--property:setter注入
name:属性名称 (具体来说是set方法名的首字母小写)xyz -> 默认会调用setXyz()
value:简单值
ref:注入的bean的id 将容器中的一个bean注入到另外一个bean中
-->
<property name="no" value="123"></property>
<property name="name" value="张三"></property>
<property name="status" value="true"></property>
<property name="car" ref="car"></property>
<!--等价-->
<!--<property name="car">
<ref bean="car"></ref>
</property>-->
</bean>
<bean id="car" class="com.igeekhome.di.Car">
<property name="brand" value="宝马"></property>
<property name="price" value="66666"></property>
</bean>
</beans>2.构造器参数注入
<?xml version="1.0" encoding="UTF-8"?>
<beans xmlns="http://www.springframework.org/schema/beans"
       xmlns:xsi="http://www.w3.org/2001/XMLSchema-instance"
       xsi:schemaLocation="http://www.springframework.org/schema/beans
        https://www.springframework.org/schema/beans/spring-beans.xsd">

    <bean id="car" class="com.igeekhome.di.Car">
        <!--使用constructor构造注入
        value:
        ref:  同上
        type: 构造参数类型 如果是引用 需要写完整类名 (每个字段不一致)
        index: 构造参数的索引位置 从0开始
        name: 构造参数的名称
        -->
        <constructor-arg name="brand" value="宝马"></constructor-arg>
        <constructor-arg name="price" value="66666"></constructor-arg>
        <constructor-arg name="no" value="001"></constructor-arg>
    </bean>

    <bean id="person" class="com.igeekhome.di.Person">
        <constructor-arg index="0" value="111"></constructor-arg>
        <constructor-arg index="1" value="李四"></constructor-arg>
        <constructor-arg index="2" value="false"></constructor-arg>
        <constructor-arg index="3" ref="car"></constructor-arg>
    </bean>

</beans>
3.p名称空间
为简化XML文件的配置,Spring2.5版本开始引入了一个新的p名称空间。简单的说,它的作用是为了简化setter方法属性依赖注入配置的,它不是真正的名称空间
它的使用方法:
p:<属性名>="xxx" 引入常量值
p:<属性名>-ref="xxx" 引用其它Bean对象
<?xml version="1.0" encoding="UTF-8"?>
<beans xmlns="http://www.springframework.org/schema/beans"
xmlns:xsi="http://www.w3.org/2001/XMLSchema-instance" xmlns:p="http://www.springframework.org/schema/p"
xsi:schemaLocation="http://www.springframework.org/schema/beans
https://www.springframework.org/schema/beans/spring-beans.xsd">
<!--p命名空间注入:
前提:基于setter注入
p:属性 = ""
p:属性-ref = ""
-->
<bean id="person" class="com.igeekhome.di.Person" p:name="张三" p:no="002" p:status="false" p:car-ref="car">
</bean>
<bean id="car" class="com.igeekhome.di.Car" p:brand="qq" p:price="66666">
</bean>
</beans>4.spEL表达式
spEL(Spring Expression Language)是一种表达式语言,它是spring3.x版本的新特性。 它的作用是:支持在运行时操作和查询对象,其语法类似统一的EL语言,但是SpEL提供了额外的功能,功能更强大
语法: #{…} , 引用另一个Bean 、属性、 方法
SpEL表达式的使用功能比较多,Bean操作相关的通常有:
#{beanId} 引用Bean(具体对象)
#{beanId.属性} 引用Bean的属性
#{beanId.方法(参数)} 调用Bean的方法
<?xml version="1.0" encoding="UTF-8"?>
<beans xmlns="http://www.springframework.org/schema/beans"
xmlns:xsi="http://www.w3.org/2001/XMLSchema-instance" xmlns:p="http://www.springframework.org/schema/p"
xsi:schemaLocation="http://www.springframework.org/schema/beans
https://www.springframework.org/schema/beans/spring-beans.xsd">
<bean id="person" class="com.igeekhome.di.Person" p:name="张三" p:no="002" p:status="false" p:car="#{car2}">
</bean>
<bean id="car" class="com.igeekhome.di.Car" p:brand="qq" p:price="66666">
</bean>
<bean id="car2" class="com.igeekhome.di.Car" p:no="#{car.no}" p:brand="#{car.brand.toUpperCase()}" p:price="#{car.price}">
</bean>
</beans>原文链接:https://www.cnblogs.com/hublogs/p/11992289.html
如有疑问请与原作者联系
标签:
版权申明:本站文章部分自网络,如有侵权,请联系:west999com@outlook.com
特别注意:本站所有转载文章言论不代表本站观点,本站所提供的摄影照片,插画,设计作品,如需使用,请与原作者联系,版权归原作者所有

- Spring系列.ApplicationContext接口 2020-06-11
- springboot2配置JavaMelody与springMVC配置JavaMelody 2020-06-11
- 给你一份超详细 Spring Boot 知识清单 2020-06-11
- SpringBoot 2.3 整合最新版 ShardingJdbc + Druid + MyBatis 2020-06-11
- 掌握SpringBoot-2.3的容器探针:实战篇 2020-06-11
IDC资讯: 主机资讯 注册资讯 托管资讯 vps资讯 网站建设
网站运营: 建站经验 策划盈利 搜索优化 网站推广 免费资源
网络编程: Asp.Net编程 Asp编程 Php编程 Xml编程 Access Mssql Mysql 其它
服务器技术: Web服务器 Ftp服务器 Mail服务器 Dns服务器 安全防护
软件技巧: 其它软件 Word Excel Powerpoint Ghost Vista QQ空间 QQ FlashGet 迅雷
网页制作: FrontPages Dreamweaver Javascript css photoshop fireworks Flash
