
SpringMVC架构模拟
2019-12-18 16:08:25来源:博客园 阅读 ()

SpringMVC架构模拟
这次来学习一下SpringMVC的源码.
对于常见的项目架构模式,比如大名鼎鼎的SSM(SpringMVC,Spring,Mybatis)框架.
SpringMVC ->web层(Controller层)
Spring ->service层
mybatis ->dao层
从SpringMVC层面上讲,他的构成如下:
Model ->数据
View ->视图
Controller ->业务
经过上面的分层,使得数据,视图(展示效果),业务逻辑进行分离,每一层的变化可以不影响其他层,增加程序的可维护性和可扩展性。
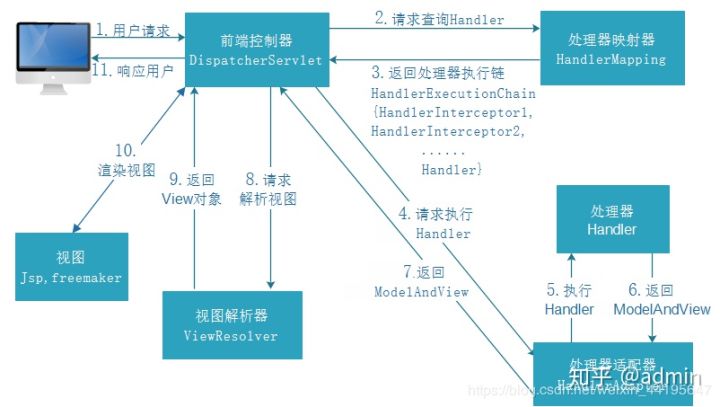
- 浏览器发出用户请求,处于web.xml中的dispacherServlet前端控制器进行接收,此时这个前端控制器并不处理请求.而是将用户发送的url请求转发到HandleMapping处理器映射器
- 第二步:HandlerMapping根据请求路径找到相对应的HandlerAdapter处理器适配器(处理器适配器就是那些拦截器或者是controller)
- 第三步:HandlerAdapter处理器适配器,可以处理一些功能请求,返回一个ModelAndView对象(包括模型数据/逻辑视图名)
- 第四步:ViewResolver视图解析器,先根据 ModelAndView中设置的view解析具体视图
- 第五步:然后再将Model模型中的数据渲染到View中
下面我们实际在项目中进行操作
一丶创建一个带有web.xml的maven项目
二丶首先自己写一个类继承HttpServlet类并重写它的doGet,doPost方法
package com.spring.mvc.config;

import javax.servlet.ServletException;
import javax.servlet.http.HttpServlet;
import javax.servlet.http.HttpServletRequest;
import javax.servlet.http.HttpServletResponse;
import java.io.IOException;

/**
 * @Author: XiaoZhe
 * @Description:
 * @Date: Created in 17:39 2019/12/16
 */
public class MyDispatchServlet extends HttpServlet{
    @Override
    protected void doGet(HttpServletRequest req, HttpServletResponse resp) throws ServletException, IOException {
        System.out.println("这是调用了doGet方法");
    }

    @Override
    protected void doPost(HttpServletRequest req, HttpServletResponse resp) throws ServletException, IOException {
        System.out.println("这是调用了doPost方法");
    }
}
三丶修改web.xml文件
<!DOCTYPE web-app PUBLIC
 "-//Sun Microsystems, Inc.//DTD Web Application 2.3//EN"
 "http://java.sun.com/dtd/web-app_2_3.dtd" >

<web-app>
  <!--注册servlet-->
  <servlet>
    <!--自己继承了HttpServlet类的名字-->
    <servlet-name>httpServletTest</servlet-name>
    <!--自己继承了HttpServlet类的所在路径-->
    <servlet-class>com.spring.mvc.servlet.MyDispatchServlet</servlet-class>
  </servlet>
  <!--映射servlet-->
  <servlet-mapping>
    <!--上面自定义的servlet-name-->
    <servlet-name>httpServletTest</servlet-name>
    <!--拦截路径/* -->
    <url-pattern>/*</url-pattern>
  </servlet-mapping>
</web-app>
四丶 启动项目,在地址栏输入项目地址并回车
可以看到控制台打印输出了我们定义的话
这是调用了doGet方法
这是调用了doGet方法
五丶创建几个注解@Controller,@RequestMapping
用过SpringMVC框架的人都知道在类上打了@Controller注解的才能被认作是一个Controller,而打了@RequestMapping才能被请求映射。
@MyController
package com.spring.mvc.annotation;

import java.lang.annotation.ElementType;
import java.lang.annotation.Retention;
import java.lang.annotation.RetentionPolicy;
import java.lang.annotation.Target;

/**
 * @Author: ZhengZhe
 * @Description: 作用于class上的功能类似于Spring的@Controller注解
 * @Date: Created in 10:34 2019/12/17
 */
@Target(ElementType.TYPE)//标识此注解只能作用在类上面
@Retention(RetentionPolicy.RUNTIME)//标识此注解一直存活,可被反射获取
public @interface MyController {
}
@MyRequestMapping
package com.spring.mvc.annotation;

import java.lang.annotation.ElementType;
import java.lang.annotation.Retention;
import java.lang.annotation.RetentionPolicy;
import java.lang.annotation.Target;

/**
 * @Author: ZhengZhe
 * @Description: 作用于class或者method上的功能类似于Spring的@RequestMapping注解
 * @Date: Created in 10:38 2019/12/17
 */
@Target({ElementType.TYPE,ElementType.METHOD})//标识此注解只能作用在类或者方法上面
@Retention(RetentionPolicy.RUNTIME)//标识此注解一直存活,可被反射获取
public @interface MyRequestMapping {
    String value();//用来存储对应的url , 网络请求路径
}
六丶DispatchServlet
DispatchServlet在MVC引导着非常强大的作用,网络中的请求传到DispatchServlet中,由DispatchServlet进行截取分析并传到对应的由@Controller和@RequestMapping注解的类或方法中,使得网路请求能正确的请求到对应的资源上.
下面我们自定义一个DispatchServlet实现他所实现的功能
首先看一下源码中MVC做了什么
protected void initStrategies(ApplicationContext context) {
        this.initMultipartResolver(context);
        this.initLocaleResolver(context);
        this.initThemeResolver(context);
        this.initHandlerMappings(context);
        this.initHandlerAdapters(context);
        this.initHandlerExceptionResolvers(context);
        this.initRequestToViewNameTranslator(context);
        this.initViewResolvers(context);
        this.initFlashMapManager(context);
    }
从上面我们可以看到初始化方法的参数是ApplicationContext,这个是IOC的初始化容器,我之前的博客中解析过IOC的源码,不懂的可以去里面解读.
initStrategies方法的目的就是从容器中获取已经解析出来的bean资源,并获取其带有@Controller和@RequestMapping注解的bean资源.
protected void doService(HttpServletRequest request, HttpServletResponse response) throws Exception {
        if (this.logger.isDebugEnabled()) {
            String resumed = WebAsyncUtils.getAsyncManager(request).hasConcurrentResult() ? " resumed" : "";
            this.logger.debug("DispatcherServlet with name '" + this.getServletName() + "'" + resumed + " processing " + request.getMethod() + " request for [" + getRequestUri(request) + "]");
        }

        Map<String, Object> attributesSnapshot = null;
        if (WebUtils.isIncludeRequest(request)) {
            attributesSnapshot = new HashMap();
            Enumeration attrNames = request.getAttributeNames();

            label108:
            while(true) {
                String attrName;
                do {
                    if (!attrNames.hasMoreElements()) {
                        break label108;
                    }

                    attrName = (String)attrNames.nextElement();
                } while(!this.cleanupAfterInclude && !attrName.startsWith("org.springframework.web.servlet"));

                attributesSnapshot.put(attrName, request.getAttribute(attrName));
            }
        }

        request.setAttribute(WEB_APPLICATION_CONTEXT_ATTRIBUTE, this.getWebApplicationContext());
        request.setAttribute(LOCALE_RESOLVER_ATTRIBUTE, this.localeResolver);
        request.setAttribute(THEME_RESOLVER_ATTRIBUTE, this.themeResolver);
        request.setAttribute(THEME_SOURCE_ATTRIBUTE, this.getThemeSource());
        FlashMap inputFlashMap = this.flashMapManager.retrieveAndUpdate(request, response);
        if (inputFlashMap != null) {
            request.setAttribute(INPUT_FLASH_MAP_ATTRIBUTE, Collections.unmodifiableMap(inputFlashMap));
        }

        request.setAttribute(OUTPUT_FLASH_MAP_ATTRIBUTE, new FlashMap());
        request.setAttribute(FLASH_MAP_MANAGER_ATTRIBUTE, this.flashMapManager);

        try {
            this.doDispatch(request, response);
        } finally {
            if (!WebAsyncUtils.getAsyncManager(request).isConcurrentHandlingStarted() && attributesSnapshot != null) {
                this.restoreAttributesAfterInclude(request, attributesSnapshot);
            }

        }

    }
doService方法其实目的就是解析用户的请求路径,根据请求路径找到对应类和方法,使用反射调用.
七丶MyDispatchServlet(自定义前端控制器)
我们自己写代码来实现对应的init方法和Service方法的功能.
package com.spring.mvc.servlet;

import com.spring.mvc.annotation.MyController;
import com.spring.mvc.annotation.MyRequestMapping;

import javax.servlet.ServletException;
import javax.servlet.http.HttpServlet;
import javax.servlet.http.HttpServletRequest;
import javax.servlet.http.HttpServletResponse;
import java.io.File;
import java.io.IOException;
import java.lang.reflect.Method;
import java.net.URL;
import java.util.Enumeration;
import java.util.Map;
import java.util.Set;
import java.util.concurrent.ConcurrentHashMap;
import java.util.concurrent.ConcurrentMap;

/**
 * @Author: ZhengZhe
 * @Description:
 * @Date: Created in 10:56 2019/12/17
 */
public class MyDispatchServlet extends HttpServlet{
    //我们定义两个集合去存储扫描到的带有@MyController 和 @MyRequestMapping注解的类或者方法
    //存放 被@MyRequestMapping注解修饰的类或者方法
    private ConcurrentHashMap<String,Method> MyMethodsCollection = new ConcurrentHashMap();
    //存放 被@MyController注解修饰的类
    private ConcurrentHashMap<String,Object> MyControllerCollection = new ConcurrentHashMap();

    @Override
    protected void doGet(HttpServletRequest req, HttpServletResponse resp) throws ServletException, IOException {

        MyInit(req,resp);

        MyService(req,resp);

    }

    /**
     * 作用是 : 根据配置的包名,扫描所有包含@MyController注解修饰的类和@MyRequestMapping注解修饰的类或者方法
     *并将对应的 beanName放入上面定义的 集合中
     * @param req
     * @param resp
     */
    private void MyInit(HttpServletRequest req, HttpServletResponse resp) {
        //在源码中,有IOC实现了容器的扫描和初始化,MVC中只是直接拿出来,但是这个方法中我们就不通过容器去获取了
        //直接扫描并且存入上面的集合中就可以了
        String basePackage ="com.spring.mvc";
        //根据传入的包路径,扫描包,此时只是将该包下所有的文件资源存入集合中,但是并没有筛选加了@MyController和
        //@RequestMapping注解的类,即扫描所有.class字节码对象并保存起来
        ConcurrentHashMap<String, Class<?>> scannerClass = scannerClass(basePackage);

        //下面直接进行筛选@MyController和@RequestMapping注解的类
        Set<Map.Entry<String, Class<?>>> entrySet = scannerClass.entrySet();
        for (Map.Entry<String, Class<?>> entry : entrySet) {
            //获取key : 类名称
            String className = entry.getKey();
            //获取value : 对应的.class字节码对象
            Class<?> clazz = entry.getValue();
            //定义MyRequestMapping的url
            String classUrl = "";
            try {
                //该类是否标记了MyController注解
                if (clazz.isAnnotationPresent(MyController.class)){
                    //该类是否标记了MyRequestMapping注解
                    if (clazz.isAnnotationPresent(MyRequestMapping.class)){
                        //如果该类被MyRequestMapping注解所标识,获取其属性url值
                        MyRequestMapping requestMapping = clazz.getAnnotation(MyRequestMapping.class);
                        classUrl = requestMapping.value();
                    }
                    //将被标识了MyController注解的类存入集合中
                    MyControllerCollection.put("className",clazz.newInstance());
                    //判断该类中的方法是否标识了@MyRequestMapping注解,如果标识了存入MyMethodsCollection集合中
                    //获取该类下的方法
                    Method[] methods = clazz.getMethods();//获取该类中的方法数组
                    //遍历该数组
                    for (Method method : methods) {
                        //判断是否被@MyRequestMapping注解标识
                        if (method.isAnnotationPresent(MyRequestMapping.class)){
                            //已被@MyRequestMapping注解标识
                            //获取其url
                            MyRequestMapping myRequestMapping = method.getAnnotation(MyRequestMapping.class);
                            //获取method上的url
                            String methodUrl = myRequestMapping.value();
                            //拼接两端MyController和method的url
                            MyMethodsCollection.put(classUrl+methodUrl,method);
                        }
                    }


                }
            } catch (Exception e) {
                e.printStackTrace();
            }
        }
    }
    //根据传入的包路径,进行bean资源的获取,一般可以在xml中设置包路径.但是我们直接给出即可(简单)
    private static ConcurrentHashMap<String, Class<?>> scannerClass(String basePackage) {
        ConcurrentHashMap<String, Class<?>> result = new ConcurrentHashMap<>();
        //把com.spring.mvc 换成com/spring/mvc再类加载器读取文件
        String basePath = basePackage.replaceAll("\\.", "/");
        try {
            //得到com/spring/mvc的绝对地址 /D:xxxxx/com/spring/mvc
            String rootPath = MyDispatchServlet.class.getClassLoader().getResource(basePath).getPath();
            //只留com/ming/mvc 目的为了后续拼接成一个全限定名
            if (rootPath != null) {
                rootPath = rootPath.substring(rootPath.indexOf(basePath));
            }
            Enumeration<URL> enumeration = MyDispatchServlet.class.getClassLoader().getResources(basePath);
            while (enumeration.hasMoreElements()) {
                URL url = enumeration.nextElement();
                if (url.getProtocol().equals("file")) {//如果是个文件
                    File file = new File(url.getPath().substring(1));
                    scannerFile(file, rootPath, result);
                }
            }

        } catch (IOException e) {
            e.printStackTrace();
        }
        return result;

    }

    //递归扫描文件
    private static void scannerFile(File folder, String rootPath, ConcurrentHashMap<String, Class<?>> classes) {
        try {
            File[] files = folder.listFiles();
            for (int i = 0; files != null && i < files.length; i++) {
                File file = files[i];
                if (file.isDirectory()) {
                    scannerFile(file, rootPath + file.getName() + "/", classes);
                } else {
                    if (file.getName().endsWith(".class")) {
                        String className = (rootPath + file.getName()).replaceAll("/", ".");
                        className = className.substring(0, className.indexOf(".class"));//去掉扩展名得到全限定名
                        //Map容器存储全限定名和Class
                        classes.put(className, Class.forName(className));
                    }
                }

            }
        } catch (Exception e) {
            e.printStackTrace();
        }
    }


    /**
     * 作用是 : 解析用户的请求路径,,根据请求路径找到对应的类和方法,并使用反射调用其方法
     * @param req
     * @param resp
     */
    private void MyService(HttpServletRequest req, HttpServletResponse resp) {
        //在MyInit中我们已将被@MyController和@MyRequestMapping注解标识的类或者方法存入对应的集合中了;
        //下面我们需要将网络请求中的url和我们容器中初始化好的url进行匹配,如果匹配成功,那么直接执行此方法
        //返回除去host(域名或者ip)部分的路径(包含)
        String requestURI = req.getRequestURI();//类似test/test
        //返回工程名部分,如果工程映射为/,此处返回则为空 (工程名即项目名)
        String contextPath = req.getContextPath();//类似test
        //获取实际除 ip,端口,项目名外的请求路径
        //如web.xml中的servlet拦截路径设置的为/* 采用下面的方法,如果采用的是/*.do或者/*.action类似的后缀,需要把后面的也去掉
        String requestMappingPath = requestURI.substring(contextPath.length());
        //通过截取到的实际的请求url为key获取对应的方法
        Method method = MyMethodsCollection.get(requestMappingPath);
        try {
            if (method == null){
                //此时就是大名鼎鼎的404 了~
                //直接返回404
                resp.sendError(404);
                return;
            }
            //存在,那么直接执行
            //获取方法所对应的的class<?>字节码文件
            Class<?> declaringClass = method.getDeclaringClass();
            //下面按照源码来说还需要去判断是否是单例等操作,我们直接省去
            method.invoke(declaringClass.newInstance());
        } catch (Exception e) {
            e.printStackTrace();
        }
    }

    @Override
    protected void doPost(HttpServletRequest req, HttpServletResponse resp) throws ServletException, IOException {
        System.out.println("这是调用了doPost方法");
    }
}
八丶创建ControllerTest测试类
package com.spring.mvc.controller;

import com.spring.mvc.annotation.MyController;
import com.spring.mvc.annotation.MyRequestMapping;

import javax.servlet.http.HttpServlet;
import javax.servlet.http.HttpServletResponse;
import java.io.IOException;
import java.io.PrintWriter;
import java.util.HashMap;
import java.util.Map;

/**
 * @Author: ZhengZhe
 * @Description:
 * @Date: Created in 15:07 2019/12/17
 */
@MyController
@MyRequestMapping("/hello")
public class ControllerTest {


    @MyRequestMapping("/world")
    public void helloworld(){
        System.out.println("自定义MVC测试成功~ ,现在时间是"+System.currentTimeMillis());
    }
}
查看控制台输出:
信息: At least one JAR was scanned for TLDs yet contained no TLDs. Enable debug logging for this logger for a complete list of JARs that were scanned but no TLDs were found in them. Skipping unneeded JARs during scanning can improve startup time and JSP compilation time.
[2019-12-17 03:33:26,276] Artifact mvc:war exploded: Artifact is deployed successfully
[2019-12-17 03:33:26,276] Artifact mvc:war exploded: Deploy took 565 milliseconds
自定义MVC测试成功~ ,现在时间是1576568012163
————————————————
本人免费整理了Java高级资料,涵盖了Java、Redis、MongoDB、MySQL、Zookeeper、Spring Cloud、Dubbo高并发分布式等教程,一共30G,需要自己领取。
传送门:https://mp.weixin.qq.com/s/osB-BOl6W-ZLTSttTkqMPQ
原文链接:https://www.cnblogs.com/yunxi520/p/12063637.html
如有疑问请与原作者联系
标签:
版权申明:本站文章部分自网络,如有侵权,请联系:west999com@outlook.com
特别注意:本站所有转载文章言论不代表本站观点,本站所提供的摄影照片,插画,设计作品,如需使用,请与原作者联系,版权归原作者所有

上一篇:Socket编程
下一篇:微信公众平台后台配置自定义菜单
- springboot2配置JavaMelody与springMVC配置JavaMelody 2020-06-11
- 老板让你抗住千万级流量,如何做架构设计? 2020-06-11
- 聊聊微服务架构及分布式事务解决方案! 2020-06-10
- 来看看阿里架构师Java 代码打日志姿势!你也是这样写的吗 2020-06-08
- 【从单体架构到分布式架构】(二)请求增多,单点变集群(1) 2020-06-07
IDC资讯: 主机资讯 注册资讯 托管资讯 vps资讯 网站建设
网站运营: 建站经验 策划盈利 搜索优化 网站推广 免费资源
网络编程: Asp.Net编程 Asp编程 Php编程 Xml编程 Access Mssql Mysql 其它
服务器技术: Web服务器 Ftp服务器 Mail服务器 Dns服务器 安全防护
软件技巧: 其它软件 Word Excel Powerpoint Ghost Vista QQ空间 QQ FlashGet 迅雷
网页制作: FrontPages Dreamweaver Javascript css photoshop fireworks Flash
