
Dubbo(三):深入理解Dubbo源码之如何实现服务…
2020-02-12 16:01:34来源:博客园 阅读 ()

Dubbo(三):深入理解Dubbo源码之如何实现服务引用
一、前言
前面讲了服务是如何导出到注册中心的。其实Dubbo做的一件事就是将服务的URL发布到注册中心上。那现在我们聊一聊消费者一方如何从注册中心订阅服务并进行远程调用的。
二、引用服务时序图
首先总的来用文字说一遍内部的大致机制
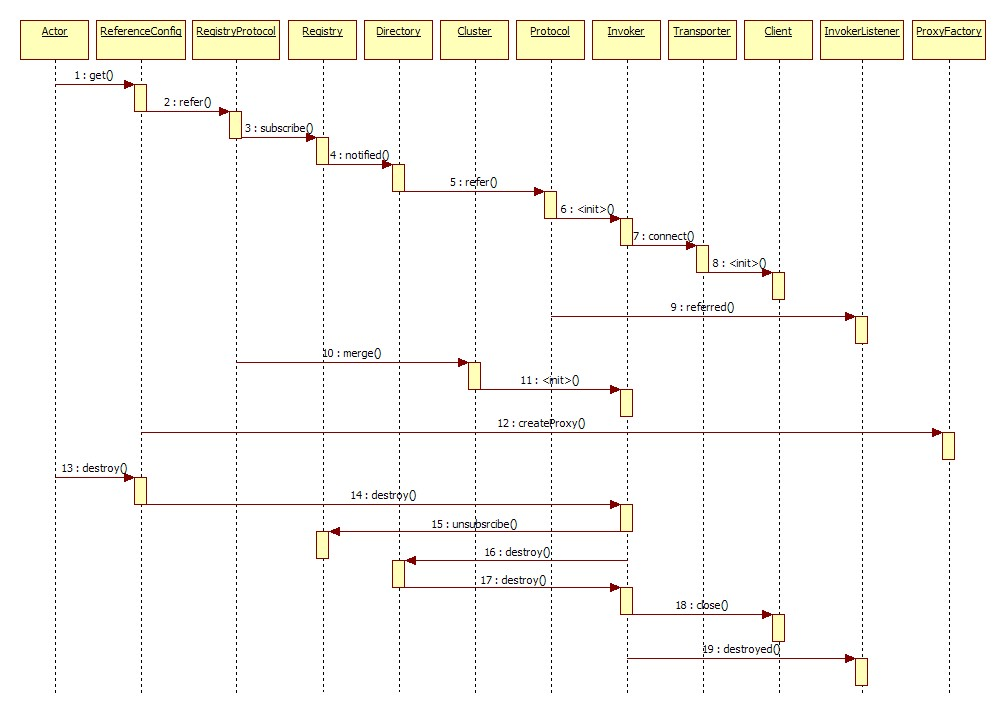
Actor:可以当做我们的消费者。当我们使用@Reference注解将对应服务注入到其他类中这时候Spring会第一时间调用getObject方法,而getObject中只有一个方法就是get()。这里可以理解为消费者开始引入服务了。
饿汉式:在 Spring 容器调用 ReferenceBean 的 afterPropertiesSet 方法时引用服务。
懒汉式:在 ReferenceBean 对应的服务被注入到其他类中时引用。Dubbo默认使用懒汉式。
ReferenceConfig:通过get方法其实是进入到ReferenceConfig类中执行init()方法。在这个方法里主要做了下面几件事情:
1,、对@Reference标注的接口查看是否合法,检查该接口是不是存在泛型
2、在系统中拿到dubbo.resolve.file这个文件,这个文件是进行配置consumer的接口的。将配置好的consumer信息存到URL中
3、将配置好的ApplicationConfig、ConsumerConfig、ReferenceConfig、MethodConfig,以及消费者的IP地址存到系统的上下文中
4、接下来开始创建代理对象进入到ReferenceConfig的createProxy 。这里还是在ReferenceConfig类中。上面的那些配置统统传入该方法中。上面有提到resolve解析consumer为URL,现在就根据这个URL首先判断是否远程调用还是本地调用。
4.1若是本地调用,则调用 InjvmProtocol 的 refer 方法生成 InjvmInvoker 实例
4.2若是远程调用,则读取直连配置项,或注册中心 url,并将读取到的 url 存储到 urls 中。然后根据 urls 元素数量进行后续操作。若 urls 元素数量为1,则直接通过 Protocol 自适应拓展类即RegistryProtocol类或者DubboProtocol构建 Invoker 实例接口,这得看URL前面的是registry://开头还是以dubbo://。若 urls 元素数量大于1,即存在多个注册中心或服务直连 url,此时先根据 url 构建 Invoker。然后再通过 Cluster 合并即merge多个 Invoker,最后调用 ProxyFactory 生成代理类。
RegistryProtocol:在refer方法中首先为 url 设置协议头,然后根据 url 参数加载注册中心实例。然后获取 group 配置,根据 group 配置决定 doRefer 第一个参数的类型。doRefer 方法创建一个 RegistryDirectory 实例,然后生成服务消费者链接,通过registry.register方法向注册中心注册消费者的链接,然后通过directory.subscribe向注册中心订阅 providers、configurators、routers 等节点下的数据。完成订阅后,RegistryDirectory 会收到这几个节点下的子节点信息。由于一个服务可能部署在多台服务器上,这样就会在 providers 产生多个节点,这个时候就需要 Cluster 将多个服务节点合并为一个,并生成一个 Invoker。同样Invoker创建过程先不分析,后面会拿一章专门介绍。
ProxyFactory:Invoker 创建完毕后,接下来要做的事情是为服务接口生成代理对象。有了代理对象,即可进行远程调用。代理对象生成的入口方法为的getProxy。获取需要创建的接口列表,组合成数组。而后将该接口数组传入 Proxy 的 getProxy 方法获取 Proxy 子类,然后创建 InvokerInvocationHandler 对象,并将该对象传给 newInstance 生成 Proxy 实例。InvokerInvocationHandler 实现 JDK 的 InvocationHandler 接口,具体的用途是拦截接口类调用。可以理解为AOP或拦截器。也就是在获取该对象之前会调用到Proxy实例而不会调用到服务提供者对应的类。至于如何创建proxy实例,请看后面源码的注释。
三、Dubbo源码
服务引用入口源码ReferenceBean的getObject方法:


 1 public Object getObject() throws Exception {
 2     return get();
 3 }
 4
 5 public synchronized T get() {
 6     if (destroyed) {
 7         throw new IllegalStateException("Already destroyed!");
 8     }
 9     // 检测 ref 是否为空,为空则通过 init 方法创建
10     if (ref == null) {
11         // init 方法主要用于处理配置,以及调用 createProxy 生成代理类
12         init();
13     }
14     return ref;
15 }
View Code
ReferenceConfig 的 init 进行消费者一方的配置:
对源码进行了分割,方便理清逻辑
  1 private void init() {
  2     // 避免重复初始化
  3     if (initialized) {
  4         return;
  5     }
  6     initialized = true;
  7     // 检测接口名合法性
  8     if (interfaceName == null || interfaceName.length() == 0) {
  9         throw new IllegalStateException("interface not allow null!");
 10     }
 11
 12     // 检测 consumer 变量是否为空,为空则创建
 13     checkDefault();
 14     appendProperties(this);
 15     if (getGeneric() == null && getConsumer() != null) {
 16         // 设置 generic
 17         setGeneric(getConsumer().getGeneric());
 18     }
 19
 20     // 检测是否为泛化接口
 21     if (ProtocolUtils.isGeneric(getGeneric())) {
 22         interfaceClass = GenericService.class;
 23     } else {
 24         try {
 25             // 加载类
 26             interfaceClass = Class.forName(interfaceName, true, Thread.currentThread()
 27                     .getContextClassLoader());
 28         } catch (ClassNotFoundException e) {
 29             throw new IllegalStateException(e.getMessage(), e);
 30         }
 31         checkInterfaceAndMethods(interfaceClass, methods);
 32     }
 33
 34     // -------------------------------分割线1------------------------------
 35
 36     // 从系统变量中获取与接口名对应的属性值
 37     String resolve = System.getProperty(interfaceName);
 38     String resolveFile = null;
 39     if (resolve == null || resolve.length() == 0) {
 40         // 从系统属性中获取解析文件路径
 41         resolveFile = System.getProperty("dubbo.resolve.file");
 42         if (resolveFile == null || resolveFile.length() == 0) {
 43             // 从指定位置加载配置文件
 44             File userResolveFile = new File(new File(System.getProperty("user.home")), "dubbo-resolve.properties");
 45             if (userResolveFile.exists()) {
 46                 // 获取文件绝对路径
 47                 resolveFile = userResolveFile.getAbsolutePath();
 48             }
 49         }
 50         if (resolveFile != null && resolveFile.length() > 0) {
 51             Properties properties = new Properties();
 52             FileInputStream fis = null;
 53             try {
 54                 fis = new FileInputStream(new File(resolveFile));
 55                 // 从文件中加载配置
 56                 properties.load(fis);
 57             } catch (IOException e) {
 58                 throw new IllegalStateException("Unload ..., cause:...");
 59             } finally {
 60                 try {
 61                     if (null != fis) fis.close();
 62                 } catch (IOException e) {
 63                     logger.warn(e.getMessage(), e);
 64                 }
 65             }
 66             // 获取与接口名对应的配置
 67             resolve = properties.getProperty(interfaceName);
 68         }
 69     }
 70     if (resolve != null && resolve.length() > 0) {
 71         // 将 resolve 赋值给 url
 72         url = resolve;
 73     }
 74
 75     // -------------------------------分割线2------------------------------
 76     if (consumer != null) {
 77         if (application == null) {
 78             // 从 consumer 中获取 Application 实例,下同
 79             application = consumer.getApplication();
 80         }
 81         if (module == null) {
 82             module = consumer.getModule();
 83         }
 84         if (registries == null) {
 85             registries = consumer.getRegistries();
 86         }
 87         if (monitor == null) {
 88             monitor = consumer.getMonitor();
 89         }
 90     }
 91     if (module != null) {
 92         if (registries == null) {
 93             registries = module.getRegistries();
 94         }
 95         if (monitor == null) {
 96             monitor = module.getMonitor();
 97         }
 98     }
 99     if (application != null) {
100         if (registries == null) {
101             registries = application.getRegistries();
102         }
103         if (monitor == null) {
104             monitor = application.getMonitor();
105         }
106     }
107
108     // 检测 Application 合法性
109     checkApplication();
110     // 检测本地存根配置合法性
111     checkStubAndMock(interfaceClass);
112
113     // -------------------------------分割线3------------------------------
114
115     Map<String, String> map = new HashMap<String, String>();
116     Map<Object, Object> attributes = new HashMap<Object, Object>();
117
118     // 添加 side、协议版本信息、时间戳和进程号等信息到 map 中
119     map.put(Constants.SIDE_KEY, Constants.CONSUMER_SIDE);
120     map.put(Constants.DUBBO_VERSION_KEY, Version.getProtocolVersion());
121     map.put(Constants.TIMESTAMP_KEY, String.valueOf(System.currentTimeMillis()));
122     if (ConfigUtils.getPid() > 0) {
123         map.put(Constants.PID_KEY, String.valueOf(ConfigUtils.getPid()));
124     }
125
126     // 非泛化服务
127     if (!isGeneric()) {
128         // 获取版本
129         String revision = Version.getVersion(interfaceClass, version);
130         if (revision != null && revision.length() > 0) {
131             map.put("revision", revision);
132         }
133
134         // 获取接口方法列表,并添加到 map 中
135         String[] methods = Wrapper.getWrapper(interfaceClass).getMethodNames();
136         if (methods.length == 0) {
137             map.put("methods", Constants.ANY_VALUE);
138         } else {
139             map.put("methods", StringUtils.join(new HashSet<String>(Arrays.asList(methods)), ","));
140         }
141     }
142     map.put(Constants.INTERFACE_KEY, interfaceName);
143     // 将 ApplicationConfig、ConsumerConfig、ReferenceConfig 等对象的字段信息添加到 map 中
144     appendParameters(map, application);
145     appendParameters(map, module);
146     appendParameters(map, consumer, Constants.DEFAULT_KEY);
147     appendParameters(map, this);
148
149     // -------------------------------分割线4------------------------------
150
151     String prefix = StringUtils.getServiceKey(map);
152     if (methods != null && !methods.isEmpty()) {
153         // 遍历 MethodConfig 列表
154         for (MethodConfig method : methods) {
155             appendParameters(map, method, method.getName());
156             String retryKey = method.getName() + ".retry";
157             // 检测 map 是否包含 methodName.retry
158             if (map.containsKey(retryKey)) {
159                 String retryValue = map.remove(retryKey);
160                 if ("false".equals(retryValue)) {
161                     // 添加重试次数配置 methodName.retries
162                     map.put(method.getName() + ".retries", "0");
163                 }
164             }
165
166             // 添加 MethodConfig 中的“属性”字段到 attributes
167             // 比如 onreturn、onthrow、oninvoke 等
168             appendAttributes(attributes, method, prefix + "." + method.getName());
169             checkAndConvertImplicitConfig(method, map, attributes);
170         }
171     }
172
173     // -------------------------------? 分割线5 ?------------------------------
174
175     // 获取服务消费者 ip 地址
176     String hostToRegistry = ConfigUtils.getSystemProperty(Constants.DUBBO_IP_TO_REGISTRY);
177     if (hostToRegistry == null || hostToRegistry.length() == 0) {
178         hostToRegistry = NetUtils.getLocalHost();
179     } else if (isInvalidLocalHost(hostToRegistry)) {
180         throw new IllegalArgumentException("Specified invalid registry ip from property..." );
181     }
182     map.put(Constants.REGISTER_IP_KEY, hostToRegistry);
183
184     // 存储 attributes 到系统上下文中
185     StaticContext.getSystemContext().putAll(attributes);
186
187     // 创建代理类
188     ref = createProxy(map);
189
190     // 根据服务名,ReferenceConfig,代理类构建 ConsumerModel,
191     // 并将 ConsumerModel 存入到 ApplicationModel 中
192     ConsumerModel consumerModel = new ConsumerModel(getUniqueServiceName(), this, ref, interfaceClass.getMethods());
193     ApplicationModel.initConsumerModel(getUniqueServiceName(), consumerModel);
194 }
View Code
ReferenceConfig 的 createProxy 创建代理对象:
但是不是在这个方法内创建proxy实例,而是对URL进行解析后分三种创建Invoker线路,包括InjvmProtocol中的refer、DubboProtocol的refer与RegistryProtocol中的refer,最后再调用ProxyFactory来对proxy实例进行创建:
  1 private T createProxy(Map<String, String> map) {
  2     URL tmpUrl = new URL("temp", "localhost", 0, map);
  3     final boolean isJvmRefer;
  4     if (isInjvm() == null) {
  5         // url 配置被指定,则不做本地引用
  6         if (url != null && url.length() > 0) {
  7             isJvmRefer = false;
  8         // 根据 url 的协议、scope 以及 injvm 等参数检测是否需要本地引用
  9         // 比如如果用户显式配置了 scope=local,此时 isInjvmRefer 返回 true
 10         } else if (InjvmProtocol.getInjvmProtocol().isInjvmRefer(tmpUrl)) {
 11             isJvmRefer = true;
 12         } else {
 13             isJvmRefer = false;
 14         }
 15     } else {
 16         // 获取 injvm 配置值
 17         isJvmRefer = isInjvm().booleanValue();
 18     }
 19
 20     // 本地引用
 21     if (isJvmRefer) {
 22         // 生成本地引用 URL,协议为 injvm
 23         URL url = new URL(Constants.LOCAL_PROTOCOL, NetUtils.LOCALHOST, 0, interfaceClass.getName()).addParameters(map);
 24         // 调用 refer 方法构建 InjvmInvoker 实例
 25         invoker = refprotocol.refer(interfaceClass, url);
 26
 27     // 远程引用
 28     } else {
 29         // url 不为空,表明用户可能想进行点对点调用
 30         if (url != null && url.length() > 0) {
 31             // 当需要配置多个 url 时,可用分号进行分割,这里会进行切分
 32             String[] us = Constants.SEMICOLON_SPLIT_PATTERN.split(url);
 33             if (us != null && us.length > 0) {
 34                 for (String u : us) {
 35                     URL url = URL.valueOf(u);
 36                     if (url.getPath() == null || url.getPath().length() == 0) {
 37                         // 设置接口全限定名为 url 路径
 38                         url = url.setPath(interfaceName);
 39                     }
 40
 41                     // 检测 url 协议是否为 registry,若是,表明用户想使用指定的注册中心
 42                     if (Constants.REGISTRY_PROTOCOL.equals(url.getProtocol())) {
 43                         // 将 map 转换为查询字符串,并作为 refer 参数的值添加到 url 中
 44                         urls.add(url.addParameterAndEncoded(Constants.REFER_KEY, StringUtils.toQueryString(map)));
 45                     } else {
 46                         // 合并 url,移除服务提供者的一些配置(这些配置来源于用户配置的 url 属性),
 47                         // 比如线程池相关配置。并保留服务提供者的部分配置,比如版本,group,时间戳等
 48                         // 最后将合并后的配置设置为 url 查询字符串中。
 49                         urls.add(ClusterUtils.mergeUrl(url, map));
 50                     }
 51                 }
 52             }
 53         } else {
 54             // 加载注册中心 url
 55             List<URL> us = loadRegistries(false);
 56             if (us != null && !us.isEmpty()) {
 57                 for (URL u : us) {
 58                     URL monitorUrl = loadMonitor(u);
 59                     if (monitorUrl != null) {
 60                         map.put(Constants.MONITOR_KEY, URL.encode(monitorUrl.toFullString()));
 61                     }
 62                     // 添加 refer 参数到 url 中,并将 url 添加到 urls 中
 63                     urls.add(u.addParameterAndEncoded(Constants.REFER_KEY, StringUtils.toQueryString(map)));
 64                 }
 65             }
 66
 67             // 未配置注册中心,抛出异常
 68             if (urls.isEmpty()) {
 69                 throw new IllegalStateException("No such any registry to reference...");
 70             }
 71         }
 72
 73         // 单个注册中心或服务提供者(服务直连,下同)
 74         if (urls.size() == 1) {
 75             // 调用 RegistryProtocol 的 refer 构建 Invoker 实例
 76             invoker = refprotocol.refer(interfaceClass, urls.get(0));
 77
 78         // 多个注册中心或多个服务提供者,或者两者混合
 79         } else {
 80             List<Invoker<?>> invokers = new ArrayList<Invoker<?>>();
 81             URL registryURL = null;
 82
 83             // 获取所有的 Invoker
 84             for (URL url : urls) {
 85                 // 通过 refprotocol 调用 refer 构建 Invoker,refprotocol 会在运行时
 86                 // 根据 url 协议头加载指定的 Protocol 实例,并调用实例的 refer 方法
 87                 invokers.add(refprotocol.refer(interfaceClass, url));
 88                 if (Constants.REGISTRY_PROTOCOL.equals(url.getProtocol())) {
 89                     registryURL = url;
 90                 }
 91             }
 92             if (registryURL != null) {
 93                 // 如果注册中心链接不为空,则将使用 AvailableCluster
 94                 URL u = registryURL.addParameter(Constants.CLUSTER_KEY, AvailableCluster.NAME);
 95                 // 创建 StaticDirectory 实例,并由 Cluster 对多个 Invoker 进行合并
 96                 invoker = cluster.join(new StaticDirectory(u, invokers));
 97             } else {
 98                 invoker = cluster.join(new StaticDirectory(invokers));
 99             }
100         }
101     }
102
103     Boolean c = check;
104     if (c == null && consumer != null) {
105         c = consumer.isCheck();
106     }
107     if (c == null) {
108         c = true;
109     }
110
111     // invoker 可用性检查
112     if (c && !invoker.isAvailable()) {
113         throw new IllegalStateException("No provider available for the service...");
114     }
115
116     // 生成代理类
117     return (T) proxyFactory.getProxy(invoker);
118 }
View Code
同样Invoker的创建后面会专门拿一篇来讲。暂时先把Invoker创建看成一个黑盒,只要我们调用即可。
RegistryProtocol中的refer:
 1 public <T> Invoker<T> refer(Class<T> type, URL url) throws RpcException {
 2     // 取 registry 参数值,并将其设置为协议头
 3     url = url.setProtocol(url.getParameter(Constants.REGISTRY_KEY, Constants.DEFAULT_REGISTRY)).removeParameter(Constants.REGISTRY_KEY);
 4     // 获取注册中心实例
 5     Registry registry = registryFactory.getRegistry(url);
 6     if (RegistryService.class.equals(type)) {
 7         return proxyFactory.getInvoker((T) registry, type, url);
 8     }
 9
10     // 将 url 查询字符串转为 Map
11     Map<String, String> qs = StringUtils.parseQueryString(url.getParameterAndDecoded(Constants.REFER_KEY));
12     // 获取 group 配置
13     String group = qs.get(Constants.GROUP_KEY);
14     if (group != null && group.length() > 0) {
15         if ((Constants.COMMA_SPLIT_PATTERN.split(group)).length > 1
16                 || "*".equals(group)) {
17             // 通过 SPI 加载 MergeableCluster 实例,并调用 doRefer 继续执行服务引用逻辑
18             return doRefer(getMergeableCluster(), registry, type, url);
19         }
20     }
21
22     // 调用 doRefer 继续执行服务引用逻辑
23     return doRefer(cluster, registry, type, url);
24 }
25 private <T> Invoker<T> doRefer(Cluster cluster, Registry registry, Class<T> type, URL url) {
26     // 创建 RegistryDirectory 实例
27     RegistryDirectory<T> directory = new RegistryDirectory<T>(type, url);
28     // 设置注册中心和协议
29     directory.setRegistry(registry);
30     directory.setProtocol(protocol);
31     Map<String, String> parameters = new HashMap<String, String>(directory.getUrl().getParameters());
32     // 生成服务消费者链接
33     URL subscribeUrl = new URL(Constants.CONSUMER_PROTOCOL, parameters.remove(Constants.REGISTER_IP_KEY), 0, type.getName(), parameters);
34
35     // 注册服务消费者,在 consumers 目录下新节点
36     if (!Constants.ANY_VALUE.equals(url.getServiceInterface())
37             && url.getParameter(Constants.REGISTER_KEY, true)) {
38         registry.register(subscribeUrl.addParameters(Constants.CATEGORY_KEY, Constants.CONSUMERS_CATEGORY,
39                 Constants.CHECK_KEY, String.valueOf(false)));
40     }
41
42     // 订阅 providers、configurators、routers 等节点数据
43     directory.subscribe(subscribeUrl.addParameter(Constants.CATEGORY_KEY,
44             Constants.PROVIDERS_CATEGORY
45                     + "," + Constants.CONFIGURATORS_CATEGORY
46                     + "," + Constants.ROUTERS_CATEGORY));
47
48     // 一个注册中心可能有多个服务提供者,因此这里需要将多个服务提供者合并为一个
49     Invoker invoker = cluster.join(directory);
50     ProviderConsumerRegTable.registerConsumer(invoker, url, subscribeUrl, directory);
51     return invoker;
52 }
View Code
在Invoker创建完后会返回到ReferenceConfig中,然后进入ProxyFactory中的getProxy方法。
ProxyFactory中的getProxy方法:
 1 public <T> T getProxy(Invoker<T> invoker) throws RpcException {
 2     // 调用重载方法
 3     return getProxy(invoker, false);
 4 }
 5
 6 public <T> T getProxy(Invoker<T> invoker, boolean generic) throws RpcException {
 7     Class<?>[] interfaces = null;
 8     // 获取接口列表
 9     String config = invoker.getUrl().getParameter("interfaces");
10     if (config != null && config.length() > 0) {
11         // 切分接口列表
12         String[] types = Constants.COMMA_SPLIT_PATTERN.split(config);
13         if (types != null && types.length > 0) {
14             interfaces = new Class<?>[types.length + 2];
15             // 设置服务接口类和 EchoService.class 到 interfaces 中
16             interfaces[0] = invoker.getInterface();
17             interfaces[1] = EchoService.class;
18             for (int i = 0; i < types.length; i++) {
19                 // 加载接口类
20                 interfaces[i + 1] = ReflectUtils.forName(types[i]);
21             }
22         }
23     }
24     if (interfaces == null) {
25         interfaces = new Class<?>[]{invoker.getInterface(), EchoService.class};
26     }
27
28     // 为 http 和 hessian 协议提供泛化调用支持,参考 pull request #1827
29     if (!invoker.getInterface().equals(GenericService.class) && generic) {
30         int len = interfaces.length;
31         Class<?>[] temp = interfaces;
32         // 创建新的 interfaces 数组
33         interfaces = new Class<?>[len + 1];
34         System.arraycopy(temp, 0, interfaces, 0, len);
35         // 设置 GenericService.class 到数组中
36         interfaces[len] = GenericService.class;
37     }
38
39     // 调用重载方法
40     return getProxy(invoker, interfaces);
41 }
42
43 public abstract <T> T getProxy(Invoker<T> invoker, Class<?>[] types);
View Code
在上面的代码主要是获取接口数组再通过抽象的getProxy进入到Proxy中的getProxy。
1 public <T> T getProxy(Invoker<T> invoker, Class<?>[] interfaces) {
2     // 生成 Proxy 子类(Proxy 是抽象类)。并调用 Proxy 子类的 newInstance 方法创建 Proxy 实例
3     return (T) Proxy.getProxy(interfaces).newInstance(new InvokerInvocationHandler(invoker));
4 }
View Code
代码具体分析上面有写。接下来进入到Proxy子类的getProxy中
  1 public static Proxy getProxy(Class<?>... ics) {
  2     // 调用重载方法
  3     return getProxy(ClassHelper.getClassLoader(Proxy.class), ics);
  4 }
  5
  6 public static Proxy getProxy(ClassLoader cl, Class<?>... ics) {
  7     if (ics.length > 65535)
  8         throw new IllegalArgumentException("interface limit exceeded");
  9
 10     StringBuilder sb = new StringBuilder();
 11     // 遍历接口列表
 12     for (int i = 0; i < ics.length; i++) {
 13         String itf = ics[i].getName();
 14         // 检测类型是否为接口
 15         if (!ics[i].isInterface())
 16             throw new RuntimeException(itf + " is not a interface.");
 17
 18         Class<?> tmp = null;
 19         try {
 20             // 重新加载接口类
 21             tmp = Class.forName(itf, false, cl);
 22         } catch (ClassNotFoundException e) {
 23         }
 24
 25         // 检测接口是否相同,这里 tmp 有可能为空
 26         if (tmp != ics[i])
 27             throw new IllegalArgumentException(ics[i] + " is not visible from class loader");
 28
 29         // 拼接接口全限定名,分隔符为 ;
 30         sb.append(itf).append(';');
 31     }
 32
 33     // 使用拼接后的接口名作为 key
 34     String key = sb.toString();
 35
 36     Map<String, Object> cache;
 37     synchronized (ProxyCacheMap) {
 38         cache = ProxyCacheMap.get(cl);
 39         if (cache == null) {
 40             cache = new HashMap<String, Object>();
 41             ProxyCacheMap.put(cl, cache);
 42         }
 43     }
 44
 45     Proxy proxy = null;
 46     synchronized (cache) {
 47         do {
 48             // 从缓存中获取 Reference<Proxy> 实例
 49             Object value = cache.get(key);
 50             if (value instanceof Reference<?>) {
 51                 proxy = (Proxy) ((Reference<?>) value).get();
 52                 if (proxy != null) {
 53                     return proxy;
 54                 }
 55             }
 56
 57             // 并发控制,保证只有一个线程可以进行后续操作
 58             if (value == PendingGenerationMarker) {
 59                 try {
 60                     // 其他线程在此处进行等待
 61                     cache.wait();
 62                 } catch (InterruptedException e) {
 63                 }
 64             } else {
 65                 // 放置标志位到缓存中,并跳出 while 循环进行后续操作
 66                 cache.put(key, PendingGenerationMarker);
 67                 break;
 68             }
 69         }
 70         while (true);
 71     }
 72
 73     long id = PROXY_CLASS_COUNTER.getAndIncrement();
 74     String pkg = null;
 75     ClassGenerator ccp = null, ccm = null;
 76     try {
 77         // 创建 ClassGenerator 对象
 78         ccp = ClassGenerator.newInstance(cl);
 79
 80         Set<String> worked = new HashSet<String>();
 81         List<Method> methods = new ArrayList<Method>();
 82
 83         for (int i = 0; i < ics.length; i++) {
 84             // 检测接口访问级别是否为 protected 或 privete
 85             if (!Modifier.isPublic(ics[i].getModifiers())) {
 86                 // 获取接口包名
 87                 String npkg = ics[i].getPackage().getName();
 88                 if (pkg == null) {
 89                     pkg = npkg;
 90                 } else {
 91                     if (!pkg.equals(npkg))
 92                         // 非 public 级别的接口必须在同一个包下,否者抛出异常
 93                         throw new IllegalArgumentException("non-public interfaces from different packages");
 94                 }
 95             }
 96
 97             // 添加接口到 ClassGenerator 中
 98             ccp.addInterface(ics[i]);
 99
100             // 遍历接口方法
101             for (Method method : ics[i].getMethods()) {
102                 // 获取方法描述,可理解为方法签名
103                 String desc = ReflectUtils.getDesc(method);
104                 // 如果方法描述字符串已在 worked 中,则忽略。考虑这种情况,
105                 // A 接口和 B 接口中包含一个完全相同的方法
106                 if (worked.contains(desc))
107                     continue;
108                 worked.add(desc);
109
110                 int ix = methods.size();
111                 // 获取方法返回值类型
112                 Class<?> rt = method.getReturnType();
113                 // 获取参数列表
114                 Class<?>[] pts = method.getParameterTypes();
115
116                 // 生成 Object[] args = new Object[1...N]
117                 StringBuilder code = new StringBuilder("Object[] args = new Object[").append(pts.length).append("];");
118                 for (int j = 0; j < pts.length; j++)
119                     // 生成 args[1...N] = ($w)$1...N;
120                     code.append(" args[").append(j).append("] = ($w)$").append(j + 1).append(";");
121                 // 生成 InvokerHandler 接口的 invoker 方法调用语句,如下:
122                 // Object ret = handler.invoke(this, methods[1...N], args);
123                 code.append(" Object ret = handler.invoke(this, methods[" + ix + "], args);");
124
125                 // 返回值不为 void
126                 if (!Void.TYPE.equals(rt))
127                     // 生成返回语句,形如 return (java.lang.String) ret;
128                     code.append(" return ").append(asArgument(rt, "ret")).append(";");
129
130                 methods.add(method);
131                 // 添加方法名、访问控制符、参数列表、方法代码等信息到 ClassGenerator 中
132                 ccp.addMethod(method.getName(), method.getModifiers(), rt, pts, method.getExceptionTypes(), code.toString());
133             }
134         }
135
136         if (pkg == null)
137             pkg = PACKAGE_NAME;
138
139         // 构建接口代理类名称:pkg + ".proxy" + id,比如 org.apache.dubbo.proxy0
140         String pcn = pkg + ".proxy" + id;
141         ccp.setClassName(pcn);
142         ccp.addField("public static java.lang.reflect.Method[] methods;");
143         // 生成 private java.lang.reflect.InvocationHandler handler;
144         ccp.addField("private " + InvocationHandler.class.getName() + " handler;");
145
146         // 为接口代理类添加带有 InvocationHandler 参数的构造方法,比如:
147         // porxy0(java.lang.reflect.InvocationHandler arg0) {
148         //     handler=$1;
149         // }
150         ccp.addConstructor(Modifier.PUBLIC, new Class<?>[]{InvocationHandler.class}, new Class<?>[0], "handler=$1;");
151         // 为接口代理类添加默认构造方法
152         ccp.addDefaultConstructor();
153
154         // 生成接口代理类
155         Class<?> clazz = ccp.toClass();
156         clazz.getField("methods").set(null, methods.toArray(new Method[0]));
157
158         // 构建 Proxy 子类名称,比如 Proxy1,Proxy2 等
159         String fcn = Proxy.class.getName() + id;
160         ccm = ClassGenerator.newInstance(cl);
161         ccm.setClassName(fcn);
162         ccm.addDefaultConstructor();
163         ccm.setSuperClass(Proxy.class);
164         // 为 Proxy 的抽象方法 newInstance 生成实现代码,形如:
165         // public Object newInstance(java.lang.reflect.InvocationHandler h) {
166         //     return new org.apache.dubbo.proxy0($1);
167         // }
168         ccm.addMethod("public Object newInstance(" + InvocationHandler.class.getName() + " h){ return new " + pcn + "($1); }");
169         // 生成 Proxy 实现类
170         Class<?> pc = ccm.toClass();
171         // 通过反射创建 Proxy 实例
172         proxy = (Proxy) pc.newInstance();
173     } catch (RuntimeException e) {
174         throw e;
175     } catch (Exception e) {
176         throw new RuntimeException(e.getMessage(), e);
177     } finally {
178         if (ccp != null)
179             // 释放资源
180             ccp.release();
181         if (ccm != null)
182             ccm.release();
183         synchronized (cache) {
184             if (proxy == null)
185                 cache.remove(key);
186             else
187                 // 写缓存
188                 cache.put(key, new WeakReference<Proxy>(proxy));
189             // 唤醒其他等待线程
190             cache.notifyAll();
191         }
192     }
193     return proxy;
194 }
View Code
ccp 用于为服务接口生成代理类,比如我们有一个 DemoService 接口,这个接口代理类就是由 ccp 生成的。ccm 则是用于为 org.apache.dubbo.common.bytecode.Proxy 抽象类生成子类,主要是实现 Proxy 类的抽象方法。
这里需要重点讲一下,因为用到了并发控制。机制是这样的,synchronized中首先获取缓存中 Reference<Proxy> 实例。因为缓存是HashMap结构来存取。key是Reference<Proxy> 实例对应的接口名称,value就是Reference<Proxy> 实例,注意的是接口列表进行拼接了。当第一个线程进入时,key对应的是实例而不是PendingGenerationMarker。所以会进入到else中,else中则设置key的对应的value为标志位PendingGenerationMarker。这样其他线程只能等待,而后对服务接口生产代理类和抽象类的子类。在最后释放资源时,会唤醒其他线程,并且把已经生成过的Reference实例标志成弱引用对象,代表可以回收了。(注:弱引用,比软引用更弱一点,被弱引用关联的对象只能生存到下一次垃圾收集发生之前。当垃圾收集发生时无论内存是否足够,都会回收弱引用对象。具体可以看JVM垃圾回收算法)
四、总结:
到这里应该算是讲完了Dubbo内的服务引用机制。对于Invoker后面会再单独讲。这里还要补充一句如果是集群的话会启动服务降级以及负载均衡每次只选择一个Invoker调用,同样这个后面会再做单独介绍。
原文链接:https://www.cnblogs.com/Cubemen/p/12301188.html
如有疑问请与原作者联系
标签:
版权申明:本站文章部分自网络,如有侵权,请联系:west999com@outlook.com
特别注意:本站所有转载文章言论不代表本站观点,本站所提供的摄影照片,插画,设计作品,如需使用,请与原作者联系,版权归原作者所有

- Dubbo+Zookeeper集群案例 2020-06-09
- 深入解析ThreadLocal和ThreadLocalMap 2020-06-08
- 深入理解:设计模式中的七大设计原则 2020-06-07
- 通俗理解spring源码(六)―― 默认标签(import、alias、be 2020-06-07
- 最强Dubbo面试题,附带超级详细答案 2020-06-06
IDC资讯: 主机资讯 注册资讯 托管资讯 vps资讯 网站建设
网站运营: 建站经验 策划盈利 搜索优化 网站推广 免费资源
网络编程: Asp.Net编程 Asp编程 Php编程 Xml编程 Access Mssql Mysql 其它
服务器技术: Web服务器 Ftp服务器 Mail服务器 Dns服务器 安全防护
软件技巧: 其它软件 Word Excel Powerpoint Ghost Vista QQ空间 QQ FlashGet 迅雷
网页制作: FrontPages Dreamweaver Javascript css photoshop fireworks Flash
