
Mybatis�Ļ���������
2020-03-27 16:07:36��Դ������ �Ķ� ()

Mybatis�Ļ���������
Ŀ¼
- һ������
- ��������
- �Զ��建��
һ������
MyBatis ������һ���dz�ǿ��IJ�ѯ��������,�����Էdz���������úͶ��ơ�MyBatis 3 �еĻ���ʵ�ֵĺܶ�Ľ����Ѿ�ʵ���ˣ�ʹ��������ǿ������������á�mybatisĬ�������ֻ�Ὺ��һ�����棬Ҳ���Ǿֲ��� session �Ự���档
��������Ҫ֪��ʲô�Dz�ѯ���棿��ѯ��������ʲô���ã�
- ���ܣ�mybatis�ṩ��ѯ���棬���ڼ�������ѹ����������ݿ����ܡ�
����ͼ��ÿһ�� session �Ự�����и��ԵĻ��棬����Ǿֲ��ģ�Ҳ������ν��һ�����棺
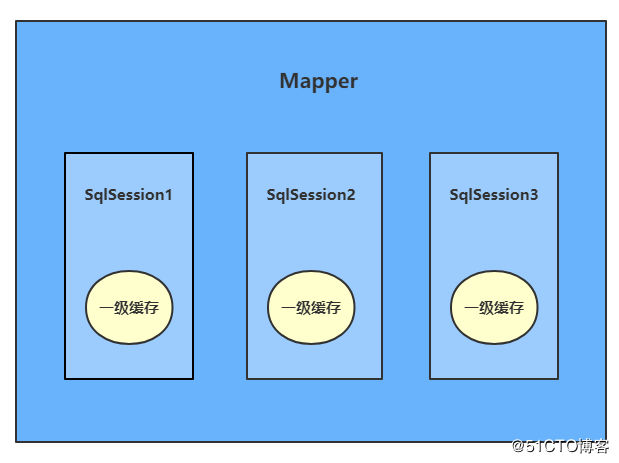
һ��������SqlSession����Ļ��档���Ƕ�֪���ڲ������ݿ�ʱ��Ҫ���� sqlSession������sqlSession��������һ�����ݽṹ��HashMap�����ڴ洢�������ݡ�
����ͼ��
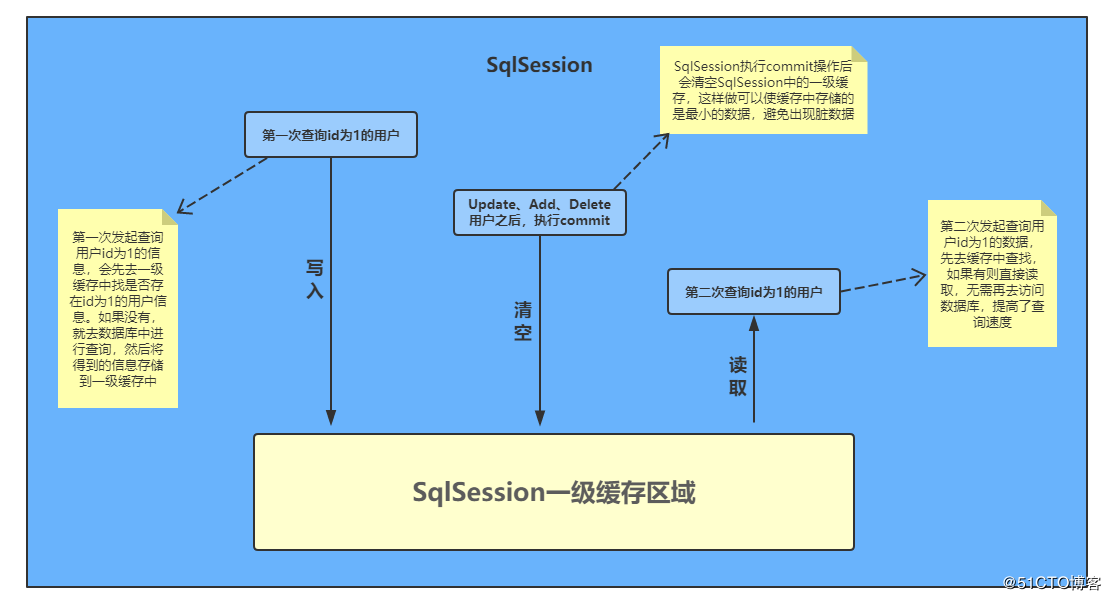
��ͼ�ϣ����ǿ��Կ�����һ�����������Ǹ���SqlSessionΪ��λ���ֵġ�ÿ�β�ѯ�����ȴӻ��������ң�����Ҳ����ͻ�����ݿ��ѯ���ݣ�Ȼ��ѯ��������д��һ�������С�Mybatis�ڲ��洢����ʹ�õ���һ��HashMap����keyΪ hashCode + sqlId + sql ��䡣��valueֵ���ǴӲ�ѯ����ӳ�����ɵ�java����Ϊ�˱�֤������������ݿ϶���ȷ���ݱ��������ÿ�����ǽ��������ĺ�����ɾ���IJ������ͻ�ִ��commit��������ջ�������
���ǿ�����дһ����������������һ��ͬһ�����ݵĵڶ��β�ѯ�Ƿ�û�з������ݿ⣬�������£�
package org.zero01.test;
import org.apache.ibatis.io.Resources;
import org.apache.ibatis.session.*;
import org.json.JSONObject;
import org.junit.Test;
import org.zero01.dao.StudentMapper;
import org.zero01.pojo.Student;
import java.io.IOException;
import java.io.InputStream;
public class TestMybatisCache {
@Test
public void testMybatisCache() throws IOException {
String confPath = "mybatis-config.xml";
InputStream inputStream = Resources.getResourceAsStream(confPath);
SqlSessionFactory sqlSessionFactory = new SqlSessionFactoryBuilder().build(inputStream);
SqlSession sqlSession = sqlSessionFactory.openSession();
StudentMapper studentMapper = sqlSession.getMapper(StudentMapper.class);
// ���е�һ�β�ѯ
Student student1 = studentMapper.selectByPrimaryKey(1);
System.out.println("sqlSession1 ��һ�β�ѯ��" + new JSONObject(student1));
// ���еڶ��β�ѯ
Student student2 = studentMapper.selectByPrimaryKey(1);
System.out.println("sqlSession1 �ڶ��β�ѯ��" + new JSONObject(student2));
sqlSession.close();
}
}
����̨��ӡ�����

���ϣ����Կ���ֻ�е�һ�β�ѯ���������ݿ⡣�ڶ��β�ѯ��û�з������ݿ⣬�Ǵ��ڴ���ֱ�Ӷ�ȡ���������ݡ�
��������Ҳ�ᵽ�ˣ��������������ɾ���ĵ�sql�����������������commit�ύ������SqlSession�е�һ������ͻᱻ��գ����ᵼ�������ݵij��֡�ͬ���ģ����ǿ���ʹ�ò�����������ʾ��һ�㣬�IJ��Դ������£�
est
public void testMybatisCache() throws IOException {
String confPath = "mybatis-config.xml";
InputStream inputStream = Resources.getResourceAsStream(confPath);
SqlSessionFactory sqlSessionFactory = new SqlSessionFactoryBuilder().build(inputStream);
SqlSession sqlSession = sqlSessionFactory.openSession();
StudentMapper studentMapper = sqlSession.getMapper(StudentMapper.class);
// ���е�һ�β�ѯ
Student student1 = studentMapper.selectByPrimaryKey(2);
System.out.println("sqlSession1 ��һ�β�ѯ��" + new JSONObject(student1));
Student stuUpdate = new Student();
stuUpdate.setSid(2);
stuUpdate.setSname("������");
stuUpdate.setAge(21);
int rowCount = studentMapper.updateByPrimaryKeySelective(stuUpdate);
if (rowCount > 0) {
sqlSession.commit();
System.out.println("����student���ݳɹ�");
}
// ���еڶ��β�ѯ
Student student2 = studentMapper.selectByPrimaryKey(2);
System.out.println("sqlSession1 �ڶ��β�ѯ��" + new JSONObject(student2));
sqlSession.close();
}
����̨��ӡ�����

���ϣ����Կ��������ݸ��³ɹ���commit�����SqlSession�е�һ�����棬�ڶ��β�ѯ�ͻ�������ݿ��ѯ���µ������ˡ�
��ͬ��sqlSession֮��Ļ�����������HashMap���ǻ��Ӱ��ġ���������������£��Dz���ʵ�ֿ����session�����ġ���һ��ֵ��ע����ǣ����ڲ�ͬ��sqlSession֮��Ļ������������������ʹ�ö��SqlSession�����ݿ���в���ʱ���ͻ���������ݡ����ǿ�����֮ǰ�IJ�����������ʾ��������IJ��Դ������£�
@Test
public void testMybatisCache() throws IOException {
String confPath = "mybatis-config.xml";
InputStream inputStream = Resources.getResourceAsStream(confPath);
SqlSessionFactory sqlSessionFactory = new SqlSessionFactoryBuilder().build(inputStream);
SqlSession sqlSession1 = sqlSessionFactory.openSession();
SqlSession sqlSession2 = sqlSessionFactory.openSession();
// ʹ��sqlSession1���е�һ�β�ѯ
StudentMapper studentMapper = sqlSession1.getMapper(StudentMapper.class);
Student student = studentMapper.selectByPrimaryKey(1);
System.out.println("sqlSession1 ��һ�β�ѯ��" + new JSONObject(student));
// ʹ��sqlSession2�������ݵĸ���
StudentMapper studentMapper2 = sqlSession2.getMapper(StudentMapper.class);
Student student2 = new Student();
student2.setSid(1);
student2.setSname("������");
student2.setAge(21);
int rowCount = studentMapper2.updateByPrimaryKeySelective(student2);
if (rowCount > 0) {
sqlSession2.commit();
System.out.println("sqlSession2 ����student���ݳɹ�");
}
// ʹ��sqlSession1���еڶ��β�ѯ
student = studentMapper.selectByPrimaryKey(1);
System.out.println("sqlSession1 �ڶ��β�ѯ��" + new JSONObject(student));
sqlSession1.close();
sqlSession2.close();
}
����̨��ӡ���:
sqlSession1 ��һ�β�ѯ��{"address":"����","sname":"С��","sex":"��","age":16,"sid":1,"cid":1}
sqlSession2 ����student���ݳɹ�
sqlSession1 �ڶ��β�ѯ��{"address":"����","sname":"С��","sex":"��","age":16,"sid":1,"cid":1}
�ɴ˿ɼ���Mybatis��һ������ֻ������SqlSession�У�����������ǵIJ�ѯ���ܣ��������ݿ�ѹ�������Dz���ʵ�ֶ�sql��session����������ʹ�ö��SqlSession�������ݿ����������ݡ�
��������
����������mapper����Ļ��棬���SqlSessionȥ����ͬһ��Mapper��sql��䣬���SqlSession���Թ��ö������棬���������ǿ��Ժ���SqlSession�ġ�
ʾ��ͼ��
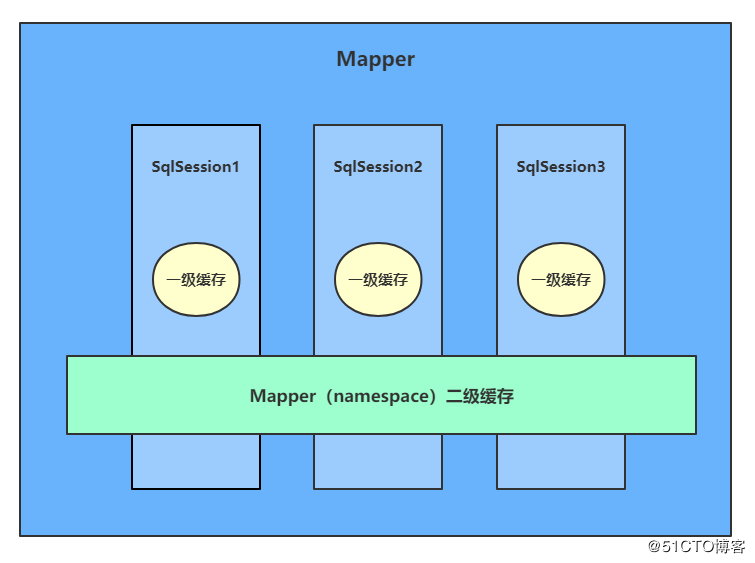
�������������Ǹ���mapper��namespace���ֵģ���ͬnamespace��mapper��ѯ���ݷ���ͬһ���������ʹ��mapper��������ÿ��mapper��namespace����ͬ����ʱ��������Ϊ�������������Ǹ���mapper���֣�Ҳ���Ǹ��������ռ������ֵģ��������mapper�ļ��������ռ�һ������������ͬ��SqlSession֮��Ϳ��Թ���һ��mapper���档
ʾ��ͼ��
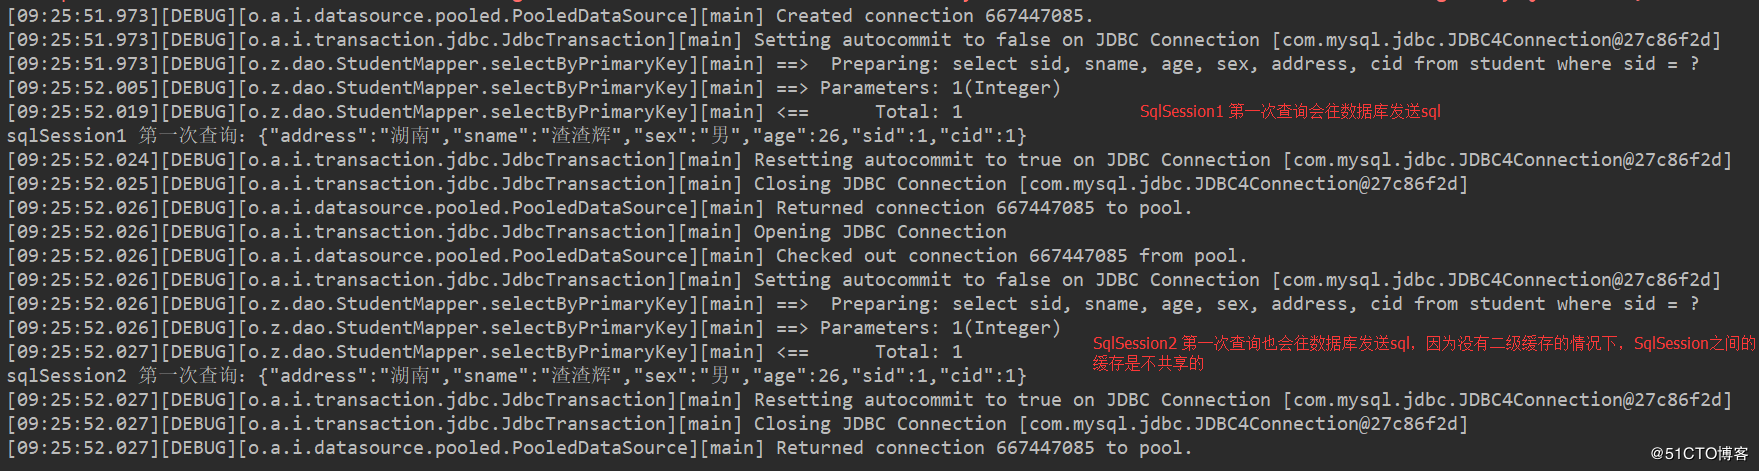
��Ĭ���������û�п�����������ģ����˾ֲ��� session ���档����һ������������Ҳ�����ˣ���ͬ��SqlSession֮���һ�������Dz������ģ������������������SqlSessionȥ��ѯͬһ�����ݣ����������ݿⷢ��sql����һ�㣬����Ҳ����ͨ�������������в��ԣ����Դ������£�
@Test
public void testMybatisCache2() throws IOException {
String confPath = "mybatis-config.xml";
InputStream inputStream = Resources.getResourceAsStream(confPath);
SqlSessionFactory sqlSessionFactory = new SqlSessionFactoryBuilder().build(inputStream);
SqlSession sqlSession1 = sqlSessionFactory.openSession();
SqlSession sqlSession2 = sqlSessionFactory.openSession();
// ʹ��sqlSession1���е�һ�β�ѯ
StudentMapper studentMapper = sqlSession1.getMapper(StudentMapper.class);
Student student = studentMapper.selectByPrimaryKey(1);
System.out.println("sqlSession1 ��һ�β�ѯ��" + new JSONObject(student));
sqlSession1.close();
// ʹ��sqlSession2���е�һ�β�ѯ
StudentMapper studentMapper2 = sqlSession2.getMapper(StudentMapper.class);
Student student2 = studentMapper2.selectByPrimaryKey(1);
System.out.println("sqlSession2 ��һ�β�ѯ��" + new JSONObject(student2));
sqlSession2.close();
}
����̨��������
�����Ҫ�����������棬����Ҫ�����mybatis�������ļ�����룺
<settings>
<!-- ���ڴ������ļ��µ�����cache����ȫ���ԵĿ�/�����á�Ĭ��ֵ��true -->
<setting name="cacheEnabled" value="true"/>
</settings>
Ȼ������Ҫ������� SQL ӳ���ļ�������һ��cache���ü��ɣ�
...
<mapper namespace="org.zero01.dao.StudentMapper">
    ...
    <cache/>
    ...
</mapper>
�����Ͽ��������������������Ч������:
- ӳ������ļ��е����� select ��佫�ᱻ���档
- ӳ������ļ��е����� insert,update �� delete ����ˢ�»��档
- �����ʹ�� Least Recently Used(LRU,�������ʹ�õ�)�㷨���ջء�
- ����ʱ���(���� no Flush Interval,û��ˢ�¼��), ���治�����κ�ʱ��˳�� ��ˢ�¡�
- �����洢�б����ϻ����(���۲�ѯ��������ʲô)�� 1024 �����á�
- ����ᱻ��Ϊ�� read/write(�ɶ�/��д)�Ļ���,��ζ�Ŷ���������ǹ�����,�� �ҿ���ȫ�ر���������,�������������������߳�������DZ���ġ�
ע������ֻ�����ڻ��������ڵ�ӳ���ļ�����������䡣�����ʹ�õ���java��API��XMLӳ���ļ�һ��Ĭ������²��Ỻ��ӿ�����������䡣����Ҫ�ѻ�����ʹ��@CacheNamespaceRefע�����������
����˵���ѿ������������Mapper���и�statementҪ�������ô�죬��Ҳ���ѣ�ֻ��Ҫ��statement������useCache="false"�Ϳ��Խ��õ�ǰselect���Ķ������棬Ҳ����ÿ�ζ�������sqlȥ��ѯ��ps��Ĭ�������Ĭ����true��Ҳ����Ĭ��ʹ�ö������档����ʾ����
<select id="findAll" resultMap="BaseResultMap" useCache="false">
    select
    <include refid="Base_Column_List"/>
    from
    student
</select>
����֮�⣬���и�flushCache���ԣ�����������ˢ�»��棬��������Ϊ trueʱ���κ�ʱ��ֻҪ��䱻���ã����ᵼ��һ������Ͷ������涼�ᱻ��գ�Ĭ��ֵ��false����mapper��ͬһ��namespace�У����������insert��update��delete��������Ҫִ��ˢ�»���������������������ʱ����ֻ��Ҫ����statement�����е�flushCache="true"���ԣ��ͻ�Ĭ��ˢ�»��棬�෴�����false�Ͳ����ˡ���Ȼ�����ܿ���������ˢ�¹��ܣ���Ҫ���ֶ��������ݿ�����Ƕ��϶����ܱ�������ķ���������ʾ����
<select id="findAll" resultMap="BaseResultMap" flushCache="true">
    ...
</select>
�Ǽ�Ȼ�ܹ�ˢ�»��棬�ܶ�ʱˢ����Ҳ��������ʱ������ˢ�»��棬���ǿ϶��ġ�������mapperӳ���ļ�������<cache/>����ʾ�������棬�������ǾͿ���ͨ��<cache/>Ԫ�ص��������������á����磺
<cache
  eviction="FIFO"
  flushInterval="60000"
  size="512"
  readOnly="true"/>
������������ô�����һ�� FIFO ���棬��ÿ�� 60 ��ˢ�£��������������б��� 512 �����ã����ҷ��صĶ�����Ϊ��ֻ���ģ�����ڲ�ͬ�߳��еĵ�����֮�������ǻᵼ�³�ͻ��
- flushInterval(ˢ�¼��) ���Ա�����Ϊ�����������,�������Ǵ���һ�������ĺ��� ��ʽ��ʱ��Ρ�Ĭ������Dz�����,Ҳ����û��ˢ�¼��,��������������ʱˢ�¡�
- size(������Ŀ) ���Ա�����Ϊ����������,Ҫ��ס�㻺��Ķ�����Ŀ�������л����� �����ڴ���Դ��Ŀ��Ĭ��ֵ�� 1024��
- readOnly(ֻ��) ���Կ��Ա�����Ϊ true �� false��ֻ���Ļ��������е����߷��ػ� ��������ͬʵ���������Щ�����ܱ��ġ����ṩ�˺���Ҫ���������ơ��ɶ�д�Ļ��� �᷵�ػ������Ŀ���(ͨ�����л�) �������һЩ,���ǰ�ȫ,���Ĭ���� false��
���õ��ջز�����:
- LRU �C �������ʹ�õ�:�Ƴ��ʱ�䲻��ʹ�õĶ���Ĭ�ϣ�
- FIFO �C �Ƚ��ȳ�����������뻺���˳�����Ƴ����ǡ�
- SOFT �C �����ã��Ƴ���������������״̬�������ù���Ķ���
- WEAK �C �����ã����������Ƴ����������ռ���״̬�������ù���Ķ���
�����˶�������֮�������������в��ԣ����������в�������֮ǰ��������Ҫ��pojo�����ʵ�����л��ӿڵĴ��룬��Ȼ�ڹر�SqlSession��ʱ��ͻᱨ�����������£�
package org.zero01.pojo;

import java.io.Serializable;

public class Student implements Serializable {
    ...
}
���Դ��벻�䣬���к���̨���������£�
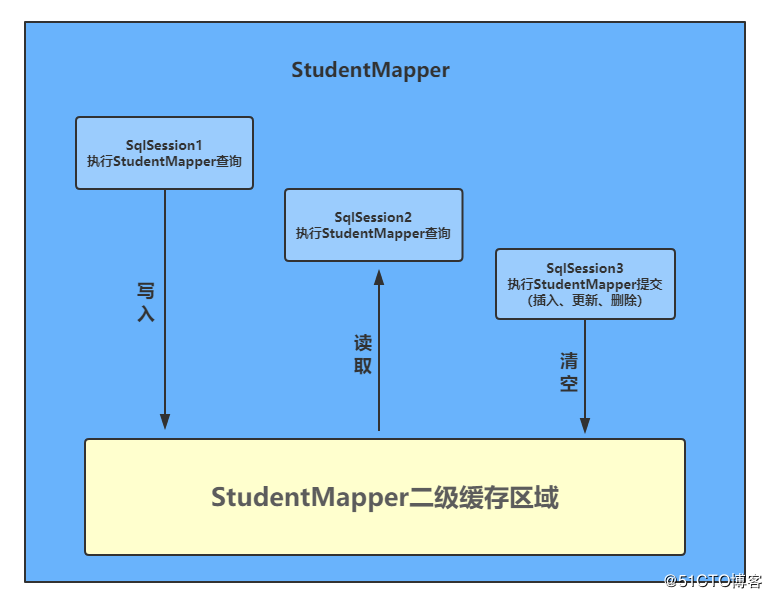
���Կ������������������SqlSession֮������ݾͿ���ͨ���������湲���ˣ���һ������һ������ִ����insert��update��delete�Ȳ�����commit�ύ��ͻ���ն�����������һ������Ͷ�������ͬʱ����ʱ�����ȷ��ʶ������棬��ȥ���ʸ��Ե�һ�����棬�����û����Ҫ�����ݣ��Ż������ݿⷢ��sql���в�ѯ����һ�㣬����Ҳ����ͨ���������������в��ԣ����Դ������£�
@Test
public void testMybatisCache() throws IOException {
String confPath = "mybatis-config.xml";
InputStream inputStream = Resources.getResourceAsStream(confPath);
SqlSessionFactory sqlSessionFactory = new SqlSessionFactoryBuilder().build(inputStream);
SqlSession sqlSession1 = sqlSessionFactory.openSession();
SqlSession sqlSession2 = sqlSessionFactory.openSession();
// ʹ��sqlSession1���е�һ�β�ѯ
StudentMapper studentMapper = sqlSession1.getMapper(StudentMapper.class);
Student student = studentMapper.selectByPrimaryKey(1);
System.out.println("sqlSession1 ��һ�β�ѯ��" + new JSONObject(student));
// ʹ��sqlSession2�������ݵĸ���
StudentMapper studentMapper2 = sqlSession2.getMapper(StudentMapper.class);
Student student2 = new Student();
student2.setSid(1);
student2.setSname("��");
student2.setAge(16);
int rowCount = studentMapper2.updateByPrimaryKeySelective(student2);
if (rowCount > 0) {
sqlSession2.commit();
System.out.println("sqlSession2 ����student���ݳɹ�");
}
// ʹ��sqlSession1���еڶ��β�ѯ
student = studentMapper.selectByPrimaryKey(1);
System.out.println("sqlSession1 �ڶ��β�ѯ��" + new JSONObject(student));
// ʹ��sqlSession2���е�һ�β�ѯ
student2 = studentMapper2.selectByPrimaryKey(1);
System.out.println("sqlSession2 ��һ�β�ѯ��" + new JSONObject(student2));
// �رջỰ
sqlSession1.close();
sqlSession2.close();
}
���в��Դ������̨���������£�
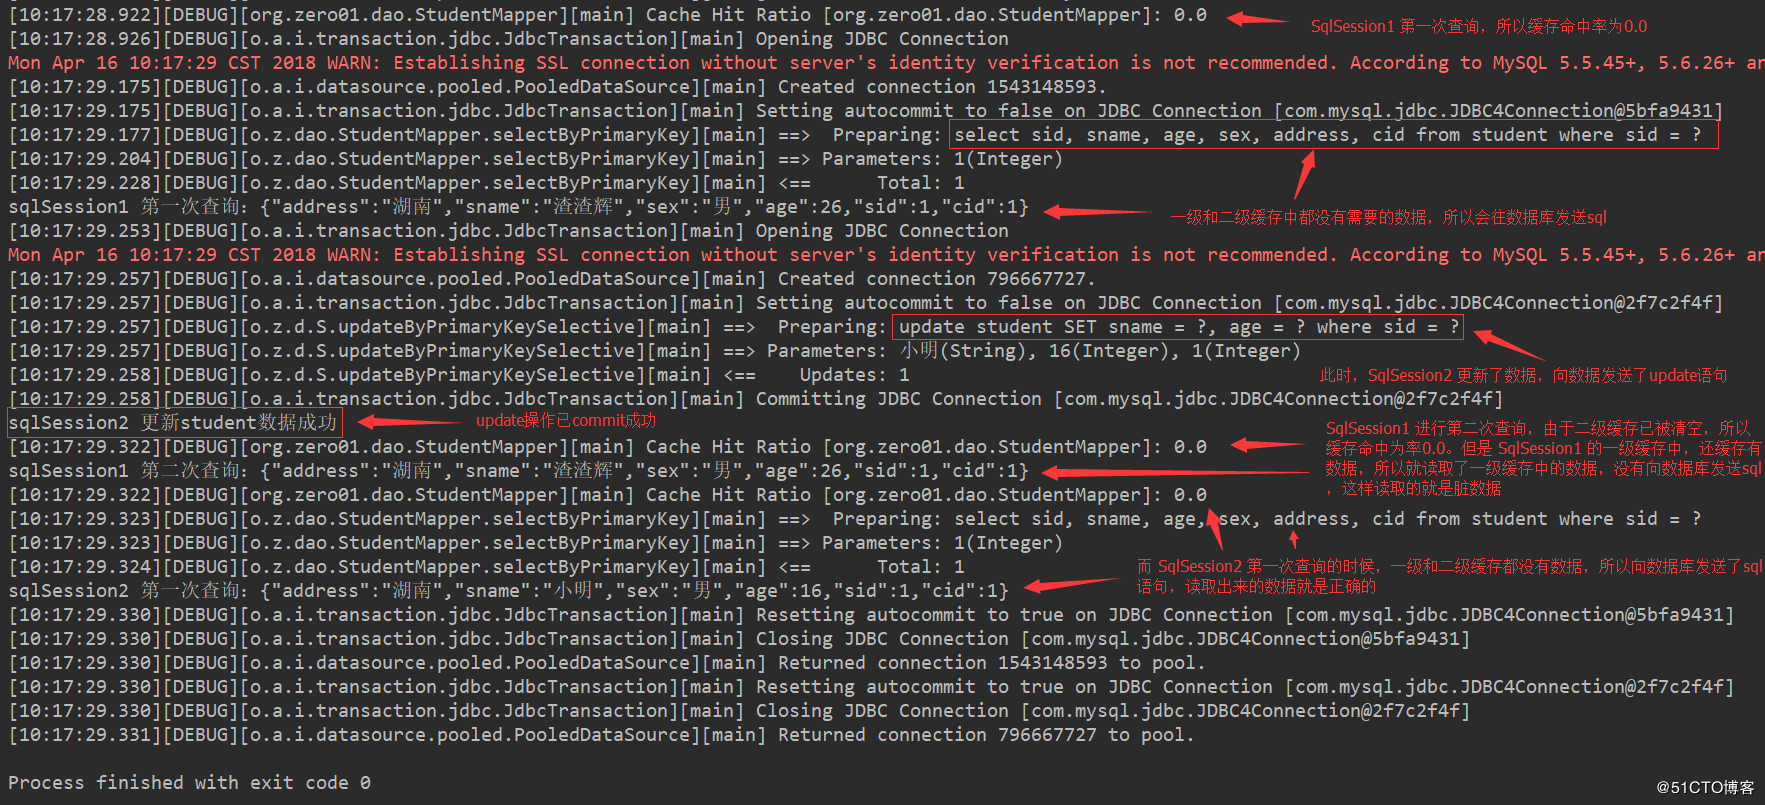
ͨ���˲����������Կ������㣺
- 1.Mybatis�Ķ��������ǿ�Session�ģ�ÿ��Mapper����ͬһ������������ͬ����ÿ��ִ��commit����֮����ն�����������
- 2.������ݴ���һ������Ļ������ɻ�ȥһ�������ж�ȡ���ݣ������ᷢ��������������ǿ�������Ӧ��statement�У�����
flushCache="true"������ÿ�ζ���������棬�������ݷ���sql�����в�ѯ��
����ȫ�ֹرձ��ء��������棺
<settings>
    <setting name="cacheEnabled" value="false"/>
    <setting name="localCacheScope" value="STATEMENT"/>
</settings>
������ʹ�ö��sqlSession�������ݿ��ʱ����һ����Ҫע������⣬�Ǿ���������뼶��mysql��Ĭ��������뼶����REPEATABLE-READ�����ظ����������������sqlsession����ͬһ�����ݵ�ʱ���ܻᵼ��������ͬ�������ѯ���������ݲ�һ�£����磬sqlsession1 ��ͬһ�������ж�ȡ���������ݣ��� sqlsession2 �� sqlsession1 ��һ�β�ѯ֮����������ݣ���ô���ڿ��ظ�����ԭ��sqlsession1 �ڶ��β�ѯ����������֮ǰ�����ݡ�
���ǿ���ʹ�ò�������������һ�£����ȵùرջ����������Ӧ��statement������flushCache����ֵΪtrue(��ʱû�л���)�����������������£�
@Test
public void testMybatisCache() throws IOException {
String confPath = "mybatis-config.xml";
InputStream inputStream = Resources.getResourceAsStream(confPath);
SqlSessionFactory sqlSessionFactory = new SqlSessionFactoryBuilder().build(inputStream);
SqlSession sqlSession1 = sqlSessionFactory.openSession();
SqlSession sqlSession2 = sqlSessionFactory.openSession();
// ʹ��sqlSession1���е�һ�β�ѯ
StudentMapper studentMapper = sqlSession1.getMapper(StudentMapper.class);
Student student = studentMapper.selectByPrimaryKey(1);
System.out.println("sqlSession1 ��һ�β�ѯ��" + new JSONObject(student));
// ʹ��sqlSession2�������ݵĸ���
StudentMapper studentMapper2 = sqlSession2.getMapper(StudentMapper.class);
Student student2 = new Student();
student2.setSid(1);
student2.setSname("��");
student2.setAge(16);
int rowCount = studentMapper2.updateByPrimaryKeySelective(student2);
if (rowCount > 0) {
sqlSession2.commit();
System.out.println("sqlSession2 ����student���ݳɹ�");
}
// ʹ��sqlSession1���еڶ��β�ѯ
student = studentMapper.selectByPrimaryKey(1);
System.out.println("sqlSession1 �ڶ��β�ѯ��" + new JSONObject(student));
// ʹ��sqlSession2���е�һ�β�ѯ
student2 = studentMapper2.selectByPrimaryKey(1);
System.out.println("sqlSession2 ��һ�β�ѯ��" + new JSONObject(student2));
// �رջỰ
sqlSession1.close();
sqlSession2.close();
}
����̨��������

�����mysqlĬ��������뼶��REPEATABLE-READ�����ظ��������µ��������ָ��뼶���ܹ���֤ͬһ����������������ڣ���ȡ��������һ�µģ�����������ͬ������֮���ȡ���������ݾͿ��ܲ�һ�¡�
�����������ϣ���ڲ�ͬ����������������ڶ�ȡ������һ�µĻ�������Ҫ��������뼶��ij�READ-COMMITTED�������ύ�����ü���ᵼ�²����ظ�����Ҳ����˵��ͬһ����������������ڶ�ȡ�������ݿ����Dz�һ�µģ�����������ͬ������֮���ȡ����������һ�µġ�ͬ�������ǿ���ʹ�ò����������в��ԣ��IJ��Դ������£�
@Test
public void testMybatisCache() throws IOException {
String confPath = "mybatis-config.xml";
InputStream inputStream = Resources.getResourceAsStream(confPath);
SqlSessionFactory sqlSessionFactory = new SqlSessionFactoryBuilder().build(inputStream);
// ����������뼶��Ϊ�����ύ
SqlSession sqlSession1 = sqlSessionFactory.openSession(TransactionIsolationLevel.READ_COMMITTED);
SqlSession sqlSession2 = sqlSessionFactory.openSession(TransactionIsolationLevel.READ_COMMITTED);
// ʹ��sqlSession1���е�һ�β�ѯ
StudentMapper studentMapper = sqlSession1.getMapper(StudentMapper.class);
Student student = studentMapper.selectByPrimaryKey(1);
System.out.println("sqlSession1 ��һ�β�ѯ��" + new JSONObject(student));
// ʹ��sqlSession2�������ݵĸ���
StudentMapper studentMapper2 = sqlSession2.getMapper(StudentMapper.class);
Student student2 = new Student();
student2.setSid(1);
student2.setSname("������");
student2.setAge(22);
int rowCount = studentMapper2.updateByPrimaryKeySelective(student2);
if (rowCount > 0) {
sqlSession2.commit();
System.out.println("sqlSession2 ����student���ݳɹ�");
}
// ʹ��sqlSession1���еڶ��β�ѯ
student = studentMapper.selectByPrimaryKey(1);
System.out.println("sqlSession1 �ڶ��β�ѯ��" + new JSONObject(student));
// ʹ��sqlSession2���е�һ�β�ѯ
student2 = studentMapper2.selectByPrimaryKey(1);
System.out.println("sqlSession2 ��һ�β�ѯ��" + new JSONObject(student2));
// �رջỰ
sqlSession1.close();
sqlSession2.close();
}
����̨��������
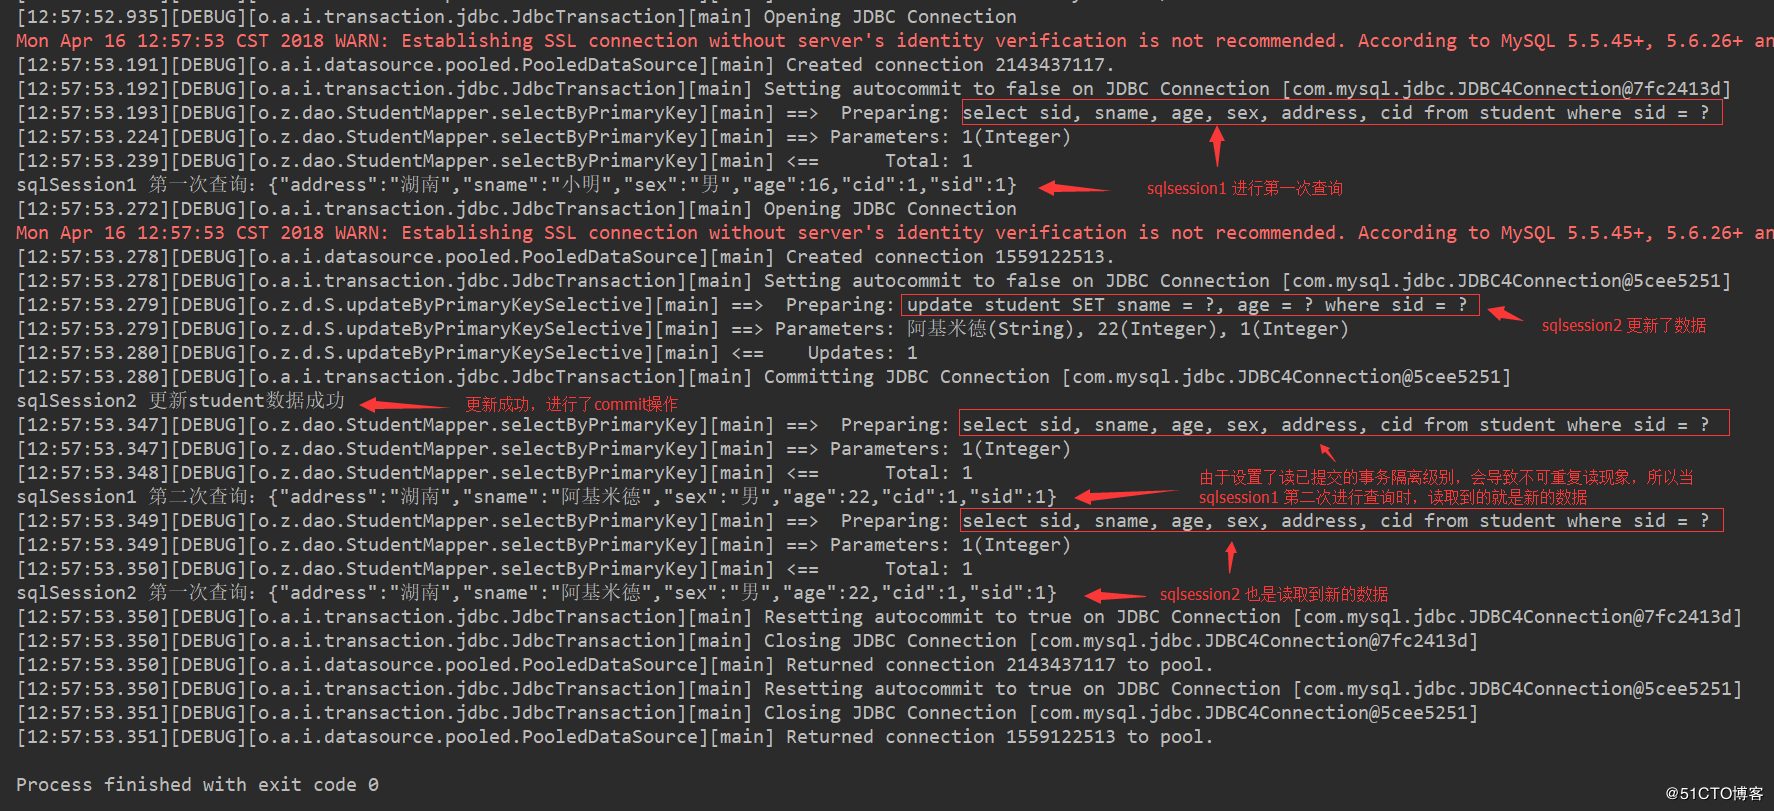
���Կ��������óɶ����ύ���������������ݸ��º��ѯ������������һ�µ��ˡ�������ʹ�ÿ��ظ������Ƕ����ύ����ȡ����ʵ�ʵ�ҵ�������ˣ����ϣ��ͬһ����������������ڣ���ȡ��������һ�µģ���ʹ�ÿ��ظ����������ϣ��������ͬ������֮���ѯ������������һ�µģ���ô��ʹ�ö����ύ����
�Զ��建��
mybatis�����Ļ������IJ�����������������ʹ��mybatis�Դ��Ķ������棬 ��Ҳ����ʹ�����Լ�ʵ�ֵĻ�����������������Ļ��淽����������������ȫ���ǻ�����Ϊ���������ṩ��ʹ���Զ��建��Ļ��ᣬ���ǿ���ѡ��ʹ������ϲ�����Զ��建�棬���潫����һ�£�ʹ��ehcache��Ϊmybatis���Զ��建��ľ��岽�衣
���ȣ�Ҫ��ʹ��mybatis�Զ��建�棬�ͱ������Զ��建����ʵ��mybatis�ṩ��Cache �ӿڣ�org.apache.ibatis.cache.Cache����
public interface Cache {
// ��ȡ������
String getId();
// ��ȡ�������Ĵ�С
int getSize();
// ����keyֵ�������
void putObject(Object key, Object value);
// ͨ��kEY��ȡֵ
Object getObject(Object key);
// �������Ƿ���ij��key
boolean hasKey(Object key);
// ��ȡ����Ķ�д��
ReadWriteLock getReadWriteLock();
// ͨ��keyɾ���������
Object removeObject(Object key);
// ��ջ���
void clear();
}
����Ҫʹ��ehcache���Զ��建�棬��Ӧ���������Զ��建���࣬��mybatis��git���ṩ������ڵ������������ֻ��Ҫ���ؼ��ɣ��������������maven������
<dependency>
    <groupId>org.mybatis.caches</groupId>
    <artifactId>mybatis-ehcache</artifactId>
    <version>1.1.0</version>
</dependency>
��������Ӧ�� mapper xml�ļ���������Ӧ�Ļ���ʵ���ࣺ
<cache type="org.mybatis.caches.ehcache.EhcacheCache"/>
ʵ��Cache�ӿڵ���EhcacheCache�ĸ���AbstractEhcacheCache�����ǿ��Կ�һ������Դ�룺
package org.mybatis.caches.ehcache;

import java.util.concurrent.locks.ReadWriteLock;
import net.sf.ehcache.CacheManager;
import net.sf.ehcache.Ehcache;
import net.sf.ehcache.Element;
import org.apache.ibatis.cache.Cache;

public abstract class AbstractEhcacheCache implements Cache {
    protected static CacheManager CACHE_MANAGER = CacheManager.create();
    protected final String id;
    protected Ehcache cache;

    public AbstractEhcacheCache(String id) {
        if (id == null) {
            throw new IllegalArgumentException("Cache instances require an ID");
        } else {
            this.id = id;
        }
    }

    public void clear() {
        this.cache.removeAll();
    }

    public String getId() {
        return this.id;
    }

    public Object getObject(Object key) {
        Element cachedElement = this.cache.get(key);
        return cachedElement == null ? null : cachedElement.getObjectValue();
    }

    public int getSize() {
        return this.cache.getSize();
    }

    public void putObject(Object key, Object value) {
        this.cache.put(new Element(key, value));
    }

    public Object removeObject(Object key) {
        Object obj = this.getObject(key);
        this.cache.remove(key);
        return obj;
    }

    public void unlock(Object key) {
    }

    public boolean equals(Object obj) {
        if (this == obj) {
            return true;
        } else if (obj == null) {
            return false;
        } else if (!(obj instanceof Cache)) {
            return false;
        } else {
            Cache otherCache = (Cache)obj;
            return this.id.equals(otherCache.getId());
        }
    }

    public int hashCode() {
        return this.id.hashCode();
    }

    public ReadWriteLock getReadWriteLock() {
        return null;
    }

    public String toString() {
        return "EHCache {" + this.id + "}";
    }

    public void setTimeToIdleSeconds(long timeToIdleSeconds) {
        this.cache.getCacheConfiguration().setTimeToIdleSeconds(timeToIdleSeconds);
    }

    public void setTimeToLiveSeconds(long timeToLiveSeconds) {
        this.cache.getCacheConfiguration().setTimeToLiveSeconds(timeToLiveSeconds);
    }

    public void setMaxEntriesLocalHeap(long maxEntriesLocalHeap) {
        this.cache.getCacheConfiguration().setMaxEntriesLocalHeap(maxEntriesLocalHeap);
    }

    public void setMaxEntriesLocalDisk(long maxEntriesLocalDisk) {
        this.cache.getCacheConfiguration().setMaxEntriesLocalDisk(maxEntriesLocalDisk);
    }

    public void setMemoryStoreEvictionPolicy(String memoryStoreEvictionPolicy) {
        this.cache.getCacheConfiguration().setMemoryStoreEvictionPolicy(memoryStoreEvictionPolicy);
    }
}
�������ǻ���Ҫ��resourcesĿ¼�£�����ehcache�������ļ���ehcache.xml���ļ��������£�
<ehcache xmlns:xsi="http://www.w3.org/2001/XMLSchema-instance" xsi:noNamespaceSchemaLocation="../config/ehcache.xsd">
<diskStore path="java.io.tmpdir"/>
<!--
Mandatory Default Cache configuration. These settings will be applied to caches
created programmtically using CacheManager.add(String cacheName)
-->
<!--
name:�������ơ�
maxElementsInMemory��������������
eternal:�����Ƿ�������Ч��һ�������ˣ�timeout���������á�
timeToIdleSeconds�����ö�����ʧЧǰ����������ʱ�䣨��λ���룩������eternal=false������������Чʱʹ�ã���ѡ���ԣ�Ĭ��ֵ��0��Ҳ���ǿ�����ʱ�������
timeToLiveSeconds�����ö�����ʧЧǰ�������ʱ�䣨��λ���룩�����ʱ����ڴ���ʱ���ʧЧʱ��֮�䡣����eternal=false������������Чʱʹ�ã�Ĭ����0.��Ҳ���Ƕ�����ʱ�������
overflowToDisk�����ڴ��ж��������ﵽmaxElementsInMemoryʱ��Ehcache�������д�������С�
diskSpoolBufferSizeMB�������������DiskStore�����̻��棩�Ļ�������С��Ĭ����30MB��ÿ��Cache��Ӧ�����Լ���һ����������
maxElementsOnDisk��Ӳ����������
diskPersistent���Ƿ���������������� Whether the disk store persists between restarts of the Virtual Machine. The default value is false.
diskExpiryThreadIntervalSeconds������ʧЧ�߳�����ʱ������Ĭ����120�롣
memoryStoreEvictionPolicy�����ﵽmaxElementsInMemory����ʱ��Ehcache�������ָ���IJ���ȥ�����ڴ档Ĭ�ϲ�����LRU���������ʹ�ã������������ΪFIFO���Ƚ��ȳ�������LFU������ʹ�ã���
clearOnFlush���ڴ��������ʱ�Ƿ������
-->
<defaultCache
maxElementsInMemory="10000"
eternal="false"
timeToIdleSeconds="5"
timeToLiveSeconds="5"
overflowToDisk="true"
maxElementsOnDisk="10000000"
diskPersistent="false"
diskExpiryThreadIntervalSeconds="120"
memoryStoreEvictionPolicy="LRU"
/>
</ehcache>
���Ͼ�������Զ��建������ã����������Dz���һ�»����Ƿ���Ч�����Դ������£�
@Test
public void testMybatisCache2() throws IOException {
String confPath = "mybatis-config.xml";
InputStream inputStream = Resources.getResourceAsStream(confPath);
SqlSessionFactory sqlSessionFactory = new SqlSessionFactoryBuilder().build(inputStream);
SqlSession sqlSession1 = sqlSessionFactory.openSession();
SqlSession sqlSession2 = sqlSessionFactory.openSession();
// ʹ��sqlSession1���е�һ�β�ѯ
StudentMapper studentMapper = sqlSession1.getMapper(StudentMapper.class);
Student student = studentMapper.selectByPrimaryKey(1);
System.out.println("sqlSession1 ��һ�β�ѯ��" + new JSONObject(student));
sqlSession1.close();
// ʹ��sqlSession2���е�һ�β�ѯ
StudentMapper studentMapper2 = sqlSession2.getMapper(StudentMapper.class);
Student student2 = studentMapper2.selectByPrimaryKey(1);
System.out.println("sqlSession2 ��һ�β�ѯ��" + new JSONObject(student2));
sqlSession2.close();
}
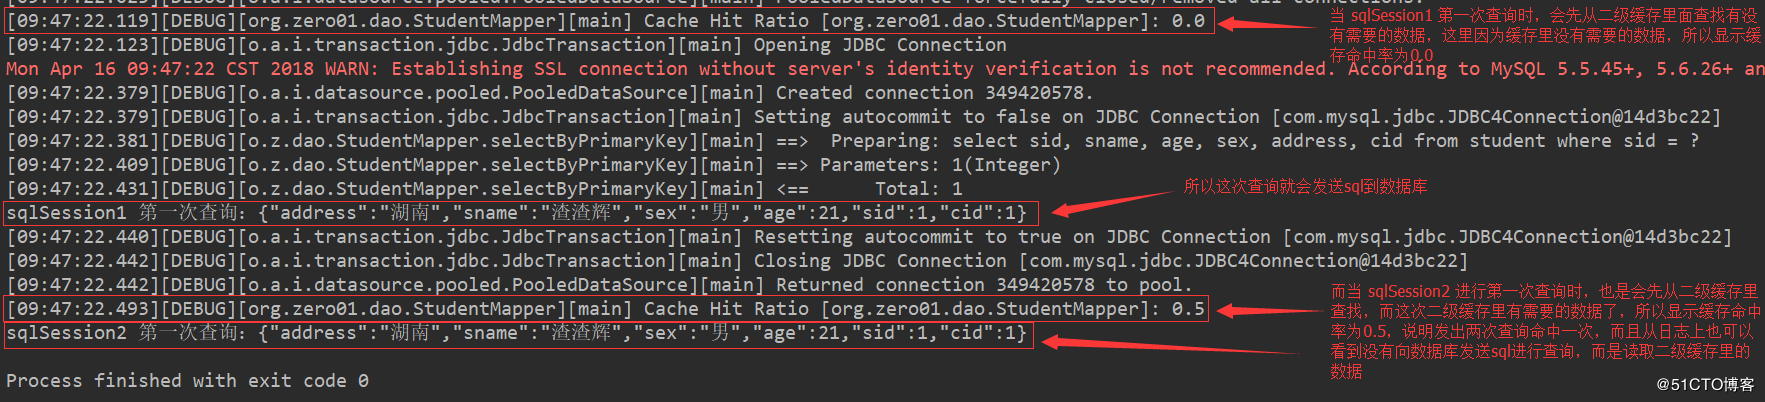
����̨��������

���Կ�����sqlsession2 ��ѯ���ݵ�ʱ��������Ϊ0.5������Ҳû�������ݿⷢ��sql��䣬��ô�ʹ����������õ��Զ��建����Ч�����Գɹ����������ˡ�
վ�ھ��˵ļ����ժƻ��:
https://blog.51cto.com/zero01/2103911
ԭ������:https://www.cnblogs.com/eternityz/p/12584990.html
������������ԭ������ϵ
��ǩ��
��Ȩ��������վ���²��������磬������Ȩ������ϵ��west999com@outlook.com
�ر�ע�⣺��վ����ת���������۲�������վ�۵㣬��վ���ṩ����Ӱ��Ƭ���廭�������Ʒ������ʹ�ã�����ԭ������ϵ����Ȩ��ԭ��������

- redis���� 2020-06-12
- MyBatis�е�$��#���ò��ã������ˣ� 2020-06-11
- ����Դ���� | Kafka��Ⱥ���������Ϣ�洢������� 2020-06-11
- SpringBoot 2.3 �������°� ShardingJdbc + Druid + MyBatis 2020-06-11
- ���ģ��ֶ���дmybatis���ξ�Ȼ��ô�� 2020-06-06
IDC��Ѷ�� ������Ѷ ע����Ѷ �й���Ѷ vps��Ѷ ��վ����
��վ��Ӫ�� ��վ���� ��ӯ�� �����Ż� ��վ�ƹ� �����Դ
��վ���ˣ� �������� ���˽��� ���˵��� ������
��ҵ��Ѷ�� �������� ������Ϸ �������� ��洫ý
�����̣� Asp.Net��� Asp��� Php��� Xml��� Access Mssql Mysql ����
������������ Web������ Ftp������ Mail������ Dns������ ��ȫ����
�������ɣ� �������� Word Excel Powerpoint Ghost Vista QQ�ռ� QQ FlashGet Ѹ��
��ҳ������ FrontPages Dreamweaver Javascript css photoshop fireworks Flash
������ƣ� Java���� C/C++ VB delphi

- ʲô�������Ե�ȡ�ź�����,��ô����
- ����������վ����2020�����
- springcloudѧϰ֮·: (һ) ��Ĵ�
- ����Gradle���̳���Could not install
- ����Ū����PKIX path building failed
- Tomcat��������:org.apache.catalina.L
- spring boot ����Check your ViewRes
- ����HttpClient���°���������ϵͳģ��
- ֻ�г���Ա���ܿ����ij��ƣ�������Ȼ��
- mybatis ע��@Results��@Result��@Resu