
数据源管理 | 主从库动态路由,AOP模式读写分离
2020-04-01 16:04:53来源:博客园 阅读 ()

数据源管理 | 主从库动态路由,AOP模式读写分离
本文源码:GitHub・点这里 || GitEE・点这里
一、多数据源应用
1、基础描述
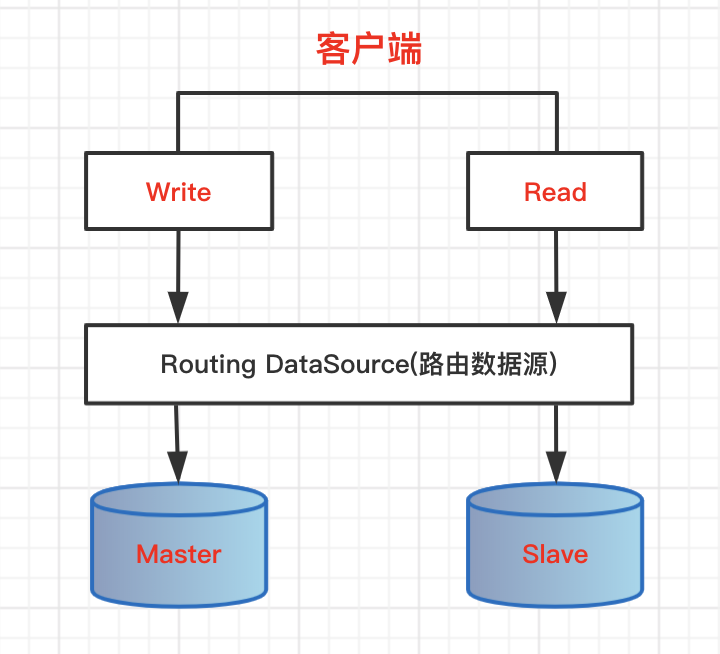
在相对复杂的应用服务中,配置多个数据源是常见现象,例如常见的:配置主从数据库用来写数据,再配置一个从库读数据,这种读写分离模式可以缓解数据库压力,提高系统的并发能力和稳定性,执行效率。
2、核心API
在处理这种常见问题,要学会查询服务基础框架的API,说直白点就是查询Spring框架的API(工作几年,还没用过Spring之外的框架搭建环境),这种常用的业务模式,基本上Spring都提供了API支持。
核心API:AbstractRoutingDataSource
底层维护Map容器,用来保存数据源集合,提供一个抽象方法,实现自定义的路由策略。
@Nullable
private Map<Object, DataSource> resolvedDataSources;
@Nullable
protected abstract Object determineCurrentLookupKey();
补刀一句:为何框架的原理很难通过一篇文章看明白?因为使用的不多,基本意识没有形成,熟悉框架原理的基本要求:对框架的各种功能都熟悉,经常使用,自然而然的就明白了,盐大晒的久,咸鱼才够味。
二、数据源路由
1、数据源管理
配置两个数据源
spring:
  datasource:
    type: com.alibaba.druid.pool.DruidDataSource
    driverClassName: com.mysql.jdbc.Driver
    master:
      url: jdbc:mysql://localhost:3306/data_master
      username: root
      password: 123456
    slave:
      url: jdbc:mysql://localhost:3306/data_slave
      username: root
      password: 123456
从实际开发角度,这两个数据源需要配置主从复制流程,再基于安全角度,写库可以只给写权限,读库只给读权限。
Map容器加载
@Configuration
public class DruidConfig {
    // 忽略参数加载,源码中有
    @Bean
    @Primary
    public DataSource primaryDataSource() {
        Map<Object, Object> map = new HashMap<>();
        map.put("masterDataSource", masterDataSource());
        map.put("slaveDataSource", slaveDataSource());
        RouteDataSource routeDataSource = new RouteDataSource();
        routeDataSource.setTargetDataSources(map);
        routeDataSource.setDefaultTargetDataSource(masterDataSource());
        return routeDataSource ;
    }
    private DataSource masterDataSource() {
        return getDefDataSource(masterUrl,masterUsername,masterPassword);
    }
    private DataSource slaveDataSource() {
        return getDefDataSource(slaveUrl,slaveUsername,slavePassword);
    }
    private DataSource getDefDataSource (String url,String userName,String passWord){
        DruidDataSource datasource = new DruidDataSource();
        datasource.setDriverClassName(driverClassName);
        datasource.setUrl(url);
        datasource.setUsername(userName);
        datasource.setPassword(passWord);
        return datasource;
    }
}
这里的Map容器管理两个key,masterDataSource和slaveDataSource代表两个不同的库,使用不同的key即加载对应的库。
2、容器Key管理
使用ThreadLocal管理当前会会话中线程参数,存取使用极其方便。
public class RouteContext implements AutoCloseable {

    private static final ThreadLocal<String> threadLocal = new ThreadLocal<>();
    public static void setRouteKey (String key){
        threadLocal.set(key);
    }
    public static String getRouteKey() {
        String key = threadLocal.get();
        return key == null ? "masterDataSource" : key;
    }
    @Override
    public void close() {
        threadLocal.remove();
    }
}
3、路由Key实现
获取ThreadLocal中,当前数据源的key,适配相关联的数据源。
public class RouteDataSource extends AbstractRoutingDataSource {
    @Override
    protected Object determineCurrentLookupKey() {
        return RouteContext.getRouteKey();
    }
}
三、读写分离
1、AOP思维
基于AOP的切面思想,不同的方法类型,去设置对应路由Key,这样就可以在业务逻辑执行之前,切换到不同的数据源。
Aspect
@Component
@Order(1)
public class ReadWriteAop {

    private static Logger LOGGER = LoggerFactory.getLogger(ReadWriteAop.class) ;

    @Before("execution(* com.master.slave.controller.*.*(..))")
    public void setReadDataSourceType() {
        HttpServletRequest request = ((ServletRequestAttributes) RequestContextHolder.getRequestAttributes()).getRequest();
        String method = request.getRequestURI() ;
        boolean rwFlag = readOrWrite(method) ;
        if (rwFlag){
            RouteContext.setRouteKey("slaveDataSource");
        } else {
            RouteContext.setRouteKey("masterDataSource");
        }
        LOGGER.info("请求方法:"+method+";执行库:"+RouteContext.getRouteKey());
    }

    private String[] readArr = new String[]{"select","count","query","get","find"} ;
    private boolean readOrWrite (String method){
        for (String readVar:readArr) {
            if (method.contains(readVar)){
                return true ;
            }
        }
        return false ;
    }
}
常见的读取方法:select、count、query、get、find等等,方法的命名要遵循自定义的路由规则。
2、提供测试接口
控制层API
import com.master.slave.entity.User;
import com.master.slave.service.UserService;
import org.springframework.web.bind.annotation.GetMapping;
import org.springframework.web.bind.annotation.RequestParam;
import org.springframework.web.bind.annotation.RestController;
import javax.annotation.Resource;

@RestController
public class UserController {

    @Resource
    private UserService userService ;

    @GetMapping("/selectById")
    public User selectById (@RequestParam("id") Integer id) {
        return userService.selectById(id) ;
    }

    @GetMapping("/insert")
    public String insert () {
        User user = new User("张三","write") ;
        userService.insert(user) ;
        return "success" ;
    }
}
服务实现
@Service
public class UserService {

    @Resource
    private UserMapper userMapper ;

    public User selectById (Integer id) {
        return userMapper.selectById(id) ;
    }

    public void insert (User user){
        userMapper.insert(user);
    }
}
这样数据源基于不同的类型方法就会一直的动态切换。
四、源代码地址
GitHub・地址
https://github.com/cicadasmile/data-manage-parent
GitEE・地址
https://gitee.com/cicadasmile/data-manage-parent

原文链接:https://www.cnblogs.com/cicada-smile/p/12610151.html
如有疑问请与原作者联系
标签:
版权申明:本站文章部分自网络,如有侵权,请联系:west999com@outlook.com
特别注意:本站所有转载文章言论不代表本站观点,本站所提供的摄影照片,插画,设计作品,如需使用,请与原作者联系,版权归原作者所有

上一篇:设计模式-代理模式
下一篇:Eclipse快捷键大全
- 数据源管理 | Kafka集群环境搭建,消息存储机制详解 2020-06-11
- SpringBoot + Vue + ElementUI 实现后台管理系统模板 -- 后 2020-06-10
- MyBatis整合双数据源 2020-06-04
- 数据分析 | 基于智能标签,精准管理数据 2020-05-30
- JSP+SSM+Mysql实现的图书馆预约占座管理系统 2020-05-26
IDC资讯: 主机资讯 注册资讯 托管资讯 vps资讯 网站建设
网站运营: 建站经验 策划盈利 搜索优化 网站推广 免费资源
网络编程: Asp.Net编程 Asp编程 Php编程 Xml编程 Access Mssql Mysql 其它
服务器技术: Web服务器 Ftp服务器 Mail服务器 Dns服务器 安全防护
软件技巧: 其它软件 Word Excel Powerpoint Ghost Vista QQ空间 QQ FlashGet 迅雷
网页制作: FrontPages Dreamweaver Javascript css photoshop fireworks Flash
