
Spring Boot 中 Redis 的使用
2020-04-12 16:05:33来源:博客园 阅读 ()

Spring Boot 中 Redis 的使用
整合 Redis 哨兵模式
引入依赖
在 pox.xml 中引入 org.apache.commons:commons-pool2 和 org.springframework.boot:spring-boot-starter-data-redis 依赖
<dependency>
    <groupId>org.apache.commons</groupId>
    <artifactId>commons-pool2</artifactId>
</dependency>
<dependency>
    <groupId>org.springframework.boot</groupId>
    <artifactId>spring-boot-starter-data-redis</artifactId>
</dependency>
相关配置
在 application.yml 中添加 redis 及哨兵集群的配置
spring:
   redis:
    lettuce:
      pool:
        # 最大连接数
        max-active: 8
        # 最大空闲连接数
        max-idle: 8
        # 最大阻塞等待时间(使用负值表示没有限制)
        max-wait: -1ms
        # 最小空闲连接数
        min-idle: 0
    sentinel:
      # 哨兵集群主节点名
      master: mymaster
      # 哨兵集群各节点
      nodes: {ip}:{port}, {ip}:{port}, {ip}:{port}
使用 Redis
注意:写入缓存的数据(如实体类)需要实现序列化,否则向 Redis 中存取数据会抛出异常
这里只简单实现对 Redis 的增删改查操作
创建 RedisService
public interface RedisService {

    /**
     * 存储缓存
     * @param key
     * @param value
     * @param seconds
     */
    void set(String key, Object value, long seconds);

    /**
     * 获取缓存
     * @param key
     * @return
     */
    Object get(String key);

    /**
     * 删除缓存
     * @param key
     */
    boolean del(String key);
}
创建 RedisServiceImpl
@Service
public class RedisServiceImpl implements RedisService {

    @Autowired
    private RedisTemplate redisTemplate;

    @Override
    public void set(String key, Object value, long seconds) {
        redisTemplate.opsForValue().set(key, value, seconds, TimeUnit.SECONDS);
    }

    @Override
    public Object get(String key) {
        return redisTemplate.opsForValue().get(key);
    }

    @Override
    public boolean del(String key) {
        return redisTemplate.delete(key);
    }
}
解决序列化 Redis key-value 乱码
spring-data-redis 的 RedisTemplate<K, V> 模板类在操作 redis 时默认使用 JdkSerializationRedisSerializer 来进行序列化,如下:
private boolean enableDefaultSerializer = true;
private RedisSerializer<?> defaultSerializer = new JdkSerializationRedisSerializer();
private RedisSerializer keySerializer = null;
private RedisSerializer valueSerializer = null;
private RedisSerializer hashKeySerializer = null;
private RedisSerializer hashValueSerializer = null;
创建 RedisListenerConfig 配置类
@Configuration
public class RedisListenerConfig {

    @Bean
    RedisMessageListenerContainer container(RedisConnectionFactory connectionFactory) {

        RedisMessageListenerContainer container = new RedisMessageListenerContainer();
        container.setConnectionFactory(connectionFactory);
        return container;
    }

    @Bean(name="redisTemplate")
    public RedisTemplate<String, String> redisTemplate(RedisConnectionFactory factory) {
        RedisTemplate<String, String> template = new RedisTemplate<>();
        RedisSerializer<String> redisSerializer = new StringRedisSerializer();
        template.setConnectionFactory(factory);
        template.setKeySerializer(redisSerializer);
        template.setValueSerializer(redisSerializer);
        template.setHashValueSerializer(redisSerializer);
        template.setHashKeySerializer(redisSerializer);
        return template;
    }
}
实现共享 Session
引入依赖
在 pom.xml 中添加 spring-session-data-redis 依赖
<dependency>
    <groupId>org.springframework.session</groupId>
    <artifactId>spring-session-data-redis</artifactId>
</dependency>
相关配置
创建 RedisConfiguration 配置类
import org.springframework.context.annotation.Configuration;
import org.springframework.session.data.redis.config.annotation.web.http.EnableRedisHttpSession;

@Configuration
@EnableRedisHttpSession(maxInactiveIntervalInSeconds = 60 * 60 * 24)
public class RedisConfiguration {

}
Controller
创建存取 session 的接口
import org.springframework.web.bind.annotation.GetMapping;
import org.springframework.web.bind.annotation.RestController;

import javax.servlet.http.HttpSession;

@RestController
public class IndexController {

    @GetMapping(value = "put")
    public String putSession(HttpSession session) {
        session.setAttribute("userId", "2384783434");
        return "ok";
    }

    @GetMapping(value = "get")
    public String getSession(HttpSession session) {
        return (String) session.getAttribute("userId");
    }

}
测试共享 Session
分别启动两次项目,第一次启动项目设置端口为 80,第二次启动项目设置端口为 81
默认情况下,Intellij IDEA 不允许同时启动两个相同的项目,需要在 Run/Debug Configurations 页面中设置允许同时运行多个相同的项目,如图所示,勾选 Allow parallel run 选项:
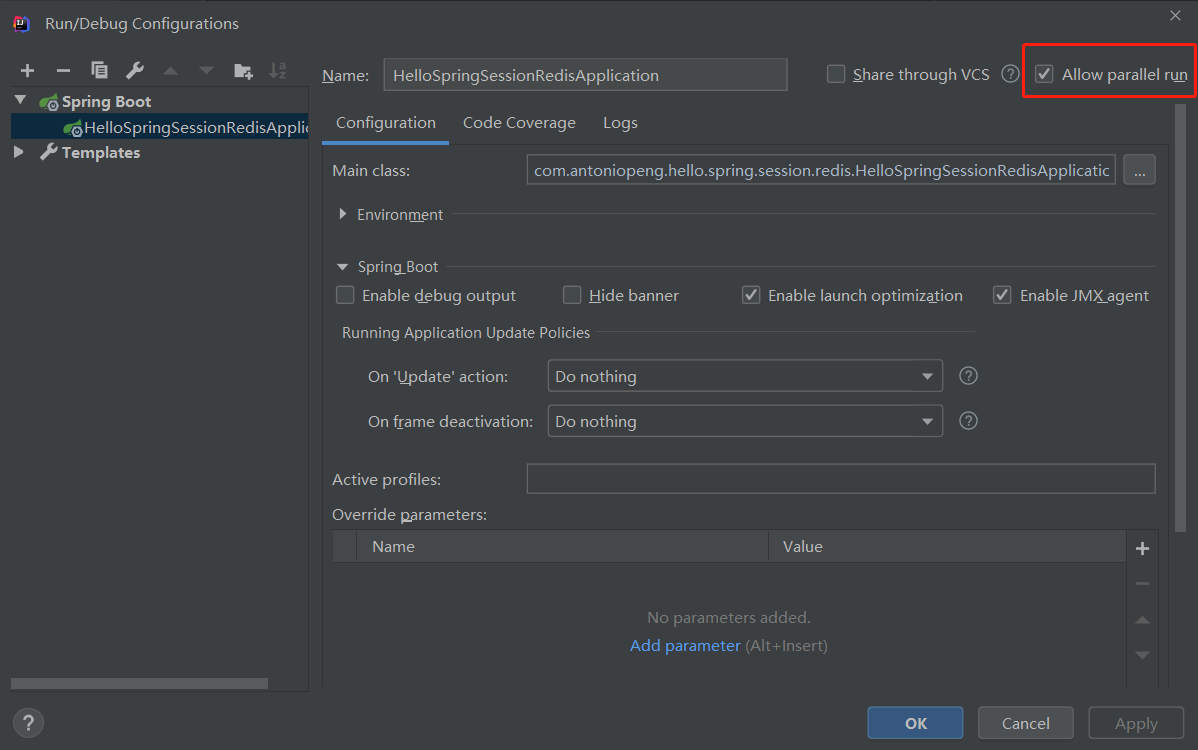
最后在浏览器中先后访问 http://localhost/put 和 http://localhost:81/get
- 文章作者:彭超
- 本文首发于个人博客:https://antoniopeng.com/2019/08/18/springboot/SpringBoot%E4%B8%ADRedis%E7%9A%84%E4%BD%BF%E7%94%A8/
- 版权声明:本博客所有文章除特别声明外,均采用 CC BY-NC-SA 4.0 许可协议。转载请注明来自 彭超 | Blog!
原文链接:https://www.cnblogs.com/antoniopeng/p/12687410.html
如有疑问请与原作者联系
标签:
版权申明:本站文章部分自网络,如有侵权,请联系:west999com@outlook.com
特别注意:本站所有转载文章言论不代表本站观点,本站所提供的摄影照片,插画,设计作品,如需使用,请与原作者联系,版权归原作者所有

- redis缓存 2020-06-12
- Spring系列.ApplicationContext接口 2020-06-11
- springboot2配置JavaMelody与springMVC配置JavaMelody 2020-06-11
- 给你一份超详细 Spring Boot 知识清单 2020-06-11
- SpringBoot 2.3 整合最新版 ShardingJdbc + Druid + MyBatis 2020-06-11
IDC资讯: 主机资讯 注册资讯 托管资讯 vps资讯 网站建设
网站运营: 建站经验 策划盈利 搜索优化 网站推广 免费资源
网络编程: Asp.Net编程 Asp编程 Php编程 Xml编程 Access Mssql Mysql 其它
服务器技术: Web服务器 Ftp服务器 Mail服务器 Dns服务器 安全防护
软件技巧: 其它软件 Word Excel Powerpoint Ghost Vista QQ空间 QQ FlashGet 迅雷
网页制作: FrontPages Dreamweaver Javascript css photoshop fireworks Flash
