
JavaWeb-JSP粗浅了解
2020-04-24 16:04:51来源:博客园 阅读 ()

JavaWeb-JSP粗浅了解
关于JSP的入门学习记录9.JSP
参考:https://www.bilibili.com/video/BV12J411M7Sj?p=22
9.0 前言
许多前辈说因为前后端分离,MVC已经实质上变成了MC,JSP已经没有学习的价值了。因此JSP的内容也只是粗浅的了解,甚至对于JSTL标签完全不去了解。
9.1 什么是JSP
Java Server Pages:Java服务器端页面,和Servlet一样,用于动态Web技术。
特点:
- 写JSP就像写HTML
- 区别:
- HTML只给用户提供静态的数据;
- JSP页面中可以嵌入Java代码,为用户提供动态数据;
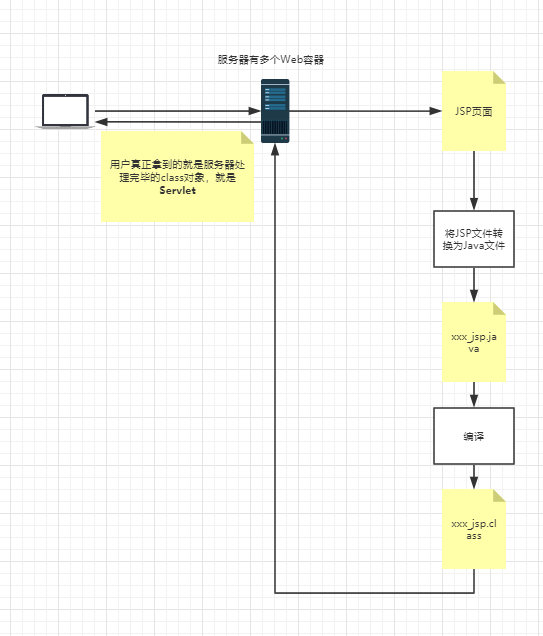
9.2 JSP原理
思路:JSP到底怎么执行的
-
代码层面没有任何问题
-
服务器内部工作
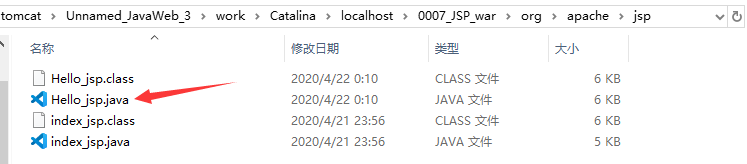
tomcat中有一个work目录;
IDEA使用Tomcat的会在IDEA的tomcat中生成一个work目录
C:\Users\用户名\.IntelliJIdea2019.3\system\tomcat\任意一个项目\work\Catalina\localhost\0006_Seesion_war\org\apache\jsp
抑或是打开Tomcat的目录
Tomcat\work\Catalina\localhost\ROOT\org\apache\jsp

可以发现页面转变成了Java程序
浏览器向服务器发送请求,不管访问什么资源,其实都是在访问Servlet
JSP最终也会转换成一个Java类
打开index_jsp.java文件,可以发现该类继承org.apache.jasper.runtime.HttpJspBase
新建一个Maven,加入如下依赖,可以看HTTPJspBase的继承:
<dependency>
    <groupId>tomcat</groupId>
    <artifactId>jasper-runtime</artifactId>
    <version>5.5.23</version>
</dependency>

JSP本质上就是一个Servlet。再往下看:

可以看到,写JSP,后面是会转化为这种以前的程序员要做的繁琐的形式,JSP简化了这个流程。
再看大约第七十几行的位置:

// 初始化
public void _jspInit() {
}

// 销毁
public void _jspDestroy() {
}

// JSPService
public void _jspService(final javax.servlet.http.HttpServletRequest request, final javax.servlet.http.HttpServletResponse response){...}
-
判断请求;
-
内置一些对象:
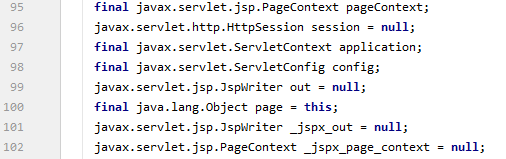
final javax.servlet.jsp.PageContext pageContext; // 页面上下文 javax.servlet.http.HttpSession session = null; // session final javax.servlet.ServletContext application; // applicationContext final javax.servlet.ServletConfig config; // config javax.servlet.jsp.JspWriter out = null; // out final java.lang.Object page = this; // page: 当前 javax.servlet.jsp.JspWriter _jspx_out = null; // 暂时不管 javax.servlet.jsp.PageContext _jspx_page_context = null; // 暂时不管 HttpServletRequest request // 请求 HttpServletResponse reponse // 响应 -
输出页面前增加的代码:
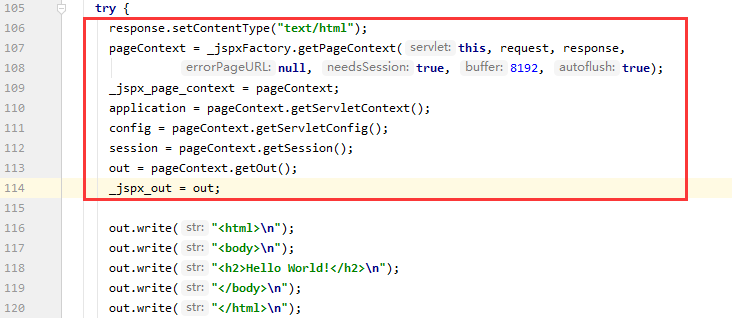
response.setContentType("text/html"); //设置响应的页面类型 pageContext = _jspxFactory.getPageContext(this, request, response, null, true, 8192, true); _jspx_page_context = pageContext; application = pageContext.getServletContext(); config = pageContext.getServletConfig(); session = pageContext.getSession(); out = pageContext.getOut(); _jspx_out = out; -
以上的这些对象可以再JSP页面中用${....}直接使用:

Hello JSP
创建一个Maven项目,模板是WebAPP。并在webapp目录下创建Hello.jsp
如下:

Hello.jsp代码如下:
<%--
  Created by IntelliJ IDEA.
  User: HuangDekai
  Date: 2020/4/21
  Time: 23:59
  To change this template use File | Settings | File Templates.
--%>
<%@ page contentType="text/html;charset=UTF-8" language="java" %>
<html>
<head>
    <title>Title</title>
</head>
<body>
    <%
        String name = "duzhuan";
    %>
    name = <%= name %>
</body>
</html>
除14到17行外,其余都是IDEA自动创建的模板。
另附一推荐浏览:JSP页面中<%!%>与<%%>与<%=%>
配置好Tomcat,可以直接访问Hello.jsp查看效果:

这时去
C:\Users\用户名\.IntelliJIdea2019.3\system\tomcat\Unnamed_JavaWeb_3\work\Catalina\localhost\0007_JSP_war\org\apache\jsp
查看情况(请注意用户名、Unnamed_JavaWeb_3的对应位置)
打开Hello_jsp.java

在JSP页面中:
- 只要是Java代码就会原封不动的输出
- 如果是HTML代码,就会转换为
out.write(....)这样格式输出到前端
9.3 JSP的基础语法
在9.2的项目里面操作,最终文件路径如下:
依赖
对9.2的项目的pom.xml添加如下依赖:
<!--   Servlet依赖     -->
<dependency>
    <groupId>javax.servlet.jsp</groupId>
    <artifactId>javax.servlet.jsp-api</artifactId>
    <version>2.3.3</version>
    <scope>provided</scope>
</dependency>

<!--   JSP依赖     -->
<dependency>
    <groupId>javax.servlet</groupId>
    <artifactId>javax.servlet-api</artifactId>
    <version>4.0.1</version>
    <scope>provided</scope>
</dependency>

<!--   JSTL表达式的依赖     -->
<dependency>
    <groupId>javax.servlet.jsp.jstl</groupId>
    <artifactId>jstl-api</artifactId>
    <version>1.2</version>
</dependency>

<!--   stadard标签库     -->
<dependency>
    <groupId>taglibs</groupId>
    <artifactId>standard</artifactId>
    <version>1.1.2</version>
</dependency>
下面的本章内容仅有这几个依赖被使用。
前言
推荐链接Idea配置热部署,方便调试
9.3.1 JSP表达式
任何语言都有自己的语法,JSP作为java技术的一种应用,还有一些自己扩充的语法(了解即可,不必深入),同时JSP对Java所有的语法都支持。
<%-- 这是JSP的注释 --%>

<%= 变量或者表达式 %>
<%= new java.util.Date()%>
比如在webap目录下新建一个Fori.jsp,路径:
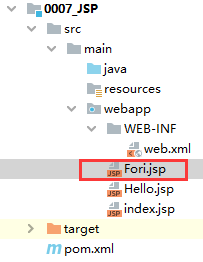
内容如下:
<%--
  Created by IntelliJ IDEA.
  User: HuangDekai
  Date: 2020/4/22
  Time: 2:15
  To change this template use File | Settings | File Templates.
--%>
<%@ page contentType="text/html;charset=UTF-8" language="java" %>
<html>
<head>
    <title>Title</title>
</head>
<body>
    <%
        int sum = 0;
        for (int i = 0; i < 100; i++) {
            sum += i;
        }
        out.println("<h1>"+sum+"</h1>");
    %>
</body>
</html>
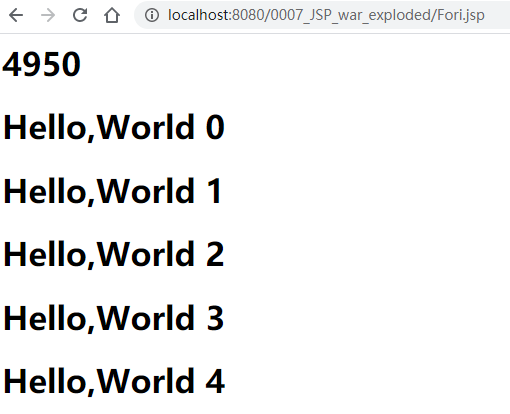
部署后访问Fori.jsp得到如下内容:

9.3.2 JSP脚本片段
JSP可以做一些好玩的事情,将下面的脚本片段加入Fori.jsp里:
<%
	for(int i = 0; i< 5; i++){
%>
	<h1>Hello,World  <%=i%> </h1>
<%
	}
%>
重新部署,访问Fori.jsp里:
打开Fori_jsp.class可以看到这样的代码:

9.3.3 JSP声明
阅读Fori_jsp.class可以看出到目前为止的代码都是写在_jspService这个方法的try{}里面
public void _jspService(final javax.servlet.http.HttpServletRequest request, final javax.servlet.http.HttpServletResponse response)
    throws java.io.IOException, javax.servlet.ServletException{....}
那么怎么写在外面的代码,使用<%! %>
在Fori.jsp中添加如下代码:
<hr>

<%!
    static {
    System.out.println("Loading Servlet!");
	}

	private int globalVar = 0;

	public void Saying(){
    	System.out.println("Sgt. Pepper's Lonely Heart's Club Band");
	}
%>
重新部署到Tomcat,后台打印:

打开Fori_jsp.class可以找到如下代码:
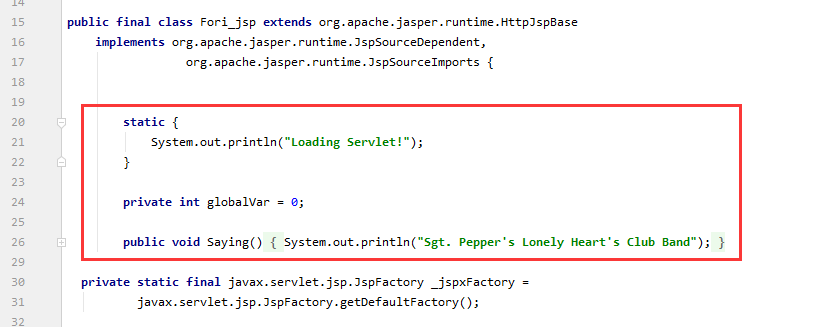
JSP声明: 会被编译到JSP生成Java的类中。其他的就会被生成到jsp_Service方法中
9.4 JSP指令
9.4.1 错误页面
9.4.1.1 在jsp页面修改
-
各文件路径:
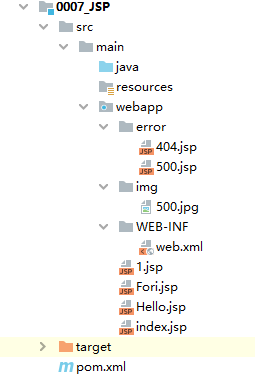
-
1.jsp
<%--
Created by IntelliJ IDEA.
User: HuangDekai
Date: 2020/4/22
Time: 17:54
To change this template use File | Settings | File Templates.
--%>
<%@ page contentType="text/html;charset=UTF-8" language="java" %>
<html>
<head>
<title>Title</title>
</head>
<body>
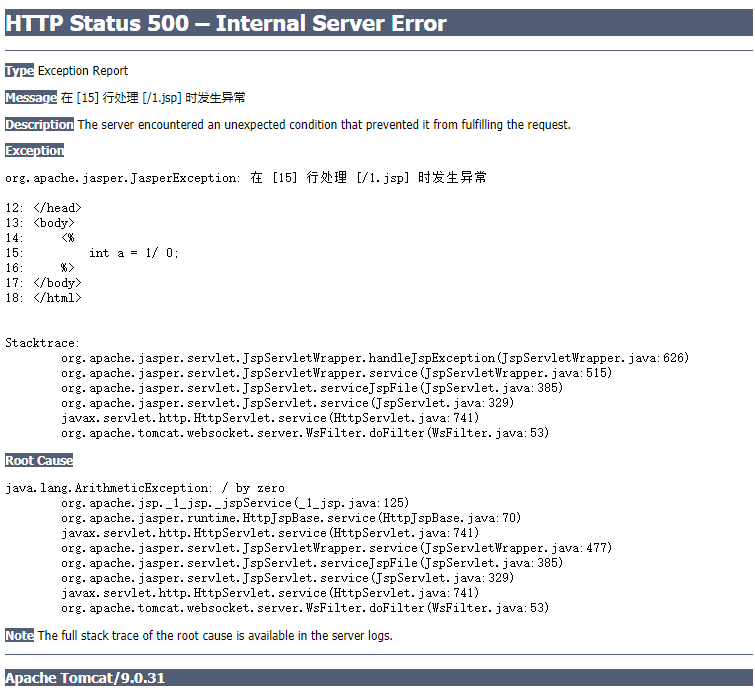
<%
int a = 1/ 0;
%>
</body>
</html>
很显然这是有错误的,当访问时会显示这样的页面:
可以用JSP更换。
因此将1.jsp修改:
<%--
  Created by IntelliJ IDEA.
  User: HuangDekai
  Date: 2020/4/22
  Time: 17:54
  To change this template use File | Settings | File Templates.
--%>
<%@ page contentType="text/html;charset=UTF-8" language="java" %>
<%@ page errorPage="error/500.jsp" %>
<html>
<head>
    <title>Title</title>
</head>
<body>
    <%
        int a = 1/ 0;
    %>
</body>
</html>
添加了<%@ page errorPage="error/500.jsp" %>这样就可以在发生错误的时候显示500.jsp这个页面。
- 500.jsp
<%--
  Created by IntelliJ IDEA.
  User: HuangDekai
  Date: 2020/4/22
  Time: 19:20
  To change this template use File | Settings | File Templates.
--%>
<%@ page contentType="text/html;charset=UTF-8" language="java" %>
<html>
<head>
    <title>Title</title>
</head>
<body>
    <img src="img/500.jpg" alt="Error 500">
</body>
</html>
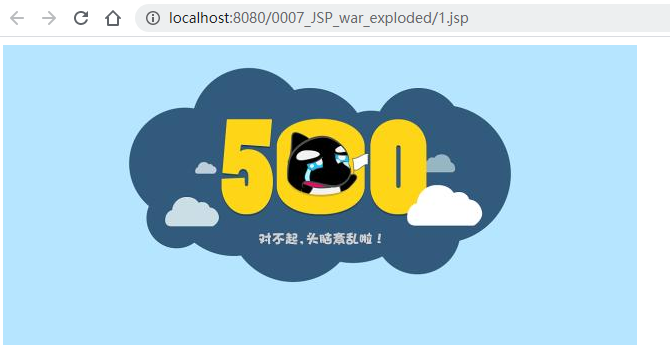
如果是访问1.jsp没有图,可试着将第14行修改为<img src="../img/500.jpg" alt="Error 500">。按照教程此处应为<img src="../img/500.jpg" alt="Error 500">,但这里实操的访问不到500.jpg这个图片,需改为500.jpg相对1.jsp的路径。如果是这种相对路径不一致的问题以后有方法解决,先不必纠结。
这里是由于JSP的静态引入的问题,通过看1.jsp的源码可以看到:

也就是说相当于直接把500.jsp的HTML的内容直接复制粘贴过来了。
JSP的问题就应该JSP解决,可以讲500.jsp的对应语句改为:
<img src="<%=request.getContextPath()%>/img/500.jpg" alt="500Error">
EL表达式,后面会讲到。
- 500.jpg是随便在网上找的一个500Error的图。
访问1.jsp,这个时候页面显示如下:

9.4.1.2 通过修改web.xml
很显然,上面的方式十分繁琐。至少比起这个方法,第一种方式需要在每个页面都写errorPage。
可以通过修改web.xml去做到同样效果:
<?xml version="1.0" encoding="UTF-8"?>
<web-app xmlns="http://xmlns.jcp.org/xml/ns/javaee"
         xmlns:xsi="http://www.w3.org/2001/XMLSchema-instance"
         xsi:schemaLocation="http://xmlns.jcp.org/xml/ns/javaee
                               http://xmlns.jcp.org/xml/ns/javaee/web-app_4_0.xsd"
         version="4.0"
         metadata-complete="true">

  <error-page>
    <error-code>404</error-code>
    <location>/error/404.jsp</location>
  </error-page>
  <error-page>
    <error-code>500</error-code>
    <location>/error/500.jsp</location>
  </error-page>
</web-app>
删掉1.jsp的<%@ page errorPage="error/500.jsp" %>
404.jsp随便的页面即可,例如:
<%--
  Created by IntelliJ IDEA.
  User: HuangDekai
  Date: 2020/4/22
  Time: 22:45
  To change this template use File | Settings | File Templates.
--%>
<%@ page contentType="text/html;charset=UTF-8" language="java" %>
<html>
<head>
    <title>Title</title>
</head>
<body>
    <h1>Error 404</h1>
</body>
</html>
重启Tomcat(非热部署,修改web.xml和Java代码需要重启Tomcat),访问1.jsp显示:
随便访问一个不存在的地址:

9.4.1.3 公共页

比如说B站的这个部分,每个页面都有。
这就是公共页。一般放在common文件夹里。下面是路径:

header.jsp
<%--
  Created by IntelliJ IDEA.
  User: HuangDekai
  Date: 2020/4/23
  Time: 22:57
  To change this template use File | Settings | File Templates.
--%>
<%@ page contentType="text/html;charset=UTF-8" language="java" %>
<html>
<head>
    <title>Title</title>
</head>
<body>
    <h1>Header</h1>
</body>
</html>
footer.jsp
<%--
  Created by IntelliJ IDEA.
  User: HuangDekai
  Date: 2020/4/23
  Time: 22:57
  To change this template use File | Settings | File Templates.
--%>
<%@ page contentType="text/html;charset=UTF-8" language="java" %>
<html>
<head>
    <title>Title</title>
</head>
<body>
    <h1>Footer</h1>
</body>
</html>
2.jsp
<%--
Created by IntelliJ IDEA.
User: HuangDekai
Date: 2020/4/23
Time: 22:59
To change this template use File | Settings | File Templates.
--%>
<%@ page contentType="text/html;charset=UTF-8" language="java" %>
<html>
<head>
<title>Title</title>
</head>
<body>
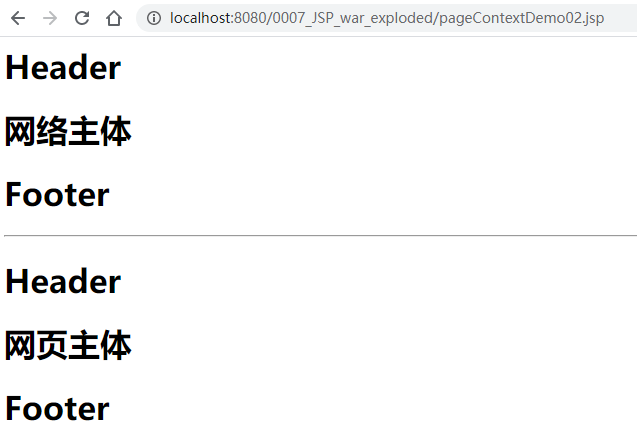
<%@include file="/common/footer.jsp"%>
<h1>网络主体</h1>
<%@include file="common/footer.jsp"%>
</body>
</html>
重新部署Tomcat,访问2.jsp,可以看到:

当然,也可以用jsp标签实现同样的效果。将2.jsp修改,只多了第18到23行:
<%--
  Created by IntelliJ IDEA.
  User: HuangDekai
  Date: 2020/4/23
  Time: 22:59
  To change this template use File | Settings | File Templates.
--%>
<%@ page contentType="text/html;charset=UTF-8" language="java" %>
<html>
<head>
    <title>Title</title>
</head>
<body>
    <%@include file="common/header.jsp"%>
    <h1>网络主体</h1>
    <%@include file="common/footer.jsp"%>

    <hr>

    <%-- JSP标签 --%>
    <jsp:include page="/common/header.jsp"></jsp:include>
    <h1>网页主体</h1>
    <jsp:include page="/common/footer.jsp"></jsp:include>

</body>
</html>
虽然
重新部署后访问2.jsp看到:

打开它生成的_2_jsp.java文件,发现这几个语句:


因此,<%@include%>会将两个页面合二为一(解释前面路径不对显示不出图片的问题),<jsp:include>拼接页面,本质上还是几个不同的页面。一般用<jsp:include>,更灵活(不过话说现在连JSP都没人用了......)。
9.5 JSP的9大内置对象及其作用域
9.5.1 内置对象
- PageContext 存东西
- Request 存东西
- Response
- Session 存东西
- Application 【ServletContext】存东西
- config【ServletConfig】
- out
- page
- exception
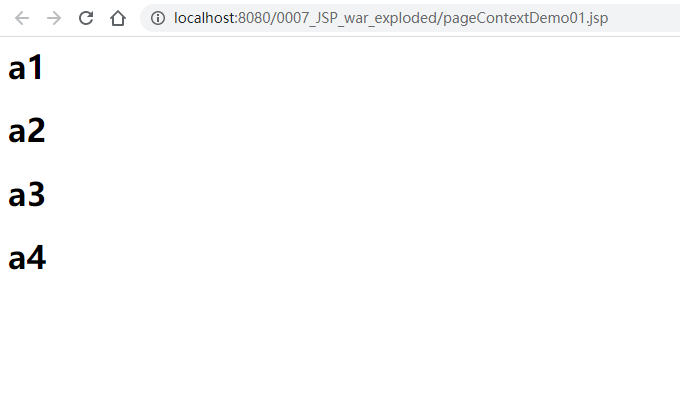
在webapp目录下建一个pageContextDemo01.jsp的文件,内容如下:
<%--
  Created by IntelliJ IDEA.
  User: HuangDekai
  Date: 2020/4/23
  Time: 23:54
  To change this template use File | Settings | File Templates.
--%>
<%@ page contentType="text/html;charset=UTF-8" language="java" %>
<html>
<head>
    <title>Title</title>
</head>
<body>
    <%
      pageContext.setAttribute("name1","a1");
      request.setAttribute("name2","a2");
      session.setAttribute("name3","a3");
      application.setAttribute("name4","a4");
    %>
    <%
    // 取出值(此处代码会被原封不动转为java代码,应用//做注释)
    // 为了学习,不直接取,而是通过寻找的方式来
        String  naem1 = (String) pageContext.findAttribute("naem1");
        String  naem2 = (String) pageContext.findAttribute("naem2");
        String  naem3 = (String) pageContext.findAttribute("naem3");
        String  naem4 = (String) pageContext.findAttribute("naem4");
        String  naem5 = (String) pageContext.findAttribute("naem5");
    %>

    <%--  使用EL表达式取  --%>
    <h1>${name1}</h1>
    <h1>${name2}</h1>
    <h1>${name3}</h1>
    <h1>${name4}</h1>

    <%--  下面这个值是不存在的  --%>
    <h1>${name5}</h1>

</body>
</html>
重新部署Tomcat,访问pageContextDemo01.jsp可以看到:
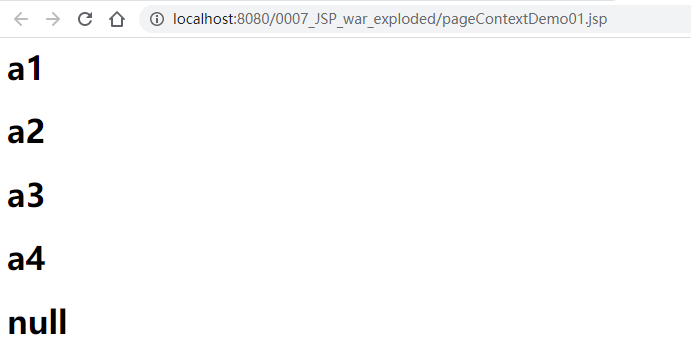
若将第37行改为<h1><%= name5%></h1>的形式,重新部署后访问可以看到:
9.5.2 作用域
<%
// 保存的数据只在一个页面种有效
pageContext.setAttribute("name1","a1");

// 保存的数据只在一次请求中有效,请求转发会携带这个页面
request.setAttribute("name2","a2");

// 保存的数据只在一次会话中有效,从打开浏览器到关闭浏览器
session.setAttribute("name3","a3");

// 保存的数据在服务器中有效,从打开服务器到关闭服务器
application.setAttribute("name4","a4");
%>
在webapp目录下创建pageDemo02.jsp,代码如下,只是从pageContextDemo01.jsp中复制粘贴了部分过来:
<%--
Created by IntelliJ IDEA.
User: HuangDekai
Date: 2020/4/24
Time: 0:27
To change this template use File | Settings | File Templates.
--%>
<%@ page contentType="text/html;charset=UTF-8" language="java" %>
<html>
<head>
<title>Title</title>
</head>
<body>
<%
// 取出值(此处代码会被原封不动转为java代码,应用//做注释)
// 为了学习,不直接取,而是通过寻找的方式来
String naem1 = (String) pageContext.findAttribute("naem1");
String naem2 = (String) pageContext.findAttribute("naem2");
String naem3 = (String) pageContext.findAttribute("naem3");
String naem4 = (String) pageContext.findAttribute("naem4");
String naem5 = (String) pageContext.findAttribute("naem5");
%>
<%-- 使用EL表达式取 --%>
<h1>${name1}</h1>
<h1>${name2}</h1>
<h1>${name3}</h1>
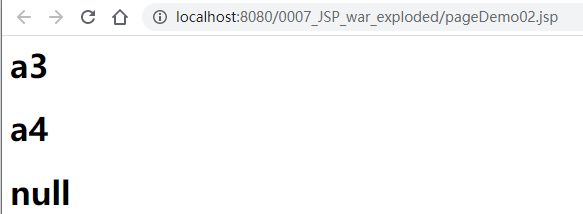
<h1>${name4}</h1>
<%-- 下面这个值是不存在的 --%>
<h1><%=naem5%></h1>
</body>
</html>
部署后访问pageDemo02.jsp可以看到(冷部署的话需要先访问pageContextDemo01.jsp赋值):
访问pageContext.setAttribute()的源码,发现有abstract public void setAttribute(String name, Object value, int scope);
去找到它的实现类:

有一段这样的代码:
public void setAttribute(String name, Object attribute, int scope) {
    switch(scope) {
        case 1:
            this.mPage.put(name, attribute);
            break;
        case 2:
            this.mRequest.put(name, attribute);
            break;
        case 3:
            this.mSession.put(name, attribute);
            break;
        case 4:
            this.mApp.put(name, attribute);
            break;
        default:
            throw new IllegalArgumentException("Bad scope " + scope);
    }

}
同时,PageContentImpl也继承了PageContent,打开,检索可以看到如下代码:
/**
     * Page scope: (this is the default) the named reference remains available
     * in this PageContext until the return from the current Servlet.service()
     * invocation.
     */
public static final int PAGE_SCOPE		= 1;

/**
     * Request scope: the named reference remains available from the
     * ServletRequest associated with the Servlet until the current request
     * is completed.
     */

public static final int REQUEST_SCOPE	= 2;

/**
     * Session scope (only valid if this page participates in a session):
     * the named reference remains available from the HttpSession (if any)
     * associated with the Servlet until the HttpSession is invalidated.
     */

public static final int SESSION_SCOPE	= 3;

/**
     * Application scope: named reference remains available in the
     * ServletContext until it is reclaimed.
     */

public static final int APPLICATION_SCOPE	= 4;
这代表了可以自己规定某些东西的作用域(一般不建议这么玩)
在webapp目录下创建pageDemo03.jsp其代码如下:
<%--
  Created by IntelliJ IDEA.
  User: HuangDekai
  Date: 2020/4/24
  Time: 0:51
  To change this template use File | Settings | File Templates.
--%>
<%@ page contentType="text/html;charset=UTF-8" language="java" %>
<html>
<head>
    <title>Title</title>
</head>
<body>
    <%
        pageContext.setAttribute("hello1","hello1",PageContext.SESSION_SCOPE);
    %>
</body>
</html>
其等价于session.setAttribute()。
JSP去获取值类似于JVM的双亲委派机制。
9.5.3 顺便内容-请求转发
在webapp目录下创建pageContentDemo02.jsp,内容如下:
<%--
  Created by IntelliJ IDEA.
  User: HuangDekai
  Date: 2020/4/24
  Time: 2:12
  To change this template use File | Settings | File Templates.
--%>
<%@ page contentType="text/html;charset=UTF-8" language="java" %>
<html>
<head>
    <title>Title</title>
</head>
<body>
    <%
        pageContext.forward("/2.jsp");
    %>
</body>
</html>
重启Tomcat后访问pageContextDemo03.jsp结果如下:
相当于request.getRequestDispatcher('/2.jsp').forward(request,respond);
-
request:客户端向服务器发送请求,产生的数据,用户看完就没用了,比如:新闻,用户看完没用的
-
session: 客户端向服务器发送请求,产生的数据,用户用完一会还有用,比如:购物车;Hystrix
-
application:客户端向服务器发送请求,产生的数据,一个用户用完了,其他用户还可能使用,比如:聊天数据。
原文链接:https://www.cnblogs.com/duzhuan/p/12768197.html
如有疑问请与原作者联系
标签:
版权申明:本站文章部分自网络,如有侵权,请联系:west999com@outlook.com
特别注意:本站所有转载文章言论不代表本站观点,本站所提供的摄影照片,插画,设计作品,如需使用,请与原作者联系,版权归原作者所有

- 今天来介绍java 各版本的新特性,一篇文章让你了解 2020-06-10
- 是时候了解下软件开发的生命周期了! 2020-06-06
- 【JVM故事】了解JVM的结构,好在面试时吹牛 2020-06-06
- 你与面试官所了解的单例模式并不一样! 2020-06-06
- XStream学习手册 2020-06-04
IDC资讯: 主机资讯 注册资讯 托管资讯 vps资讯 网站建设
网站运营: 建站经验 策划盈利 搜索优化 网站推广 免费资源
网络编程: Asp.Net编程 Asp编程 Php编程 Xml编程 Access Mssql Mysql 其它
服务器技术: Web服务器 Ftp服务器 Mail服务器 Dns服务器 安全防护
软件技巧: 其它软件 Word Excel Powerpoint Ghost Vista QQ空间 QQ FlashGet 迅雷
网页制作: FrontPages Dreamweaver Javascript css photoshop fireworks Flash
