
Spring cloudѧϰһ
2020-05-14 16:08:37��Դ������ �Ķ� ()

Spring cloudѧϰһ
SpringCLoud
����
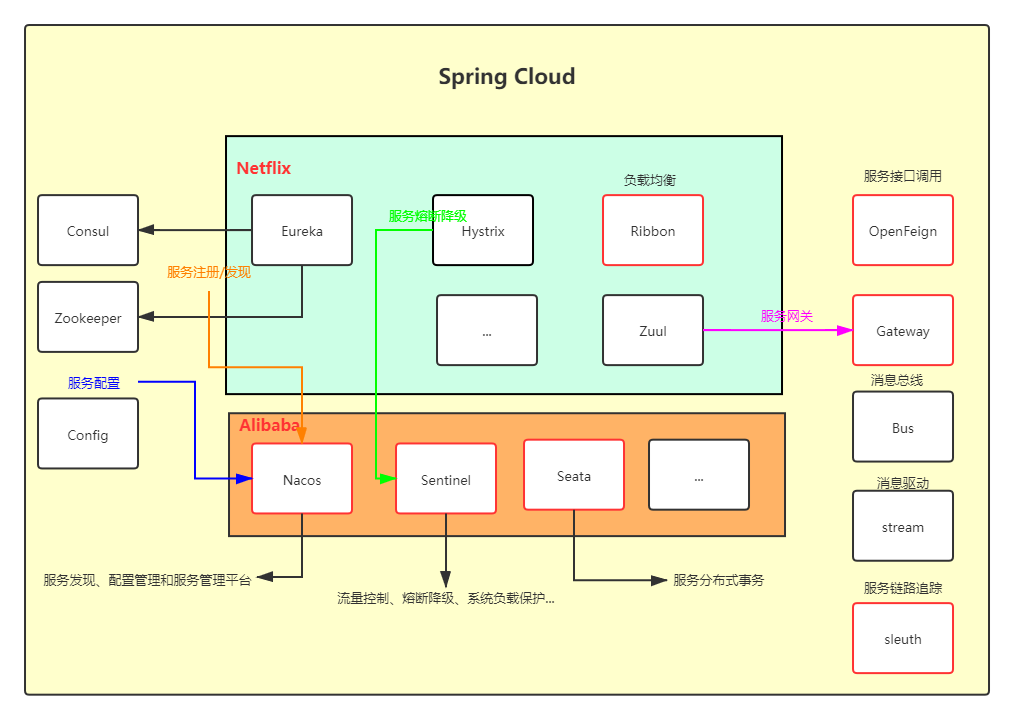
����ע��/����&ע������
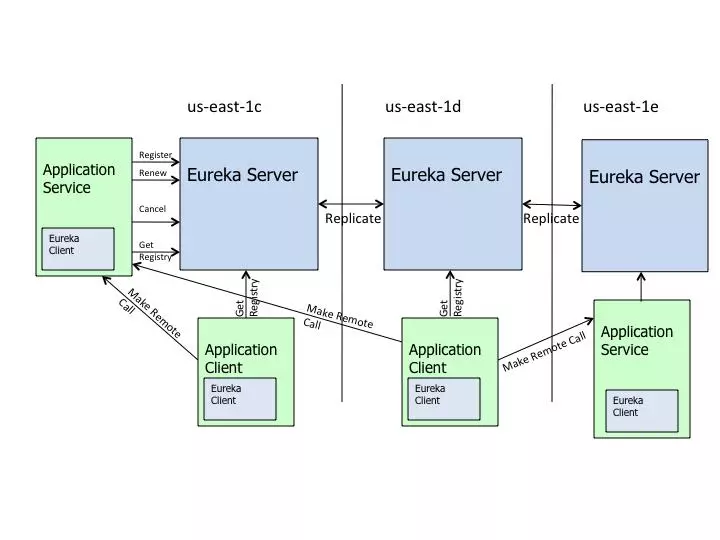
1��Eureka
����ע�ᣨ�����ṩ�ߣ�/���֣���������ߣ�&ע�����ģ������н飩

-
����ע�
��
Eureka�ͻ�����Eureka Serverע��ʱ�����ṩ������Ԫ����������IP��ַ���˿ڣ�����״��ָʾ��URL����ҳ�ȡ� -
������Լ��
Eureka�ͻ���ÿ��30��(Ĭ�������)����һ����������Լ��ͨ����Լ����֪Eureka Server��Eureka�ͻ���Ȼ���ڣ�û�г������⡣��������£����Eureka Server��90��û���յ�Eureka�ͻ�����Լ�����Ὣʵ������ע�����ɾ���� -
��������
Eureka�ͻ����ڳ���ر�ʱ��Eureka����������ȡ������������ÿͻ���ʵ����Ϣ���ӷ�������ʵ��ע�����ɾ���������������Զ���ɣ�����Ҫ�����������ݣ�
DiscoveryManager.getInstance().shutdownComponent(); -
������
��Ĭ�ϵ�����£���Eureka�ͻ�������90��(3����Լ����)û����Eureka���������ͷ�����Լ����������Eureka�������Ὣ�÷���ʵ���ӷ���ע���б�ɾ��������������
-
��ȡע���б���Ϣ Fetch Registries
Eureka�ͻ��˴ӷ�������ȡע�����Ϣ�������仺���ڱ��� �� ��ע���б���Ϣ���ڣ�ÿ30���ӣ�����һ�Ρ� ��Ĭ�ϵ������Eureka�ͻ���ʹ��ѹ��JSON��ʽ����ȡע���б�����Ϣ�� -
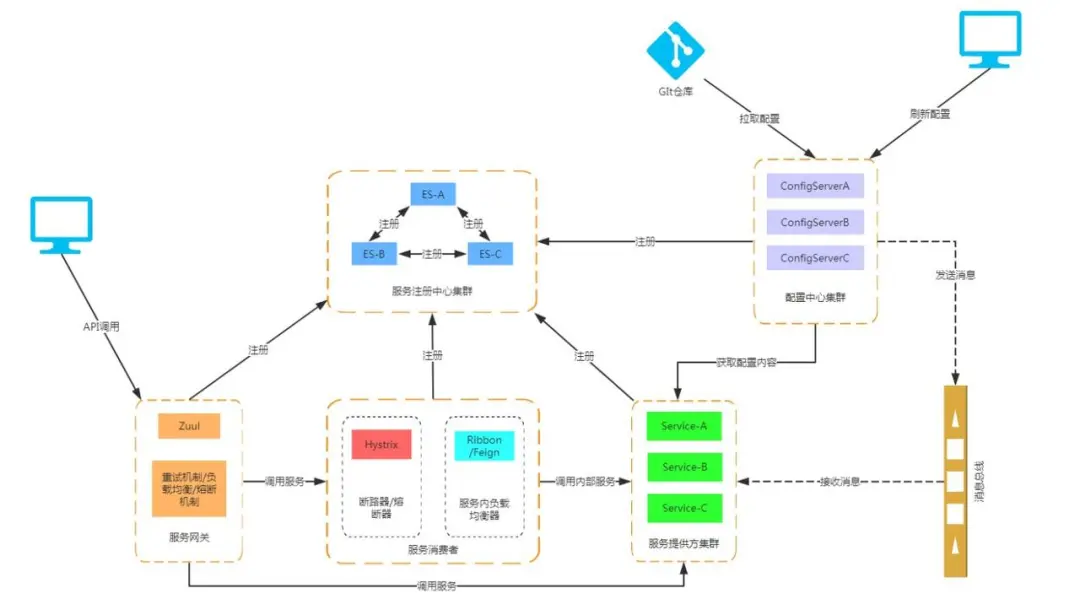
�ܹ�ͼ
-
����
-
ע������
-
pom���汾�游��Ŀ��
����Ŀ
<!--spring cloud Hoxton.SR1--> <dependency> <groupId>org.springframework.cloud</groupId> <artifactId>spring-cloud-dependencies</artifactId> <version>Hoxton.SR1</version> <type>pom</type> <scope>import</scope> </dependency>ע������
<!--eureka-server--> <dependency> <groupId>org.springframework.cloud</groupId> <artifactId>spring-cloud-starter-netflix-eureka-server</artifactId> </dependency> -
yml
fetch-registryΪtrue��ʾ��ȡע����Ϣ�б����������Ŀ����ע�����ģ���Ϊfalse��ʾ����ȥ��ȡ��
eureka: instance: hostname: eureka7001.com #eureka����˵�ʵ������ client: register-with-eureka: false #false��ʾ����ע������ע���Լ��� fetch-registry: false #false��ʾ�Լ��˾���ע�����ģ��ҵ�ְ�����ά������ʵ����������Ҫȥ�������� service-url: #��Ⱥָ������eureka # defaultZone: http://eureka7002.com:7002/eureka/ #��������7001�Լ� defaultZone: http://eureka7001.com:7001/eureka/ #server: #�ر����ұ������ƣ���֤�����÷���ʱ�߳� #enable-self-preservation: false #eviction-interval-timer-in-ms: 2000��·�����ҵ�hosts�ļ�C:\Windows\System32\drivers\etc��������һ����Ϣ������ֱ��ͨ����������
# springcloud-eureka 127.0.0.1 eureka7001.com 127.0.0.1 eureka7002.com -
��������
@EnableEurekaServerע���Eureka@SpringBootApplication @EnableEurekaServer public class EurekaServerMain7001 { public static void main(String[] args) { SpringApplication.run(EurekaServerMain7001.class,args); } }
-
-
�ͻ���
-
pom
<!-- eureka-client --> <dependency> <groupId>org.springframework.cloud</groupId> <artifactId>spring-cloud-starter-netflix-eureka-client</artifactId> </dependency> -
yml
eureka: client: register-with-eureka: true #������ע�ᵽeureka fetch-registry: true service-url: defaultZone: http://localhost:7001/eureka # http://eureka7001.com:7001/eureka/ Ҳ���� # defaultZone: http://eureka7001.com:7001/eureka,http://eureka7002.com:7002/eureka # ��Ⱥ�� -
������
@EnableEurekaClient@SpringBootApplication @EnableEurekaClient public class PaymentMain8001 { public static void main(String[] args) { SpringApplication.run(PaymentMain8001.class, args); } }
-
-
2��Consul
3��Zookeeper
����ӿڵ���
OpenFeign
OpenFeign ֱ�������� Ribbon��
RestTemplate��Spring�ṩ��һ������Http����Ŀͻ����� �������������ӣ����Ǿ���ͨ��/judge·�����ʵ�http://localhost:8081//service1
@Autowired
private RestTemplate restTemplate;
// �������ṩ��A��ip��ַ���������ʹ���� Eureka ��ô��Ӧ�����ṩ��A������
privatestaticfinal String SERVICE_PROVIDER_A = "http://localhost:8081";
@PostMapping("/judge")
public boolean judge(@RequestBody Request request) {
String url = SERVICE_PROVIDER_A + "/service1";
return restTemplate.postForObject(url, request, Boolean.class);
}
ʹ����Щ�鷳��OpenFeign�������� ������IP��ַ��ӳ��һ�����з����ĵ���
-
ʵ��
- ���Ѷ�
-
pom
<!--openfeign--> <dependency> <groupId>org.springframework.cloud</groupId> <artifactId>spring-cloud-starter-openfeign</artifactId> </dependency> -
yml
��Ĭ�ϵȴ�ʱ���ӳ���Ĭ��Ϊһ�룬��Ϊ����Զ�̷������Ѿ������Ŀֱ�ӵĵ���������ɳ�ʱ��
#����feign�ͻ��˳�ʱʱ��(OpenFeignĬ��֧��ribbon) ribbon: #ָ���ǽ����������õ�ʱ�䣬����������״�������������,�����������õ�ʱ�� ReadTimeout: 5000 #ָ���ǽ������Ӻ�ӷ�������ȡ��������Դ���õ�ʱ�� ConnectTimeout: 5000 -
��������
@SpringBootApplication @EnableFeignClients public class OrderFeignMain80 { public static void main(String[] args) { SpringApplication.run(OrderFeignMain80.class, args); } } -
service
@Component @FeignClient(value = "CLOUD-PAYMENT-SERVICE") public interface PaymentFeignService { @GetMapping(value = "/payment/get/{id}") public CommonResult<Payment> getPaymentById(@PathVariable("id") Long id); @GetMapping(value = "/payment/feign/timeout") public String paymentFeignTimeout(); } -
Controller
Controller�Ϳ�����ԭ������Service�����һ���������ˡ�@RestController @Slf4j public class OrderFeignController { @Resource private PaymentFeignService paymentFeignService; @GetMapping(value = "/consumer/payment/get/{id}") public CommonResult<Payment> getPaymentById(@PathVariable("id") Long id) { return paymentFeignService.getPaymentById(id); } @GetMapping(value = "/consumer/payment/feign/timeout") public String paymentFeignTimeout() { // OpenFeign�ͻ���һ��Ĭ�ϵȴ�1���� return paymentFeignService.paymentFeignTimeout(); } }
-
�ṩ��
ʵ��@FeignClientע���ע���·��ӳ�伴��
���ؾ���
Ribbon�������ᣩ
�����������߶����еĸ��ؾ��� ��
- RoundRobinRule����ѯ���ԡ�RibbonĬ�ϲ��õIJ��ԡ�������һ����ѯû���ҵ����õ�provider���������ѯ 10 �֡������ջ�û���ҵ����� null����Ĭ����
- RandomRule: ������ԣ������п��õ� provider �����ѡ��һ����
- RetryRule: ���Բ��ԡ��Ȱ��� RoundRobinRule ���Ի�ȡ provider������ȡʧ�ܣ�����ָ����ʱ�������ԡ�Ĭ�ϵ�ʱ��Ϊ 500 ���롣
ʵ�֣�
-
������
@Configuration public class ApplicationContextConfig { @Bean @LoadBalanced public RestTemplate getRestTemplate() { return new RestTemplate(); } }ע�⣺������Eureka���������ṩ�ˣ����������Ѷ�
�Զ��帺�ؾ����㷨
-
ʵ��
IRule�ӿ� -
�������ļ������Զ���
Java Config�ࡣ -
��������������ͬ������Ҳ������������ͬ�������Ӱ��¡�
������������
com.lx���Զ��帺�ؾ�����
com.myrule��@Configuration public class MySelfRule { @Bean public IRule myRule() { return new RandomRule();//������� } }
�����۶Ͻ���
Hystrix�������ޣ�
Hystrix��һ���⣬��ͨ�����ӵȴ�ʱ�������ݴ�����������������Щ�ֲ�ʽ����֮��Ľ�����Hystrixͨ���������֮��ķ��ʵ㣬ֹͣ����֮��ļ������ϲ��ṩ��ѡ����ʵ�ִ�Ŀ�ģ�������Щ���������ϵͳ�����嵯�ԡ�
�������У�ͨ�����кܶ��ķ�����á����һ���ײ����������⣬���ϻᱻ���ϴ������û���������Ҫһ�ֻ��ƣ����ײ������ʱ��������Ϲ��ϵĴ���������Ƕ�·�������á�����ϵͳ�����ȶ��Ե����һ�ر��ϡ�
��springcloud�ж�·���������Hystrix��HystrixҲ��Netflix����һ���֡����Ĺ����ǣ�����ij������ĵ�����һ����ʱ���ڣ�Ĭ��10000ms�����г���һ��������Ĭ��20�Σ�����ʧ���ʳ���һ��ֵ��Ĭ��50%����(���������
HystrixCommandProperties��)���÷���Ķ�·���������һ���ɿ������趨��fallback��fallback��������һ����Hystrix�����ķ�����ã�Ҳ�����ǹ̶���ֵ��fallbackҲ������Ƴ���ʽ���ã���ִ��ijЩ�����ٷ���fallback��
Hystrix������
- ��ͨ���������ͻ��˿���ʵ������ͨ����ͨ�����磩���ӳٺ��Ͻ��б����Ϳ��ơ�
- �ڸ��ӵķֲ�ʽϵͳ����ֹ�������ϡ�
- ����ʧ�ܣ����ٻָ���
- ���ˣ����������ŵؽ�����
- ���ý�ʵʱ��ء������Ͳ������ơ�
1������
�龰��
- ���������쳣
- ��ʱ
- �����۶ϴ�������
- �̳߳�/�ź���Ҳ�ᵼ�·���
ʵ�֣�
-
pom
<dependency> <groupId>org.springframework.cloud</groupId> <artifactId>spring-cloud-starter-netflix-hystrix</artifactId> </dependency> -
������
@SpringBootApplication @EnableEurekaClient @EnableCircuitBreaker public class PaymentHystrixMain8001 { public static void main(String[] args) { SpringApplication.run(PaymentHystrixMain8001.class,args); } /** *��������Ϊ�˷����ض����ã�������ݴ������أ�springcloud������Ŀ� *ServletRegistrationBean��Ϊspringboot��Ĭ��·������"/hystrix.stream"�� *ֻҪ���Լ�����Ŀ�������������servlet�Ϳ����� */ @Bean public ServletRegistrationBean getServlet() { HystrixMetricsStreamServlet streamServlet = new HystrixMetricsStreamServlet(); ServletRegistrationBean registrationBean = new ServletRegistrationBean(streamServlet); registrationBean.setLoadOnStartup(1); registrationBean.addUrlMappings("/hystrix.stream"); registrationBean.setName("HystrixMetricsStreamServlet"); return registrationBean; } } -
service
/** * @Description: �������� * @Param0: id **/ public String paymentInfo_OK(Integer id) { return "�̳߳�: "+Thread.currentThread().getName()+" paymentInfo_OK,id: "+id+"\t"+"O(��_��)O����~"; } /** * @Description: ��ʱ����/�����쳣,2s * @Param0: id **/ @HystrixCommand(fallbackMethod = "paymentInfo_TimeOutHandler", commandProperties={@HystrixProperty(name="execution.isolation.thread.timeoutInMilliseconds",value="2000")}) public String paymentInfo_TimeOut(Integer id) { int timeSleep=3000; try { TimeUnit.MILLISECONDS.sleep(timeSleep); } catch (InterruptedException e) { e.printStackTrace(); } return "�̳߳�: "+Thread.currentThread().getName()+" id: "+id+"\t"+"O(��_��)O����~"+" ��ʱ(����): "+timeSleep; } /** * @Description: ��ʱ���� **/ public String paymentInfo_TimeOutHandler(Integer id) { return "�̳߳�: "+Thread.currentThread().getName()+" 8001ϵͳ��æ�����Ժ�����,id: "+id+"\t"+"o(�i�n�i)o"; } /** * @Description: �����쳣 * @Param0: id **/ @HystrixCommand(fallbackMethod = "paymentInfo_ExceptionHandler") public String paymentInfo_Exception(Integer id) { int i=10/0; return "�̳߳�: "+Thread.currentThread().getName()+" id: "+id+"\t"+"O(��_��)O����~"+" ��� "+i; } /** * @Description: �쳣���� **/ public String paymentInfo_ExceptionHandler(Integer id) { return "�̳߳�: "+Thread.currentThread().getName()+" 8001���б��������Ժ�����,id: "+id+"\t"+"o(�i�n�i)o"; } -
���⣺
- һ������ƥ��һ��fallbackָ���ķ���
- �����쳣���������ǵ���Ҫ����������һ��
-
����
�ڵ��ö�controller���ϼ���@DefaultPropertiesע�⣬ָ���������ȫ�ֽ�����������
@RestController @DefaultProperties(defaultFallback = "payment_Global_FallbackMethod") public class OrderOpenFeignController { @Resource PaymentService paymentService; @Resource PaymentHystrixService paymentHystrixService; @GetMapping("/consumer/payment/get/{id}") public CommonResult<Payment> getPayment(@PathVariable("id") Long id) { return paymentService.getPaymentByid(id); } @GetMapping("/consumer/payment/hystrix/ok/{id}") public String paymentInfo_OK(@PathVariable("id") Integer id) { String result = paymentHystrixService.paymentInfo_OK(id); System.out.println("*****result: "+result); return result; } @GetMapping("/consumer/payment/hystrix/timeout/{id}") /* @HystrixCommand(fallbackMethod = "paymentTimeOutFallbackMethod",commandProperties = { @HystrixProperty(name="execution.isolation.thread.timeoutInMilliseconds",value="1500") })*/ //ʹ��ȫ�ִ���֮��д�����ע�⣬�������Դ���ʹ��Ĭ�ϵ�ȫ�ִ������� @HystrixCommand public String paymentInfo_TimeOut(@PathVariable("id") Integer id) { String result = paymentHystrixService.paymentInfo_TimeOut(id); System.out.println("*****result: "+result); return result; } public String paymentTimeOutFallbackMethod(@PathVariable("id") Integer id){ return "timeout"; } // ������ȫ��fallback���� public String payment_Global_FallbackMethod() { return "Global�쳣������Ϣ�����Ժ����ԣ�/(��o��)/~~"; } }
2�������۶�
��ȱ���˿�ﵽ��������ʺ�,ֱ�Ӿܾ�����,��բ��,Ȼ����÷����ķ����������Ѻ���ʾ ��
����Ľ���->�����۶�->�ָ�������·
ʵ�֣�
-
? service
//=====�����۶� @HystrixCommand(fallbackMethod = "paymentCircuitBreaker_fallback",commandProperties = { @HystrixProperty(name = "circuitBreaker.enabled",value = "true"),// �Ƿ�����·�� @HystrixProperty(name = "circuitBreaker.requestVolumeThreshold",value = "10"),// ������� @HystrixProperty(name = "circuitBreaker.sleepWindowInMilliseconds",value = "10000"), // ʱ�䴰���� @HystrixProperty(name = "circuitBreaker.errorThresholdPercentage",value = "60"),// ʧ���ʴﵽ���ٺ���բ }) public String paymentCircuitBreaker(@PathVariable("id") Integer id) { if(id < 0) { throw new RuntimeException("******id ���ܸ���"); } String serialNumber = IdUtil.simpleUUID(); return Thread.currentThread().getName()+"\t"+"���óɹ�����ˮ��: " + serialNumber; } public String paymentCircuitBreaker_fallback(@PathVariable("id") Integer id) { return "id ���ܸ��������Ժ����ԣ�/(��o��)/~~ id: " +id; } -
����
ͨ���ı�������ʣ���ʹ�ø��������ǻᴥ����������ν����������Զ����۶ϣ�����Ϊ��ʹʹ������������Ȼ�ǽ�����������֮���ָ�����������
3��������
ʵ�֣�
-
pom
<dependency> <groupId>org.springframework.cloud</groupId> <artifactId>spring-cloud-starter-netflix-hystrix-dashboard</artifactId> </dependency> -
yml
9001�˿�
-
��������
@EnableHystrixDashboard
-
Ҫ�������ṩ����˶�����actuator
<dependency> <groupId>org.springframework.boot</groupId> <artifactId>spring-boot-starter-actuator</artifactId> </dependency> -
�˰汾��Ҫ����·��,������һ��ͼƬ·������
@Bean
    public ServletRegistrationBean getServlet() {
        HystrixMetricsStreamServlet streamServlet = new HystrixMetricsStreamServlet();
        ServletRegistrationBean registrationBean = new ServletRegistrationBean(streamServlet);
        registrationBean.setLoadOnStartup(1);
        registrationBean.addUrlMappings("/hystrix.stream");
        registrationBean.setName("HystrixMetricsStreamServlet");
        return registrationBean;
    }
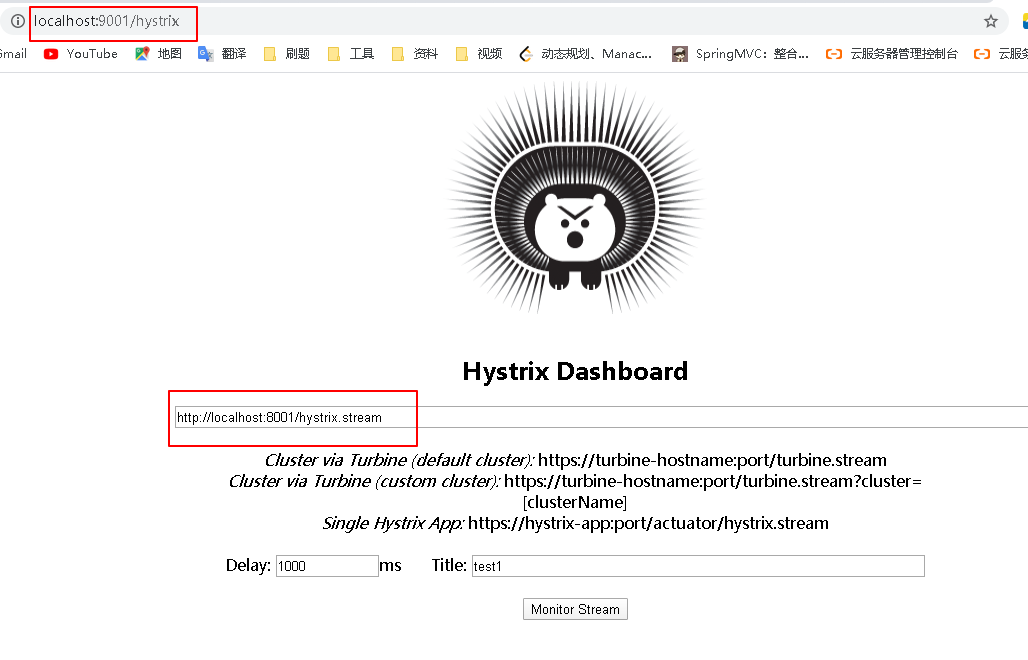
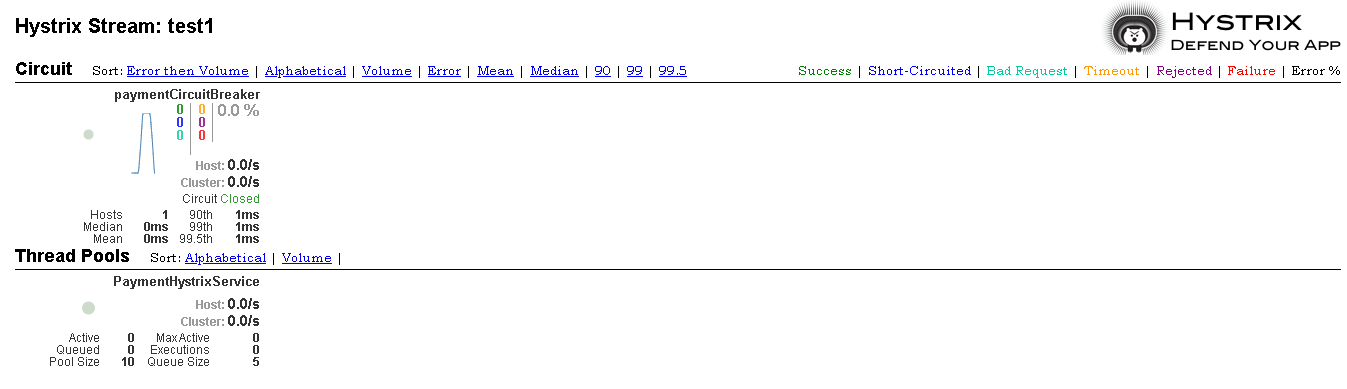
ע�⣺ÿ����ɫ�����ֶ�Ӧ���Ϸ�ÿ�����ԣ����磬��ɫ�����ɹ�������
��������
-
����ְ��
<img src="https://gitee.com/jklixin/images/raw/master/cloud/aHR0cDovL2Nvcy5yYWluMTAyNC5jb20vbWFya2Rvd24vaW1hZ2UtMjAxOTEwMDgxNjAzMjUwMjEucG5n.jpg" alt="img" style="zoom: 50%;" /> -
���ط����빦�ܣ�
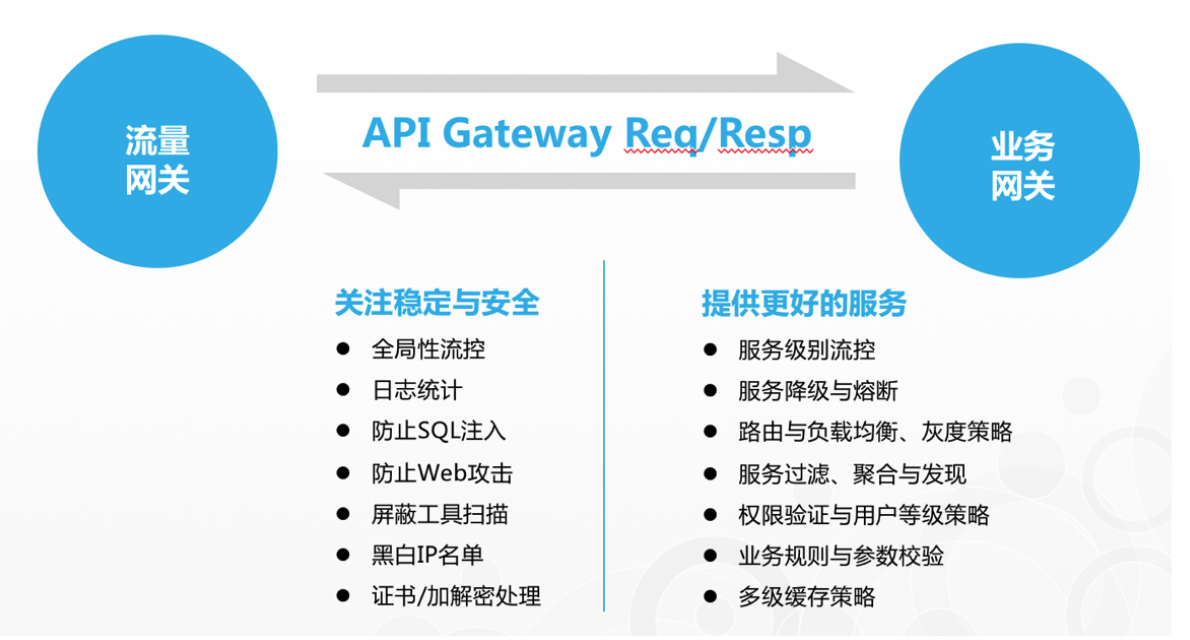
1��Gateway
Ϊ����ܹ��ṩһ�ּ���Ч��ͳһ��API·�ɹ�����ʽ
-
ʵ��
-
pom
<dependency> <groupId>org.springframework.cloud</groupId> <artifactId>spring-cloud-starter-gateway</artifactId> </dependency> -
yml
server: port: 9527 spring: application: name: cloud-gateway cloud: gateway: discovery: locator: enabled: true #������ע�����Ķ�̬����·�ɵĹ��ܣ���������������·�� routes: - id: payment_routh #·�ɵ�ID��û�й̶�����Ҫ��Ψһ��������Ϸ����� # uri: http://localhost:8001 #ƥ����ṩ�����·�ɵ�ַ uri: lb://cloud-payment-service #ƥ����ṩ�����·�ɵ�ַ predicates: - Path=/payment/** # ���ԣ�·����ƥ��Ľ���·�� eureka: instance: hostname: cloud-gateway-service client: #�����ṩ��providerע���eureka�����б��� service-url: register-with-eureka: true fetch-registry: true defaultZone: http://eureka7001.com:7001/eureka -
������
@SpringBootApplication @EnableEurekaClient public class GatewayMain9527 { public static void main(String[] args) { SpringApplication.run(GatewayMain9527.class,args); } } -
���ԣ�
ͨ���˿�9527���ʷ�����Ϊcloud-payment-service�ķ���·��ƥ��ʱ���ʳɹ�
-
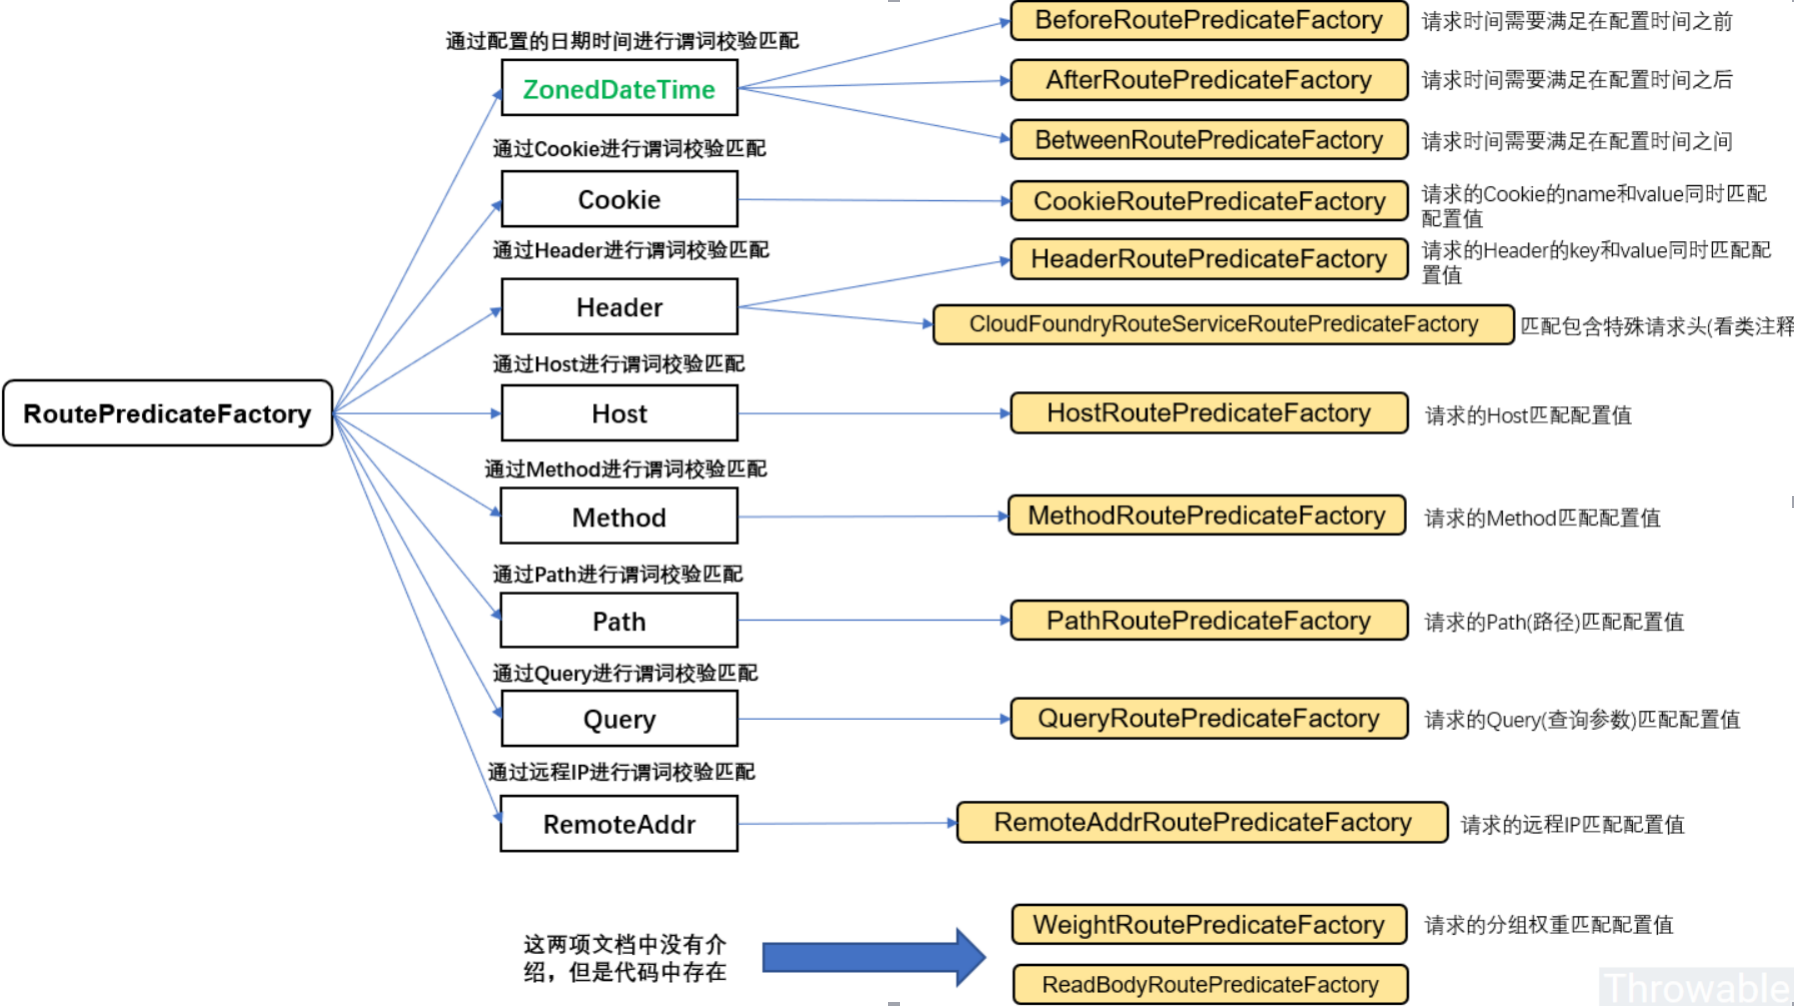
·��ת��
ʱ��ƥ��
Predicate ֧������һ��ʱ�䣬���������ת����ʱ����ͨ���ж������ʱ��֮ǰ����֮�����ת����
predicates: - After=2020-01-20T06:06:06+08:00[Asia/Shanghai]2020/01/20֮����ʲŻ����ת������Ӧ�ķ��� Before ͬ��
Cookieƥ��
Cookie Route Predicate ���Խ�������������һ���� Cookie name , һ�����������ʽ��
predicates: - Cookie=ityouknow, kee.e���ԣ�curl http://localhost:9527 --cookie "ityouknow=kee.e",ƥ��ɹ�
����ͷƥ��
Header Route Predicate �� Cookie Route Predicate һ����Ҳ�ǽ��� 2 ��������һ�� header ���������ƺ�һ���������ʽ���������ֵ���������ʽƥ����ִ�С�
predicates: - Header=X-Request-Id, \d+����1 curl http://localhost:9527 -H "X-Request-Id:1234" ƥ��ɹ�
����2 curl http://localhost:9527 -H "X-Request-Id:sfsg" ƥ��ʧ��
Hostƥ��
Host Route Predicate ����һ�������һ��ƥ��������б������ģ����һ�� ant �ָ���ģ�壬��
.����Ϊ�ָ�������ͨ�������е�������ַ��Ϊƥ�����predicates: - Host=**.ityouknow.com���� curl http://localhost:9527 -H "Host: www.ityouknow.com" ƥ��ɹ�
����ʽƥ��
 predicates:
        - Method=GET
curl Ĭ������ GET �ķ�ʽȥ����
���� curl -X POST http://localhost:9527 ƥ��ʧ��
�������ƥ��
- Query Route Predicate ֧�ִ�������������һ����������һ��Ϊ����ֵ������ֵ�������������ʽ��
predicates: - Query=smileֻҪ�����а��������Լ���ƥ��
���� curl localhost:9527?smile=x&id=2 ƥ��ɹ���
- �� Query ��ֵ�Լ�ֵ�Եķ�ʽ�������ã��������������ʱ�������ֵ���������ƥ��
predicates: - Query=keep, pu.�������а��� keep ���Բ��Ҳ���ֵ���� pu ��ͷ�ij���Ϊ��λ���ַ����Ż����ƥ���·�ɡ�
����1 curl localhost:9527?keep=pub ƥ��ɹ�
����2 curl localhost:9527?keep=pubx ƥ��ʧ��
����ipƥ��
Predicate Ҳ֧��ͨ������ij�� ip ����Ŷε�����Ż�·�ɣ�RemoteAddr Route Predicate ���� cidr ���� (IPv4 �� IPv6) �ַ������б�(��С��СΪ 1)������ 192.168.0.1/16 (���� 192.168.0.1 �� IP ��ַ��16 ����������)��
predicates: - RemoteAddr=192.168.1.1/24�����Զ�̵�ַ�� 192.168.1.10�����·�ɽ�ƥ��
���ƥ��
- ��Ҫ�������ж��������Żᱻת��
- ��������·��ʱ����ƥ����ת��ԭ��
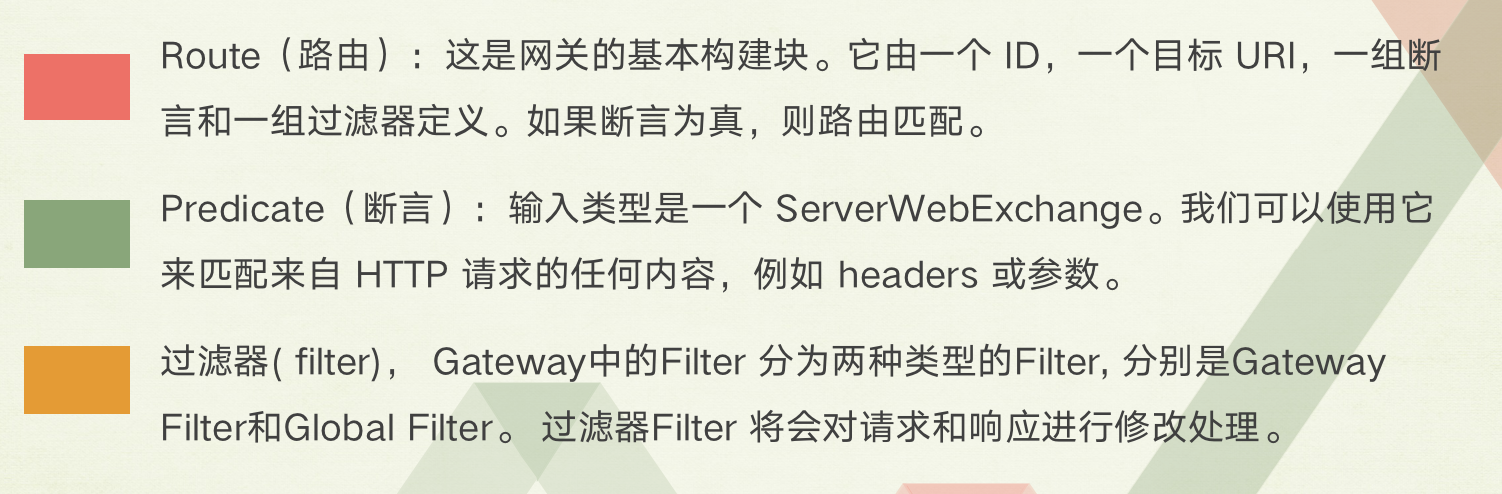
Filter
�����б�ʾ������uname�������������ʡ�
@Component
public class FilterConfig implements GlobalFilter,Ordered{
@Override
public Mono<Void> filter(ServerWebExchange exchange, GatewayFilterChain chain) {
System.out.println("���������");
String uname=exchange.getRequest().getQueryParams().getFirst("uname");
if(uname==null){
//����·����û�и�����ֵ
System.out.println("�ܾ�����");
exchange.getResponse().setStatusCode(HttpStatus.NOT_ACCEPTABLE);
return exchange.getResponse().setComplete();
}
//���ڣ�����
return chain.filter(exchange);
}
@Override
public int getOrder() {
return 0;
}
}
���ԣ� http://localhost:9527/payment/lb?uname=z3 ���ʳɹ�
������������
Ϊ�ֲ�ʽϵͳ�е��ⲿ�����ṩ�������Ϳͻ���֧�֡����㲿������ά���пͻ��ˡ�����ˡ�
�����Ҳ�Ʒֲ�ʽ�������ģ���һ������������Ӧ�ã������������÷�������Ϊ�ͻ����ṩ��ȡ������Ϣ������/������Ϣ�ȷ��ʽӿڡ�
�ͻ�������ͨ��ָ����������������Ӧ����Դ���Լ���ҵ����ص��������ݣ�����������ʱ����������Ļ�ȡ�ͼ���������Ϣ��Ĭ�ϲ��� git�����ҿ���ͨ�� git �ͻ��˹�������������ͷ����������ݡ�
�ŵ㣺
- ���й��������ļ�
- ��ͬ������ͬ���ã���̬�������ø���
- �����ڼ䣬����Ҫȥ�������������ļ��������������������ȡ�Լ�����Ϣ
- ������Ϣ�ı�ʱ������Ҫ�������ɸ���������Ϣ������
- ������Ϣ�� rest �ӿڱ�
ʵ�֣�
-
�����
-
pom
<dependency> <groupId>org.springframework.cloud</groupId> <artifactId>spring-cloud-config-server</artifactId> </dependency> -
yml
spring: application: name: cloud-config-server #ע���Eureka�������������� cloud: config: server: git: # uri: git@github.com:zzyybs/springcloud-config.git #GitHub�����git�ֿ����� uri: https://gitee.com/jklixin/springcloud-config.git #Gitee�����git�ֿ����� ####����Ŀ¼ search-paths: - springcloud-config ####��ȡ��֧ label: master -
������
@EnableConfigServer
@SpringBootApplication
@EnableConfigServer
public class ConfigMain3344 {
    public static void main(String[] args) {
        SpringApplication.run(ConfigMain3344.class,args);
    }
}
-
-
�ͻ���
-
pom
<dependency> <groupId>org.springframework.cloud</groupId> <artifactId>spring-cloud-starter-config</artifactId> </dependency> -
bootstrap.yml
spring: application: name: cloud-config-client cloud: config: lable: master name: config #��Ҫ��github�϶�ȡ����Դ���ƣ�ע��û��yml���� profile: dev #���η��ʵ������� uri: http://localhost:3344 #���÷���ˣ���������������ȥ��3344�ŷ���ͨ��SpringCloudConfig��ȡGitHub�ķ����ַ -
controller
@RestController
//@RefreshScope
public class ConfigController {

    @Value("${config.info}")
    String info;

    @GetMapping("/configInfo")
    public String getConfigInfo(){
        return info;
    }
}
-
���ʷ�ʽ��
/{application}/{profile}[/{label}]
/{application}-{profile}.yml
/{label}/{application}-{profile}.yml
/{application}-{profile}.properties
/{label}/{application}-{profile}.properties
���⣺ ����gitee�ϵ����ݣ�����˸��³ɹ������ǿͻ��˲�δ���³ɹ�
��̬ˢ��
�����
-
�ͻ�������actuator����
-
��¶��ض˵�
# ��¶��ض˵� management: endpoints: web: exposure: include: "*" -
@refreshScopeҵ����Controller��
-
��Ҫ��ά����Post����ˢ��3355
curl -X POST "http://localhost:3355/actuator/refresh"
���⣺ ����ͻ������ʵ�ֶ�̬ˢ��
��Ϣ����
Bus
Bus֧��������Ϣ����:RabbitMQ��Kafka
�㲥
ʵ��
-
�����
-
����bus-amqp����
<!--������Ϣ����RabbitMQ֧��--> <dependency> <groupId>org.springframework.cloud</groupId> <artifactId>spring-cloud-starter-bus-amqp</artifactId> </dependency> -
����rabbitmq�������
#rabbitmq������� rabbitmq: host: 123.56.16.54 port: 5672 username: guest password: guest -
��¶ˢ�¶˿�
# ��¶busˢ�µĶ˵� management: endpoints: web: exposure: include: 'bus-refresh'
-
-
�ͻ���
- ����bus-amqp����
- ����rabbitmq�������
���ԣ�
-
���������ļ�
-
ˢ��
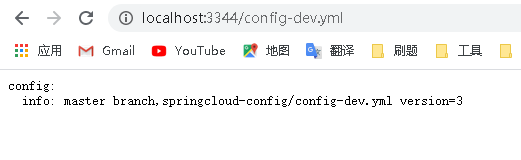
http://localhost:3344/config-dev.yml һ��
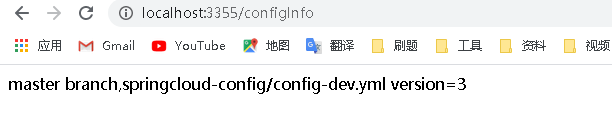
http://localhost:3355/configInfo ��һ��
-
��������ˢ�� curl -X POST "http://localhost:3344/actuator/bus-refresh"

-
ˢ��
http://localhost:3355/configInfo һ��
http://localhost:3366/configInfo һ��
����֪ͨ
ʵ�֣� ��ʽ��http://localhost:3344/actutor/bus-refresh/{destination}
���ԣ� curl -X POST "http://localhost:3344/actuator/bus-refresh/config-client:3355"
? http://localhost:3355/configInfo һ��
? http://localhost:3366/configInfo ��һ��
��Ϣ����
Stream
���εײ���Ϣ�м���IJ��죬�����л��ɱ���ͳһ��Ϣ�ı��ģ��
ԭ������:https://www.cnblogs.com/jklixin/p/12887255.html
������������ԭ������ϵ
��ǩ��
��Ȩ��������վ���²��������磬������Ȩ������ϵ��west999com@outlook.com
�ر�ע�⣺��վ����ת���������۲�������վ�۵㣬��վ���ṩ����Ӱ��Ƭ���廭�������Ʒ������ʹ�ã�����ԭ������ϵ����Ȩ��ԭ��������

- Springϵ��.ApplicationContext�ӿ� 2020-06-11
- springboot2����JavaMelody��springMVC����JavaMelody 2020-06-11
- ѧϰJava 8 Stream Api (4) - Stream �ն˲���֮ collect 2020-06-11
- javaѧϰ֮��һ�� 2020-06-11
- ����һ�ݳ���ϸ Spring Boot ֪ʶ�嵥 2020-06-11
IDC��Ѷ�� ������Ѷ ע����Ѷ �й���Ѷ vps��Ѷ ��վ����
��վ��Ӫ�� ��վ���� ��ӯ�� �����Ż� ��վ�ƹ� �����Դ
��վ���ˣ� �������� ���˽��� ���˵��� ������
��ҵ��Ѷ�� �������� ������Ϸ �������� ��洫ý
�����̣� Asp.Net��� Asp��� Php��� Xml��� Access Mssql Mysql ����
������������ Web������ Ftp������ Mail������ Dns������ ��ȫ����
�������ɣ� �������� Word Excel Powerpoint Ghost Vista QQ�ռ� QQ FlashGet Ѹ��
��ҳ������ FrontPages Dreamweaver Javascript css photoshop fireworks Flash
������ƣ� Java���� C/C++ VB delphi

- ʲô�������Ե�ȡ�ź�����,��ô����
- ����������վ����2020�����
- springcloudѧϰ֮·: (һ) ��Ĵ�
- ����Gradle���̳���Could not install
- ����Ū����PKIX path building failed
- Tomcat��������:org.apache.catalina.L
- spring boot ����Check your ViewRes
- ����HttpClient���°���������ϵͳģ��
- ֻ�г���Ա���ܿ����ij��ƣ�������Ȼ��
- mybatis ע��@Results��@Result��@Resu