
WebApi使用swagger ui自动生成接口文档
2018-06-17 23:05:12来源:未知 阅读 ()

之前就写到。最近正在使用webapi。这里介绍一个实用的东西swageer ui
现在开发都是前后端分开。我们这里是给前端提供api。有时候对于一个api的描述,并不想专门写一份文档。很浪费时间。
swagger ui就是一个能整合到项目中让api的注释能够生成到一个网页上。能简单测试和给前端看。
开怼吧。
Step.1 Nuget安装
打开你的Nuget console,Install-Package Swashbuckle(要选择哪个项目)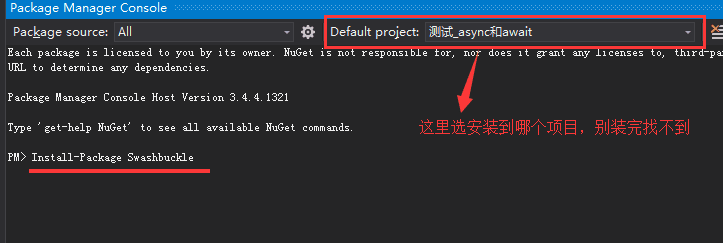
ps.其实第一步安装完了,你什么不用做。运行起来,网址进入/swagger/ui/index就能看到你的那些api了(不带注释),不过没达到我们的预期效果――将注释自动生成到文档上。so,继续往下看
Step.2 加上生成注释的代码
安装之后会在App_Start文件夹中多了SwaggerConfig.cs类,该类中的Register()方法会在应用程序启动的时候调用
里面好多注释,绿绿的,还是选择原谅他,删掉吧,删掉后就这剩下这些
 1 public static void Register()
 2 {
 3   var thisAssembly = typeof(SwaggerConfig).Assembly;
 4
 5   GlobalConfiguration.Configuration
 6   .EnableSwagger(c =>
 7   {
 8     c.SingleApiVersion("v1", "WebApplication1");
 9   })
10   .EnableSwaggerUi(c =>
11   {
12
13   });
14 }
稍微改造一下,附加个注释xml上去
 1 public static void Register()
 2 {
 3     var thisAssembly = typeof(SwaggerConfig).Assembly;
 4
 5     GlobalConfiguration.Configuration
 6     .EnableSwagger(c =>
 7     {
 8         c.SingleApiVersion("v1", "WebApplication1");
 9         c.IncludeXmlComments(GetXmlCommentsPath());
10     })
11     .EnableSwaggerUi(c =>
12     {
13
14     });
15 }
16 private static string GetXmlCommentsPath()
17 {
18     return System.String.Format(@"{0}\bin\WebApplication1.XML", System.AppDomain.CurrentDomain.BaseDirectory);
19 }
Step.3 步骤2所必须的
启用生成xml文档,右击项目文件属性 bulid发布――Output输出(勾选XML文件)
其实swagger他就是依赖于build时生成的这个xml来自动生成注释上页面的
Step.4 完成啦,看看页面
当然,我的追求不止这些,我们来优化优化
首先,我比较喜欢将config都弄进WebApiConfig中就好,看起来比较清晰
 1 public static class WebApiConfig
 2 {
 3     public static void Register(HttpConfiguration config)
 4     {
 5         // Web API configuration and services
 6
 7         // Web API routes
 8         config.MapHttpAttributeRoutes();
 9
10         config.Routes.MapHttpRoute(
11             name: "DefaultApi",
12             routeTemplate: "api/{controller}/{id}",
13             defaults: new { id = RouteParameter.Optional }
14         );
15
16         config.RegistSwagger();//添加这个swagger的Regist
17     }
18     private static void RegistSwagger(this HttpConfiguration config)
19     {
20         config.EnableSwagger("docs/{apiVersion}/swagger", c =>
21         {
22             c.SingleApiVersion("v1", "WebApplication1");
23             c.IncludeXmlComments(GetXmlCommentsPath());
24         })
25         .EnableSwaggerUi(c=>
26         {
27
28         });
29     }
30     private static string GetXmlCommentsPath()
31     {
32         return $@"{AppDomain.CurrentDomain.RelativeSearchPath}\WebApplication1.XML";
33     }
34 }
这个swagger的路径也配一下吧,可以自定义一下
 1 private static void RegistSwagger(this HttpConfiguration config)
 2 {
 3     config.EnableSwagger("docs/{apiVersion}/swagger", c =>
 4     {
 5         c.SingleApiVersion("v1", "WebApplication1");
 6         c.IncludeXmlComments(GetXmlCommentsPath());
 7     })
 8     .EnableSwaggerUi("apis/{*assetPath}");//原本进入的地址是/swagger/ui/index 这样就能换地址成/apis/index
 9 }
这样,我们这基本的配置就可以了,实现预期的效果――自动生成接口文档
这里面的配置应该还很多,等我有空更新哈,先这样
标签:
版权申明:本站文章部分自网络,如有侵权,请联系:west999com@outlook.com
特别注意:本站所有转载文章言论不代表本站观点,本站所提供的摄影照片,插画,设计作品,如需使用,请与原作者联系,版权归原作者所有

下一篇:.NET 实用扩展方法
- Django项目中使用qq第三方登录。 2019-08-13
- Python连载30-多线程之进程&线程&线程使用 2019-08-13
- Python学习日记(十) 生成器和迭代器 2019-08-13
- 【Python】语法基础 | 开始使用Python 2019-08-13
- 使用scrapy框架爬取全书网书籍信息。 2019-08-13
IDC资讯: 主机资讯 注册资讯 托管资讯 vps资讯 网站建设
网站运营: 建站经验 策划盈利 搜索优化 网站推广 免费资源
网络编程: Asp.Net编程 Asp编程 Php编程 Xml编程 Access Mssql Mysql 其它
服务器技术: Web服务器 Ftp服务器 Mail服务器 Dns服务器 安全防护
软件技巧: 其它软件 Word Excel Powerpoint Ghost Vista QQ空间 QQ FlashGet 迅雷
网页制作: FrontPages Dreamweaver Javascript css photoshop fireworks Flash
