
前端 JS 获取 Image 图像 宽高 尺寸
2019-11-02 16:01:08来源:博客园 阅读 ()

前端 JS 获取 Image 图像 宽高 尺寸
前端 JS 获取 Image 图像 宽高 尺寸
简介
项目中用到获取图片的原始尺寸,然后适配宽高;网上的大部分前端解决方案,都是new Image()后,在onload事件中获取image的尺寸。
在图片数量较多的时候,这样的获取效率实在是低下。所有就有了这篇文章。通过直接读取解析文件的字节码来获取图片的尺寸。
IMAGE_HEAD_SIGS
var IMAGE_HEAD_SIGS = {
    GIF: [0x47, 0x49, 0x46], //'G' 'I' 'F' ascii
    PNG: [0x89, 0x50, 0x4e, 0x47, 0x0d, 0x0a, 0x1a, 0x0a],
    JPG: [0xff, 0xd8, 0xff, 0xe0],
    BMP: [0x42, 0x4d]
}
PNG
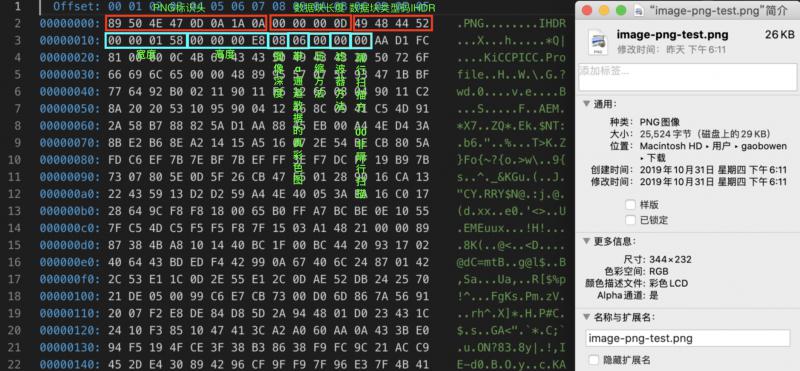
function ReadPNG(bytes) {
    if (bytes.slice(0, 8).toString() === IMAGE_HEAD_SIGS.PNG.toString()) {
        let width = readUint32BE(bytes, 16);
        let height = readUint32BE(bytes, 20);
        return { width, height }
    }
}
JPG
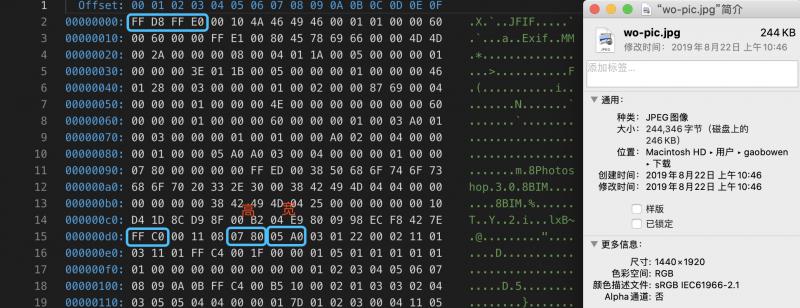
function ReadJPG(bytes) {
    if (bytes.slice(0, 4).toString() === IMAGE_HEAD_SIGS.JPG.toString()) {
        const M_SOF0 = 0xC0; /* Start Of Frame N */
        const M_SOF1 = 0xC1; /* N indicates which compression process */
        const M_SOF2 = 0xC2; /* Only SOF0-SOF2 are now in common use */
        const M_SOF3 = 0xC3;
        const M_SOF5 = 0xC5; /* NB: codes C4 and CC are NOT SOF markers */
        const M_SOF6 = 0xC6;
        const M_SOF7 = 0xC7;
        const M_SOF9 = 0xC9;
        const M_SOF10 = 0xCA;
        const M_SOF11 = 0xCB;
        const M_SOF13 = 0xCD;
        const M_SOF14 = 0xCE;
        const M_SOF15 = 0xCF;
        for (let i = 0; i < bytes.length; i++) {
            if (bytes[i] === 0xFF) {
                switch (bytes[i + 1]) {
                    case M_SOF0:
                    case M_SOF1:
                    case M_SOF2:
                    case M_SOF3:
                    case M_SOF5:
                    case M_SOF6:
                    case M_SOF7:
                    case M_SOF9:
                    case M_SOF10:
                    case M_SOF11:
                    case M_SOF13:
                    case M_SOF14:
                    case M_SOF15:
                        {
                            //高在前,宽在后。
                            let width = readUint16BE(bytes, i + 7)
                            let height = readUint16BE(bytes, i + 5)
                            return { width, height }
                        }
                    default:
                        break;
                }
            }
        }
    }
}
GIF
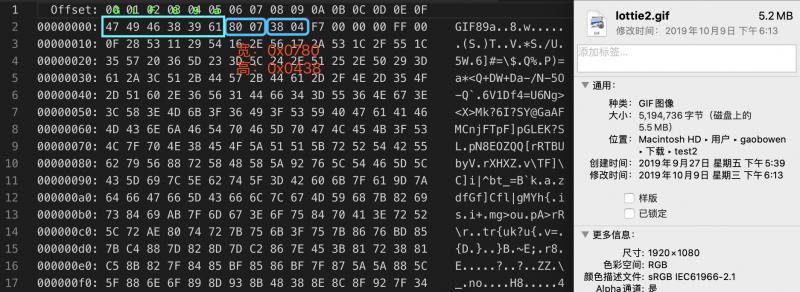
function ReadGIF(bytes) {
    if (bytes.slice(0, 3).toString() === IMAGE_HEAD_SIGS.GIF.toString()) {
        let width = readUint16LE(bytes, 6);
        let height = readUint16LE(bytes, 8);
        return { width, height }
    }
}
BMP
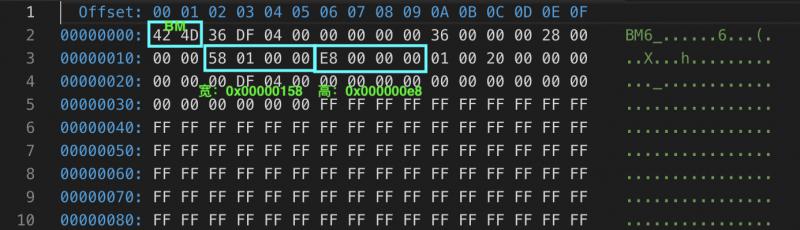
function ReadBMP(bytes) {
    if (bytes.slice(0, 2).toString() === IMAGE_HEAD_SIGS.BMP.toString()) {
        //虽然格式为4字节,这里只取2字节,确保height为正数。为负数时,图像为倒置图像。
        let height = readUint16LE(bytes, 22);
        let width = readUint16LE(bytes, 18);
        return { width, height }
    }
}
NPM
npm i image-dimensionjNPM地址
项目地址
原文链接:https://www.cnblogs.com/gaobw/p/11781128.html
如有疑问请与原作者联系
标签:
版权申明:本站文章部分自网络,如有侵权,请联系:west999com@outlook.com
特别注意:本站所有转载文章言论不代表本站观点,本站所提供的摄影照片,插画,设计作品,如需使用,请与原作者联系,版权归原作者所有

- 循序渐进VUE+Element 前端应用开发(5)--- 表格列表页面的查 2020-07-15
- 循序渐进VUE+Element 前端应用开发(5)--- 表格列表页面的查 2020-07-15
- 循序渐进VUE+Element 前端应用开发(5)--- 表格列表页面的查 2020-07-14
- 循序渐进VUE+Element 前端应用开发(5)--- 表格列表页面的查 2020-07-13
- 循序渐进VUE+Element 前端应用开发(5)--- 表格列表页面的查 2020-07-02
IDC资讯: 主机资讯 注册资讯 托管资讯 vps资讯 网站建设
网站运营: 建站经验 策划盈利 搜索优化 网站推广 免费资源
网络编程: Asp.Net编程 Asp编程 Php编程 Xml编程 Access Mssql Mysql 其它
服务器技术: Web服务器 Ftp服务器 Mail服务器 Dns服务器 安全防护
软件技巧: 其它软件 Word Excel Powerpoint Ghost Vista QQ空间 QQ FlashGet 迅雷
网页制作: FrontPages Dreamweaver Javascript css photoshop fireworks Flash
