
CSS中如果实现元素浮动,看这篇文章就足够了
2019-12-01 11:24:35来源:博客园 阅读 ()

CSS中如果实现元素浮动,看这篇文章就足够了
浮动基本介绍
- 在标准文档流中元素分为2种,
块级元素和行内元素,如果想让一些元素既要有块级元素的特点也同时保留行内元素特点,只能让这些元素脱离标准文档流即可。 - 浮动可以让元素脱离标准文档流,可以实现让多个元素排在同一行,并且可以设置宽高度。
- 其实浮动是通过
float属性来实现的。 float属性值说明表:
| 属性值 | 描述 |
|---|---|
| left | 设置元素向左浮动。 |
| right | 设置元素向右浮动。 |
右浮动实践
- 让我们进入右浮动的实践,实践内容如:将
class属性值为.box1元素设置为右浮动。 - 在进入有浮动实践之前我们先看看要浮动元素结构是什么。
代码块
<!DOCTYPE html>
<html lang="en">

<head>
    <meta charset="UTF-8">
    <meta name="viewport" content="width=device-width, initial-scale=1.0">
    <meta http-equiv="X-UA-Compatible" content="ie=edge">
    <title>浮动</title>
    <style>
       .box{
         width: 600px;
         border: 1px solid #000;
       }
    </style>
</head>

<body>
  <div class="box">
    <div class="box1"></div>
    <div class="box2"></div>
    <div class="box3"></div>
  </div>
</body>
</html>
结果图

- 为什么结果图是一条边框线呢?因为在
div标签中还没有内容呢,现在我们将子div标签设置宽高度为100px像素并且添加背景颜色。 代码块
<!DOCTYPE html>
<html lang="en">

<head>
    <meta charset="UTF-8">
    <meta name="viewport" content="width=device-width, initial-scale=1.0">
    <meta http-equiv="X-UA-Compatible" content="ie=edge">
    <title>浮动</title>
    <style>
       .box{
         width: 600px;
         border: 1px solid #000;
       }
       .box1{
         width: 100px;
         height: 100px;
         background-color: #f00;
       }
       .box2{
         width: 100px;
         height: 100px;
         background-color: #0f0;
       }
       .box3{
         width: 100px;
         height: 100px;
         background-color: #00f;
       }
    </style>
</head>

<body>
  <div class="box">
    <div class="box1"></div>
    <div class="box2"></div>
    <div class="box3"></div>
  </div>
</body>
</html>
结果图

- 为什么会排列为3行呢,因为3个
div标签都是块级元素。 - 现在我们将
class属性值为.box1的元素设置为右浮动。 代码块
<!DOCTYPE html>
<html lang="en">

<head>
    <meta charset="UTF-8">
    <meta name="viewport" content="width=device-width, initial-scale=1.0">
    <meta http-equiv="X-UA-Compatible" content="ie=edge">
    <title>浮动</title>
    <style>
       .box{
         width: 600px;
         border: 1px solid #000;
       }
       .box1{
         width: 100px;
         height: 100px;
         background-color: #f00;
         float:right;
       }
       .box2{
         width: 100px;
         height: 100px;
         background-color: #0f0;
       }
       .box3{
         width: 100px;
         height: 100px;
         background-color: #00f;
       }
    </style>
</head>

<body>
  <div class="box">
    <div class="box1"></div>
    <div class="box2"></div>
    <div class="box3"></div>
  </div>
</body>
</html>
结果图

注意:现在我们发现
calss属性值为.box元素高度变矮了,这就说明了(浮动元素它已经脱离了标准文档流,不再占用空间了)、并且向右浮动,浮动到自身的父元素的边缘位置就停止了浮动。
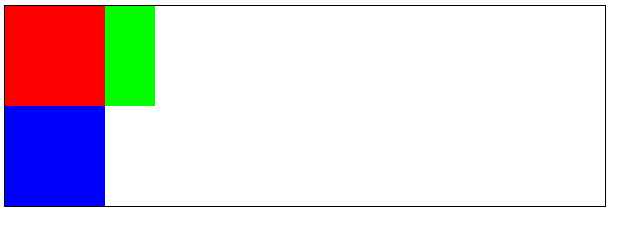
左浮动实践
- 让我们进入左浮动的实践,实践内容如:将
class属性值为.box1元素设置为左浮动。 代码块
<!DOCTYPE html>
<html lang="en">

<head>
    <meta charset="UTF-8">
    <meta name="viewport" content="width=device-width, initial-scale=1.0">
    <meta http-equiv="X-UA-Compatible" content="ie=edge">
    <title>浮动</title>
    <style>
       .box{
         width: 600px;
         border: 1px solid #000;
       }
       .box1{
         width: 100px;
         height: 100px;
         background-color: #f00;
         float:left;
       }
       .box2{
         width: 100px;
         height: 100px;
         background-color: #0f0;
       }
       .box3{
         width: 100px;
         height: 100px;
         background-color: #00f;
       }
    </style>
</head>

<body>
  <div class="box">
    <div class="box1"></div>
    <div class="box2"></div>
    <div class="box3"></div>
  </div>
</body>
</html>
结果图

- 我们先理解浮动的原理之后再解释下
class属性值为.box2元素看不见的原因。 - 现在笔者给大家看2张实践结果图如:
结果图A

结果图B

- 通过这2张结果图我们可以把浮动简单的理解为“漂”举例:
- 假设
class属性值为.box是一个池塘,3个子元素都是能够漂浮在池塘水面上的东西,现在我们将calss属性值为.box1元素浮动起来,漂在池塘水面上,是不是就不再占用池塘内的空间了。 - 既然我们理解为“漂”它一定是漂浮在池塘水面之上,但是没有浮动的元素在池塘水面之内,所以
class属性值为.box2元素看不见,并不代表它不存在只是被class属性值为.box1元素给遮挡住了,现在我们将class属性值为.box2元素宽度设置为150px像素。 代码块
<!DOCTYPE html>
<html lang="en">

<head>
    <meta charset="UTF-8">
    <meta name="viewport" content="width=device-width, initial-scale=1.0">
    <meta http-equiv="X-UA-Compatible" content="ie=edge">
    <title>浮动</title>
    <style>
       .box{
         width: 600px;
         border: 1px solid #000;
       }
       .box1{
         width: 100px;
         height: 100px;
         background-color: #f00;
         float:left;
       }
       .box2{
         width: 150px;
         height: 100px;
         background-color: #0f0;
       }
       .box3{
         width: 100px;
         height: 100px;
         background-color: #00f;
       }
    </style>
</head>

<body>
  <div class="box">
    <div class="box1"></div>
    <div class="box2"></div>
    <div class="box3"></div>
  </div>
</body>
</html>
结果图
注意:事实证明
class属性值为.box2元素是存在的。- 下面我们将
calss属性值为.box2元素设置为左浮动看看有什么不一样的效果 代码块
<!DOCTYPE html>
<html lang="en">

<head>
    <meta charset="UTF-8">
    <meta name="viewport" content="width=device-width, initial-scale=1.0">
    <meta http-equiv="X-UA-Compatible" content="ie=edge">
    <title>浮动</title>
    <style>
       .box{
         width: 600px;
         border: 1px solid #000;
       }
       .box1{
         width: 100px;
         height: 100px;
         background-color: #f00;
         float:left;
       }
       .box2{
         width: 150px;
         height: 100px;
         background-color: #0f0;
         float: left;
       }
       .box3{
         width: 100px;
         height: 100px;
         background-color: #00f;
       }
    </style>
</head>

<body>
  <div class="box">
    <div class="box1"></div>
    <div class="box2"></div>
    <div class="box3"></div>
  </div>
</body>
</html>
结果图

- 但是
class属性值为.box2的元素左浮动并没有左浮动到本身父元素的边缘位置,为什么在class属性值为.box1后面呢?因为父元素已经有了浮动的子元素后面的子元素在浮动就浮动到前面浮动的元素之后。 - 现在我们将
class属性值为.box3的元素设置为左浮动,看看有什么不一样的效果。 代码块
<!DOCTYPE html>
<html lang="en">

<head>
    <meta charset="UTF-8">
    <meta name="viewport" content="width=device-width, initial-scale=1.0">
    <meta http-equiv="X-UA-Compatible" content="ie=edge">
    <title>浮动</title>
    <style>
       .box{
         width: 600px;
         border: 1px solid #000;
       }
       .box1{
         width: 100px;
         height: 100px;
         background-color: #f00;
         float:left;
       }
       .box2{
         width: 150px;
         height: 100px;
         background-color: #0f0;
         float: left;
       }
       .box3{
         width: 100px;
         height: 100px;
         background-color: #00f;
         float: left;
       }
    </style>
</head>

<body>
  <div class="box">
    <div class="box1"></div>
    <div class="box2"></div>
    <div class="box3"></div>
  </div>
</body>
</html>
结果图

注意:浮动元素浮动以后,其父元素不再将浮动的子元素包裹在父元素之内,所以结果图出现一条黑色的边框线,若有不明白的看第一个实践内容。
将行内元素设置浮动
- 如果我们给行内元素设置了浮动,行内元素就拥有了块级元素的特点。
- 让我们进入行内元素设置浮动实践,实践内容如:将
div标签中的span标签设置为左浮动。 - 在设置左浮动之前我们先看看给
span标签设置宽高度和背景颜色有什么效果。 代码块
<!DOCTYPE html>
<html lang="en">

<head>
    <meta charset="UTF-8">
    <meta name="viewport" content="width=device-width, initial-scale=1.0">
    <meta http-equiv="X-UA-Compatible" content="ie=edge">
    <title>浮动</title>
    <style>
       .box{
         width: 600px;
         border: 1px solid #000;
       }
       .box1{
         width: 100px;
         height: 100px;
         background-color: #f00;
       }
       .box2{
         width: 100px;
         height: 100px;
         background-color: #0f0;

       }
       .box3{
         width: 100px;
         height: 100px;
         background-color: #00f;

       }
    </style>
</head>

<body>
  <div class="box">
    <span class="box1">微笑是最初的信仰1</span>
    <span class="box2">微笑是最初的信仰2</span>
    <span class="box3">微笑是最初的信仰3</span>
  </div>
</body>
</html>
结果图

- 现在发现我们给
span标签设置了宽高度为100px像素并没有生效,因为现在span标签还是行内元素。 - 现在我们给
span标签设置左浮动,然后我们在看看效果如何。 代码块
<!DOCTYPE html>
<html lang="en">

<head>
    <meta charset="UTF-8">
    <meta name="viewport" content="width=device-width, initial-scale=1.0">
    <meta http-equiv="X-UA-Compatible" content="ie=edge">
    <title>浮动</title>
    <style>
       .box{
         width: 600px;
         border: 1px solid #000;
       }
       .box1{
         width: 100px;
         height: 100px;
         background-color: #f00;
         float: left;
       }
       .box2{
         width: 100px;
         height: 100px;
         background-color: #0f0;
        float: left;
       }
       .box3{
         width: 100px;
         height: 100px;
         background-color: #00f;
        float: left;
       }
    </style>
</head>

<body>
  <div class="box">
    <span class="box1">微笑是最初的信仰1</span>
    <span class="box2">微笑是最初的信仰2</span>
    <span class="box3">微笑是最初的信仰</span>
  </div>
</body>
</html>
结果图

注意:行内元素设置为浮动之后就拥有了块级元素的特点。
设置浮动总结
- 浮动的特点如:
- 浮动元素脱离了标准的文档流,不再占用父元素的任何空间。
- 浮动元素比标准文档流的元素层级要高,会将标准文档流的元素遮挡住。
- 浮动元素会向左浮动或向右浮动。
- 浮动元素会遇到父元素的边缘就停止了浮动。
- 浮动元素会遇到已经有了浮动的元素,后者会浮动到前者之后就停止了浮动。
- 浮动元素浮动之后就脱离了父元素,并且父元素不再包裹浮动的元素。
- 行内元素设置为浮动,就拥有了块级元素的特点。
原文链接:https://www.cnblogs.com/lq0001/p/11967138.html
如有疑问请与原作者联系
标签:
版权申明:本站文章部分自网络,如有侵权,请联系:west999com@outlook.com
特别注意:本站所有转载文章言论不代表本站观点,本站所提供的摄影照片,插画,设计作品,如需使用,请与原作者联系,版权归原作者所有

- DIV居中的经典方法 2020-06-13
- CSS中的float和margin的混合使用 2020-06-11
- Html/css 列表项 区分列表首尾 2020-06-11
- css与javascript重难点,学前端,基础不好一切白费! 2020-06-11
- ie8下透明度处理 2020-06-11
IDC资讯: 主机资讯 注册资讯 托管资讯 vps资讯 网站建设
网站运营: 建站经验 策划盈利 搜索优化 网站推广 免费资源
网络编程: Asp.Net编程 Asp编程 Php编程 Xml编程 Access Mssql Mysql 其它
服务器技术: Web服务器 Ftp服务器 Mail服务器 Dns服务器 安全防护
软件技巧: 其它软件 Word Excel Powerpoint Ghost Vista QQ空间 QQ FlashGet 迅雷
网页制作: FrontPages Dreamweaver Javascript css photoshop fireworks Flash
