
搭建Nginx四层反向代理
2019-11-22 09:34:11来源:博客园 阅读 ()

搭建Nginx四层反向代理
需求背景:
前段时间公司因为业务需求需要部署一个正向代理,我已经分享出来了https://www.cnblogs.com/Dfengshuo/p/11911406.html,现有因架构个更改,需要再加个在原先的反向代理下再加一层,ok,其实还是挺鸡肋的,但是没办法,领导安排就要根据安排需求做。其实nginx反向代理分两种,四层网络层代理和七层应用层代理,想要实现这两种模式很简单,只是配置文件略微不同而已。今天分享一下四层协议的代理吧!
首先安装nginx环境:


1 yum -y install pcre-devel zlib-devel gcc gcc+c++ make openssl openssl-devel
2 tar xf nginx-1.11.4.tar.gz
3 cd nginx-1.11.4/
4  ./configure --prefix=/usr/local/nginx  --with-http_stub_status_module --with-http_gzip_static_module --with-http_ssl_module --with-http_stub_status_module --with-pcre --with-stream && make && make install
View Code
编译安装完毕后进行更改nginx配置文件,配置四层协议反向代理
#user  nobody;
worker_processes  1;

#error_log  logs/error.log;
#error_log  logs/error.log  notice;
#error_log  logs/error.log  info;

#pid        logs/nginx.pid;


events {
    worker_connections  1024;
}


--------------------------反向配置区------------------------------------------
stream {

server {

listen 30010;                #监听端口

proxy_connect_timeout 1s;

proxy_timeout 3s;

proxy_pass 10.157.8.18:30010;    #跳转地址

}

server {

listen 30013;

proxy_connect_timeout 1s;

proxy_timeout 3s;

proxy_pass 10.157.8.18:30013;

}


server {

listen 30014;

proxy_connect_timeout 1s;

proxy_timeout 3s;

proxy_pass 10.157.8.18:30014;

}


}

--------------------------反向配置区------------------------------------------

http {
    include       mime.types;
    default_type  application/octet-stream;

    #log_format  main  '$remote_addr - $remote_user [$time_local] "$request" '
    #                  '$status $body_bytes_sent "$http_referer" '
    #                  '"$http_user_agent" "$http_x_forwarded_for"';

    #access_log  logs/access.log  main;

    sendfile        on;
    #tcp_nopush     on;

    #keepalive_timeout  0;
    keepalive_timeout  65;

    #gzip  on;

    server {
        listen       80;
        server_name  localhost;

        #charset koi8-r;

        #access_log  logs/host.access.log  main;

        location / {
            root   html;
            index  index.html index.htm;
        }

    }

}
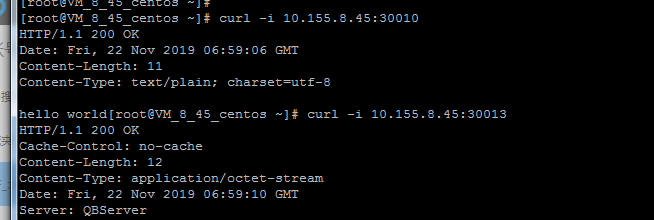
配置完成后保存重启nginx即可,进行测试,结果表明成功!
原文链接:https://www.cnblogs.com/Dfengshuo/p/11911663.html
如有疑问请与原作者联系
版权申明:本站文章部分自网络,如有侵权,请联系:west999com@outlook.com
特别注意:本站所有转载文章言论不代表本站观点,本站所提供的摄影照片,插画,设计作品,如需使用,请与原作者联系,版权归原作者所有

上一篇:搭建Nginx正向代理服务
下一篇:搭建Nginx七层反向代理
- 附020.Nginx-ingress部署及使用 2020-06-02
- LVS负载分担(NAT模式)基础搭建 2020-06-01
- postfix&dovecot搭建邮件服务器 2020-05-30
- 在树莓派里搭建 Lighttpd 服务器 2020-05-27
- Mycat-多实例的搭建 2020-05-27
IDC资讯: 主机资讯 注册资讯 托管资讯 vps资讯 网站建设
网站运营: 建站经验 策划盈利 搜索优化 网站推广 免费资源
网络编程: Asp.Net编程 Asp编程 Php编程 Xml编程 Access Mssql Mysql 其它
服务器技术: Web服务器 Ftp服务器 Mail服务器 Dns服务器 安全防护
软件技巧: 其它软件 Word Excel Powerpoint Ghost Vista QQ空间 QQ FlashGet 迅雷
网页制作: FrontPages Dreamweaver Javascript css photoshop fireworks Flash
