
Redis����֪ʶ���
2019-05-10 06:05:07��Դ������ �Ķ� ()

���´��
һ��Redis����
����Redis��װ�����ÿ����Զ�����
����Redis�ļ��ṹ
�ġ�Redis������ʽ
�塢Redis�־û�
����Redis�����ļ����
�ߡ�Redisͼ�λ�����
�ˡ�Java֮Jedis����Redis����
�š���ĿԴ������������
ʮ���ο�����
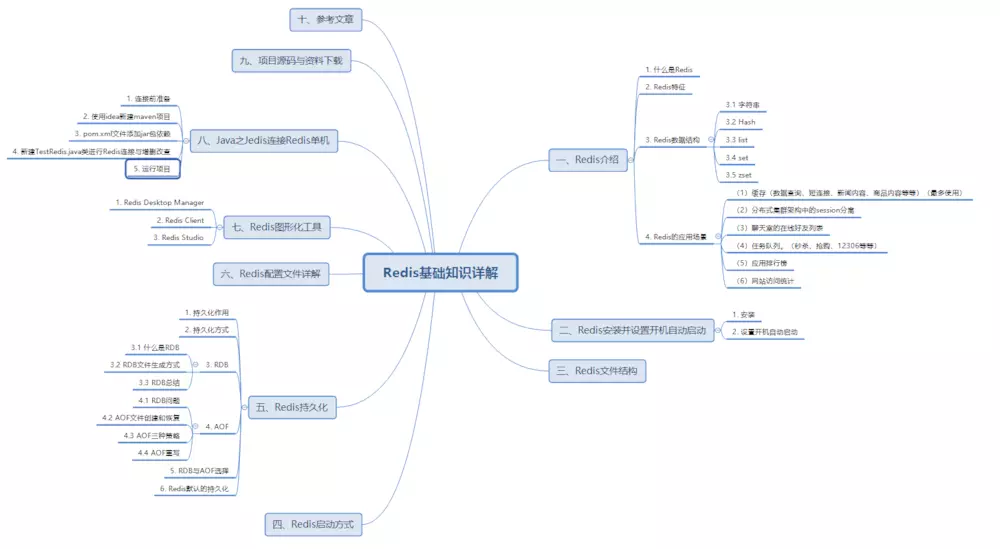
һ��Redis����
1. ʲô��Redis
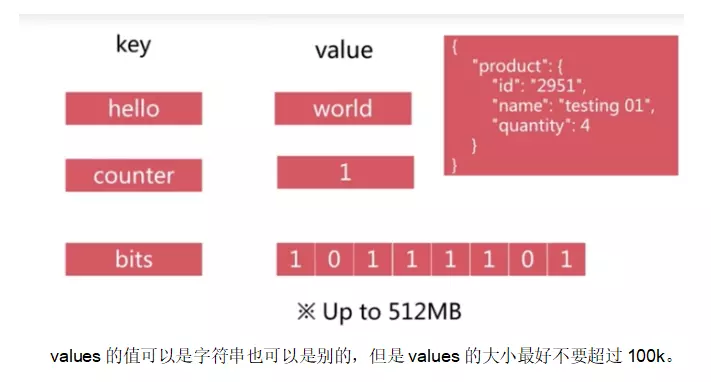
Redis����C���Կ�����һ����Դ�ĸ����ܼ�ֵ�ԣ�key-value�����ݿ⡣������linux�����У���ͨ���ṩ���ּ�ֵ������������Ӧ��ͬ�����µĴ洢�������ݴ洢���ڴ��У�Ҳ�ɳ־û��������У�ĿǰΪֹRedis֧�ֵļ�ֵ�����������£�
��1���ַ�������
��2��ɢ������
��3�������
��4����������
��5����������
2. Redis����

��1��Redis�ǰ����ݴ����ڴ��У������ٶȲŻ�졣Redis����C����д�Ŀ�Դ��Ŀ��
��2��Redis�������ݱ������ڴ��У������ݵĸ��½��첽�ر��浽�����ϣ��������������ϵ粻��ʧ���ݡ�
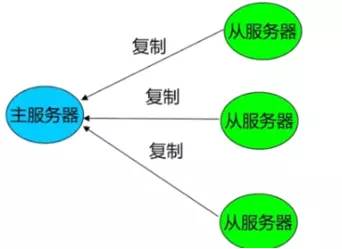
��3��Redis���Ӹ��ƿ���ʵ�ָ߿��úͷֲ�ʽ
3. Redis���ݽṹ
3.1 �ַ���
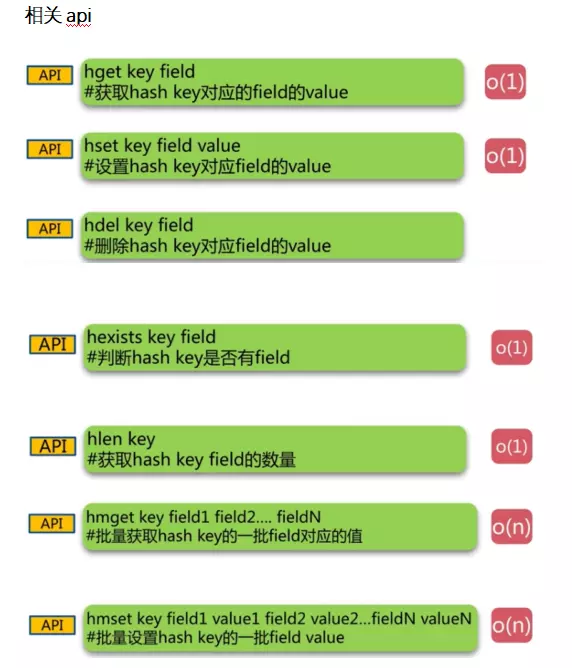
3.2 Hash

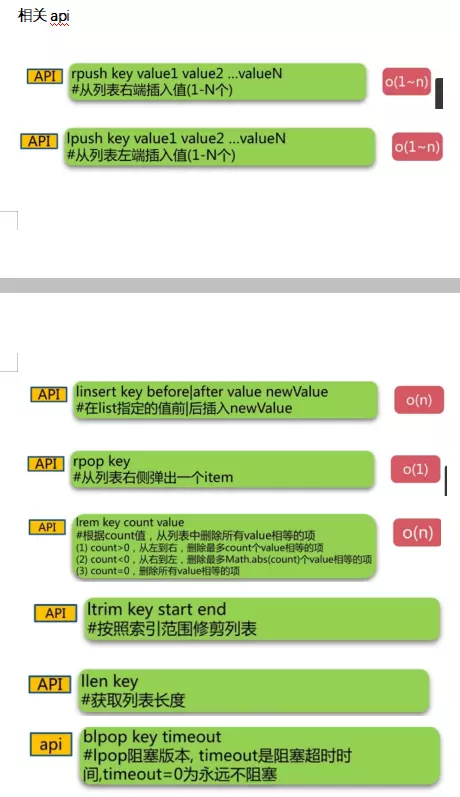
3.3 list

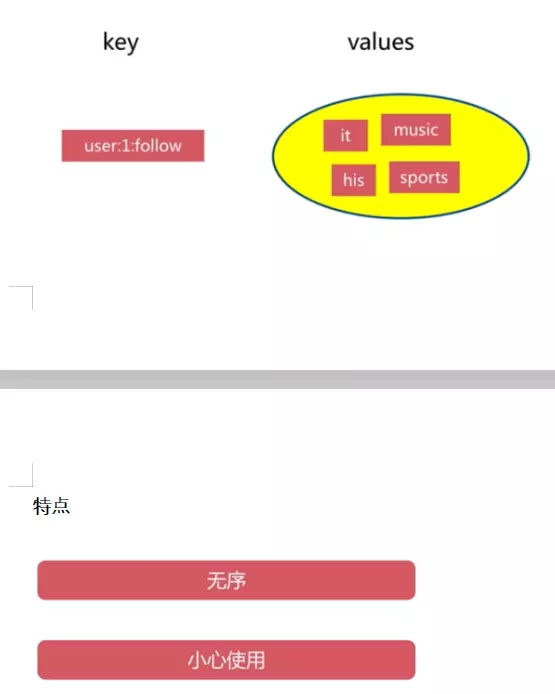
3.4 set
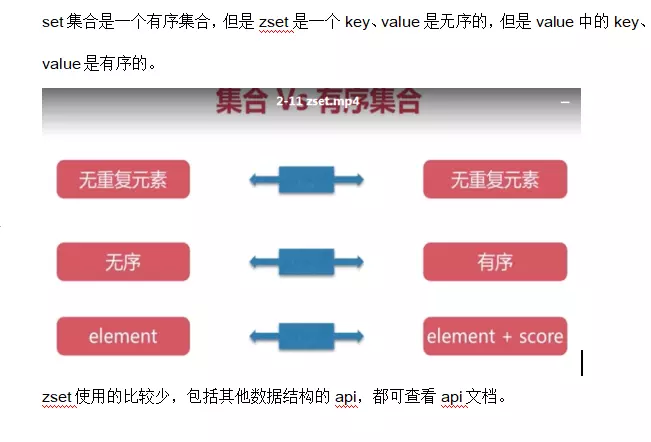
3.5 zset
4. Redis��Ӧ�ó���
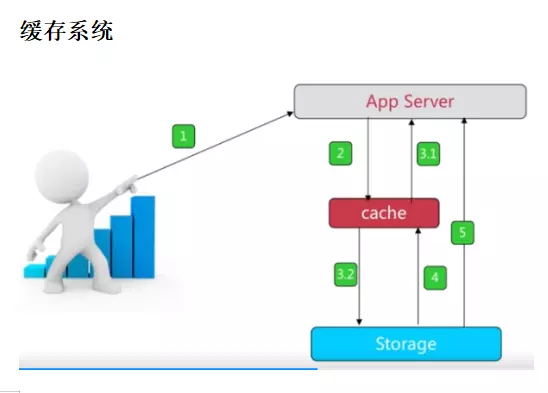
��1�����棨���ݲ�ѯ�������ӡ��������ݡ���Ʒ���ݵȵȣ������ʹ�ã�
��2���ֲ�ʽ��Ⱥ�ܹ��е�session����
��3�������ҵ����ߺ����б�
��4��������С�����ɱ��������12306�ȵȣ�

��5��Ӧ�����а�

��6����վ����ͳ��

��7�����ݹ��ڴ��������Ծ�ȷ�����룩
��ܰ��ʾ����ʹ�ó����У����ÿ������ݻ������أ���Ϊredis����ɾ����ǵ��߳�ִ�еġ�
����Redis��װ�����ÿ����Զ�����
Redis��ʹ����Linux��Ч������ѣ���������Ҫ���ֽ̳̣��������windows��Ϊ���ӽ��а�װ��
1. ��װ
Ҫ��װRedis������Ҫ��ȡ��װ����Windows��Redis��װ����Ҫ������GitHub�����ҵ������ӣ�https://github.com/MSOpenTech/redis������վ���ҵ�Release�����ǰ������ҳ�档
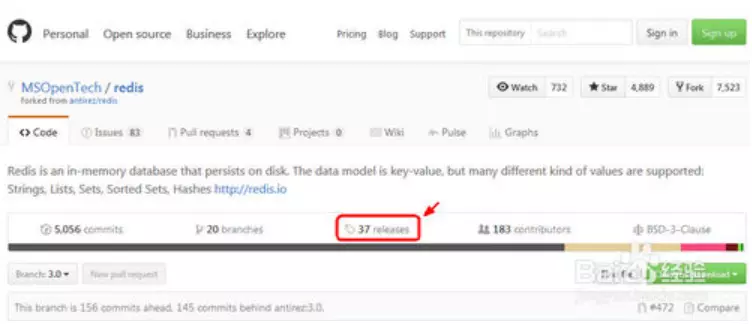
��������ҳ�У��ҵ�����еİ汾���˴���3.2.100�����ҵ�Redis-x64-3.2.100.msi��Redis-x64-3.2.100.zip��������ء�����˵��һ�£���һ����msi����ʽ�İ�װ�����ڶ�����ѹ����
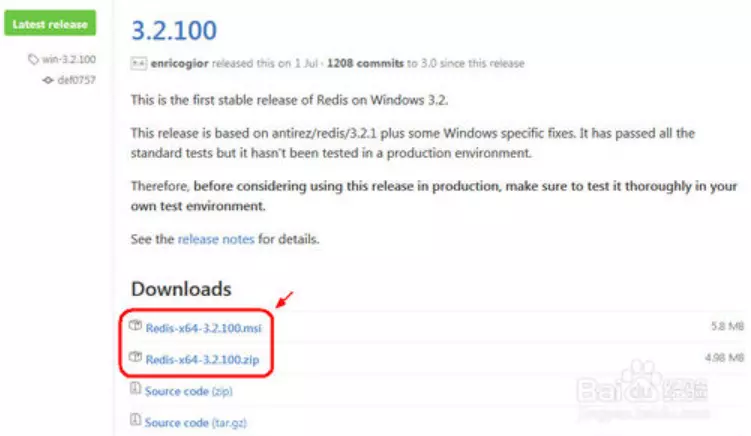
˫�������غõ�msi��ʽ�İ�װ����Redis-x64-3.2.100.msi����ʼ��װ��

ѡ��“ͬ��Э��”�������һ��������

ѡ��“����RedisĿ¼����������PATH��”����������ϵͳ�Զ�ʶ��Redisִ���ļ������

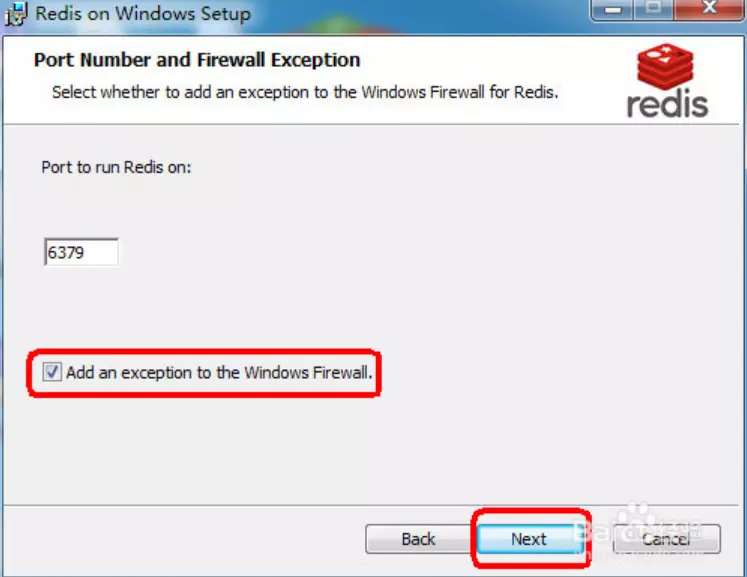
�˿ںſɱ���Ĭ�ϵ�6379����ѡ�����ǽ���⣬�Ӷ���֤�ⲿ������������Redis����
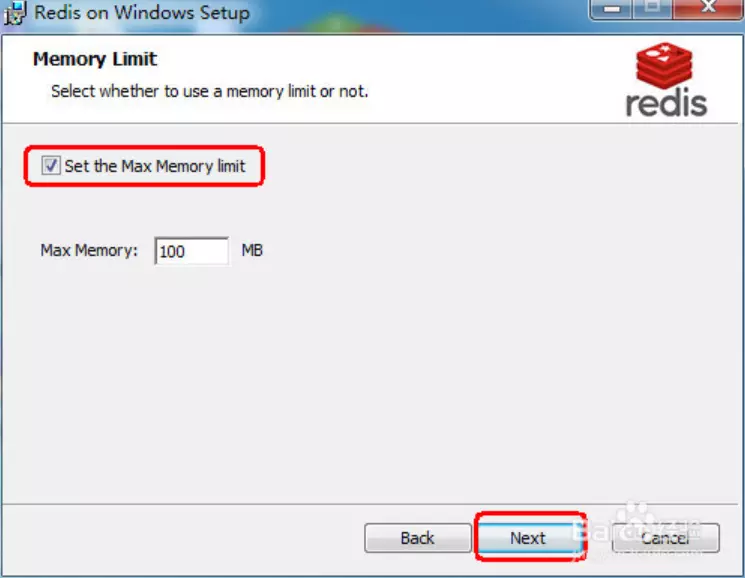
�趨���ֵΪ100M����Ϊʵ���ѧϰ��100M�㹻�ˡ�
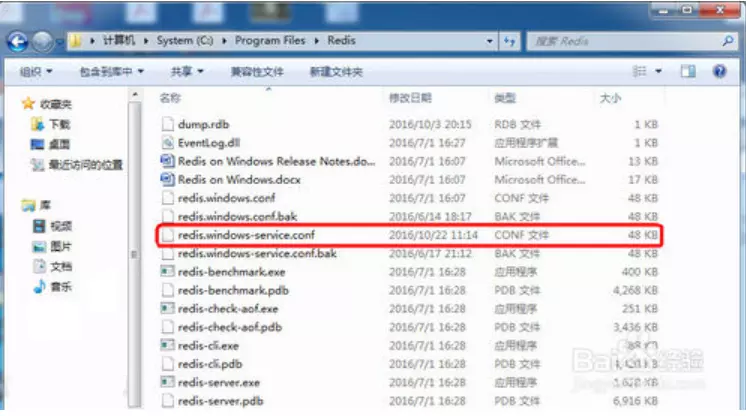
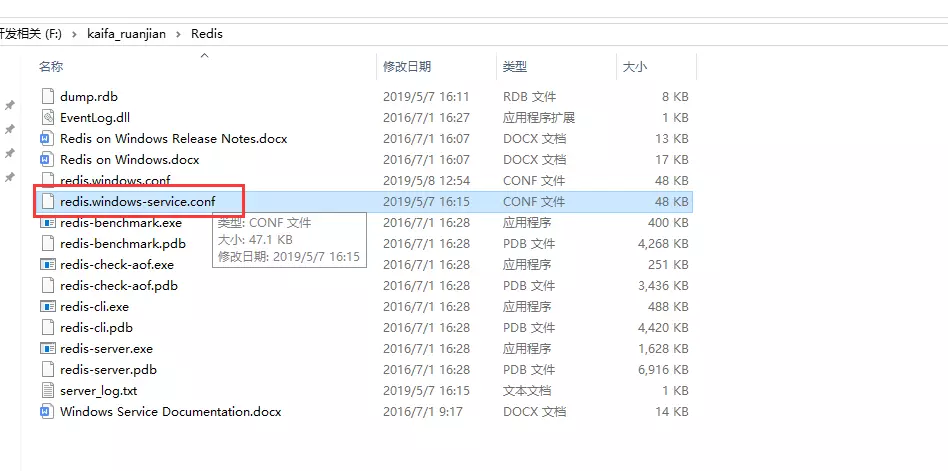
��װ��Ϻ���Ҫ����һЩ�趨�������Ա�������������������С�ʹ���ı��༭��������ʹ��Notepad++����Redis���������ļ���ע�⣺��Ҫ�Ҵ��ˣ�ͨ��Ϊredis.windows-service.conf��������redis.windows.conf���������Է�ϵͳ����ʽ��������ʹ�õ������ļ���
�ҵ�����requirepass�����ĵط�����һ�У�����requirepass 147258qq�����Ƿ���Redisʱ��������룬һ���������¿��Բ����趨���롣��������ʹ����Ϊ���ط��ʣ�Ҳ�����趨һ�����롣�˴��Լ�147258qq����ʾ��

���“��ʼ”>�һ�“�����”>ѡ��“����”����������������ҵ������“��������������أ�”>�����Ӧ�ó���>���������Ҳ��ҵ�Redis���Ƶķ��鿴�����������δ���������ֶ�����֮����������£�����Ӧ�����������������ˡ�

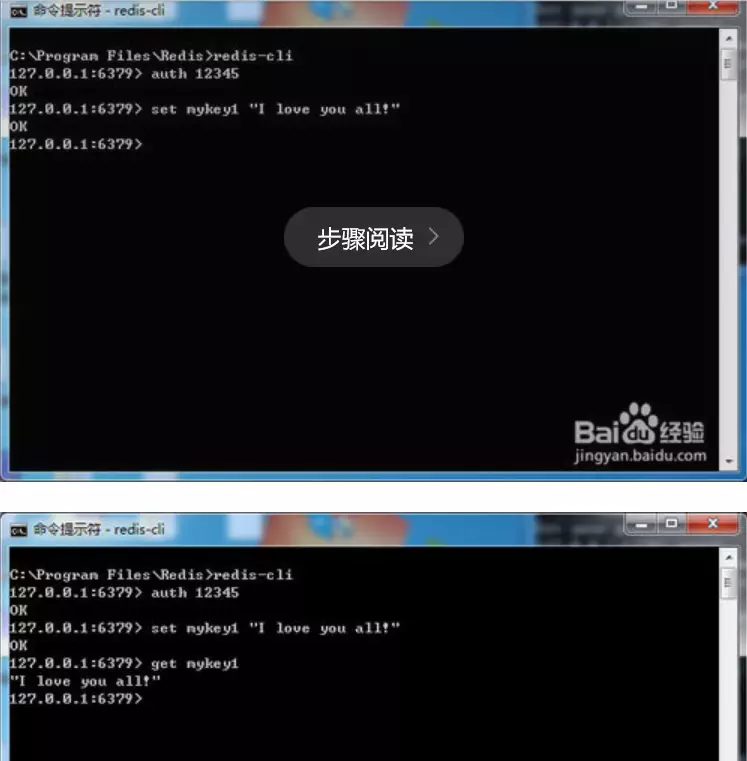
���������һ��Redis�Ƿ������ṩ������Redis��Ŀ¼��cd C:\Program Files\Redis������redis-cli���س�����redis-cli�ǿͻ��˳�����ͼ������ʾ���룬����ʾ��ȷ�˿ںţ����ʾ�����Ѿ�������

ʹ�÷���ǰ��Ҫ��ͨ��������֤������“auth 147258qq”���س���12345��֮ǰ�趨�����룩��������ʾOK��ʾ��֤ͨ����

ʵ�ʲ���һ�¶�д������set mykey1 "I love you all!”���س�����������һ����ֵ��������get mykey1����ȡ�ղű���ļ�ֵ��

2. ���ÿ����Զ�����
���÷������redis-server --service-install redis.windows-service.conf --loglevel verbose
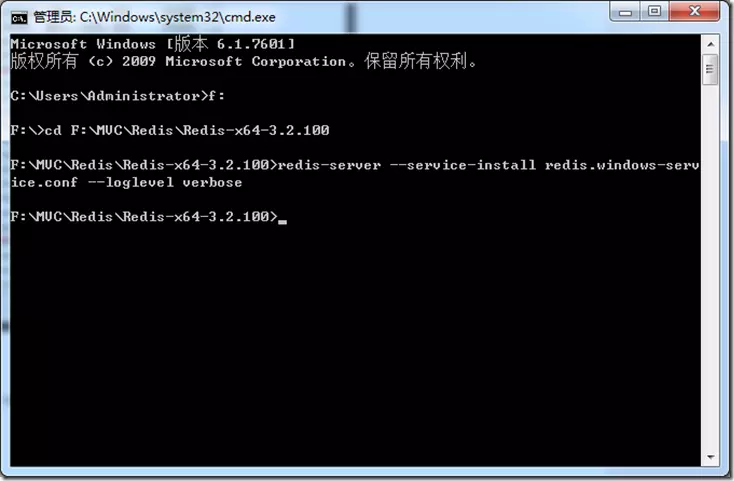
��������֮��û�б�������ʾ�ɹ��ˣ�ˢ�·��ῴ������һ��redis����
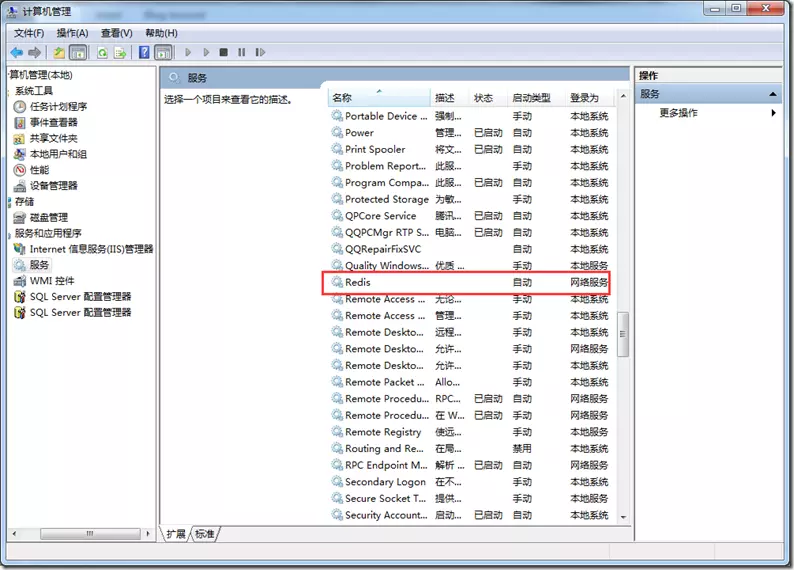
�Ҽ�Redis��ѡ������
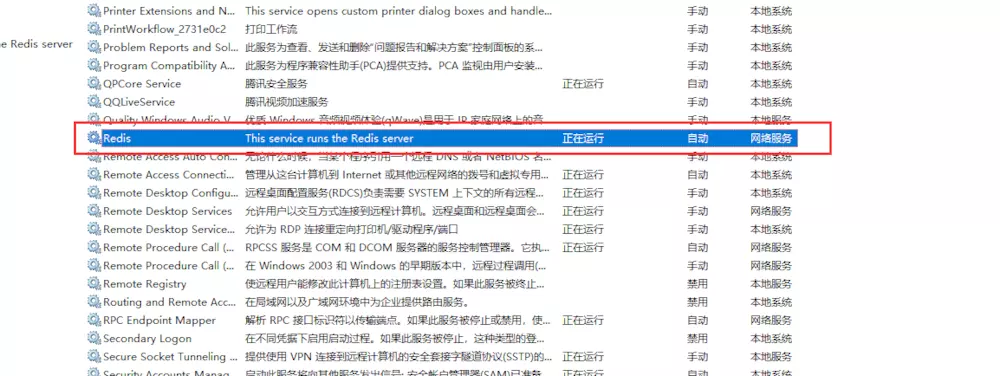
������������Ϊ�Զ�
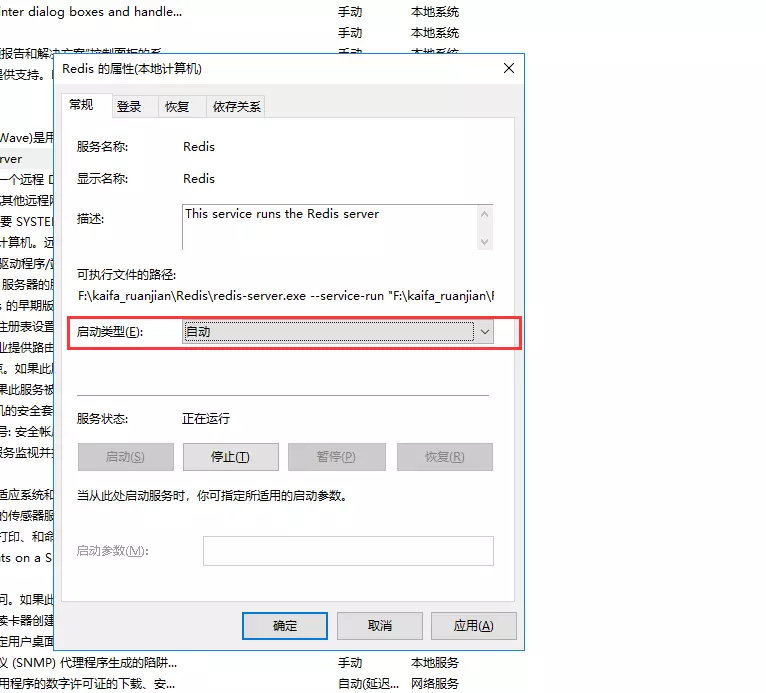
���õ�redis�������
ж�ط���redis-server --service-uninstall
��������redis-server --service-start
ֹͣ����redis-server --service-stop
��ܰ��ʾ
��1��Windowsʹ�õ����Redis��64λ�汾�ģ�32λ����ϵͳ��ͬѧ�Ͳ�Ҫ�����ˡ�
��2����Ϊ�������е�Redis�����ļ���ͨ��Ϊredis.windows-service.conf��������redis.windows.conf��С�IJ�Ҫѡ���ˡ��������redis.windows.conf����redis.windows-service.conf���ļ��ϵ����ã��ӷ��������������õ���Ϣ�Dz���Ч�ģ����������ú�ip��
����Redis�ļ��ṹ

�ġ�Redis������ʽ
Redis������������ʽ���������£�
��1��ʹ��redis-server�������Ĭ�ϵ�redis���ý�������
��2��ʹ��redis-server –port6379�Ϳ���ʹ�ö�̬�������ý�������
��3��ʹ��redis-server configPath�Ϳ���ʹ�������ļ���ʽ��������
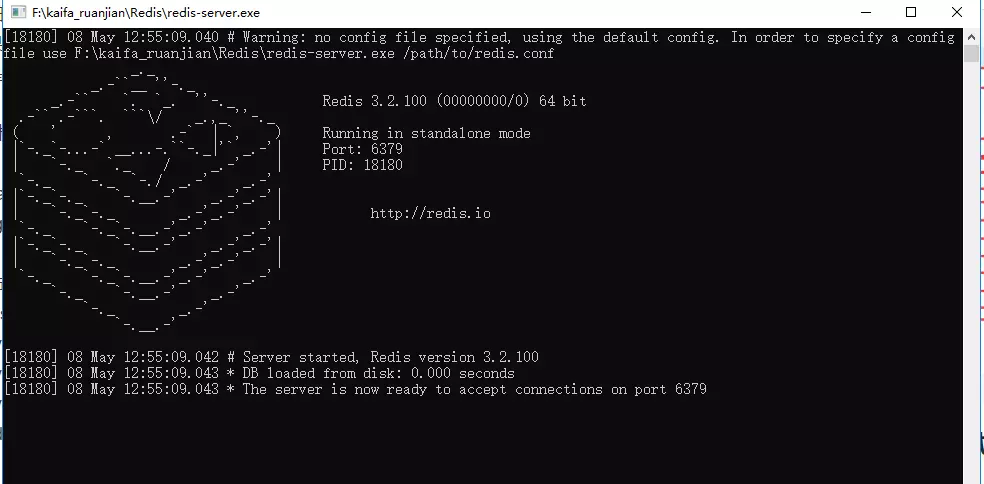
��4����ֱ������redis-service.exeʱ����û��ʹ�������ļ��ģ����һ���ʾ�������ݣ�

�塢Redis�־û�
1. �־û�����

2. �־û���ʽ

3. RDB
3.1 ʲô��RDB

3.2 RDB�ļ����ɷ�ʽ

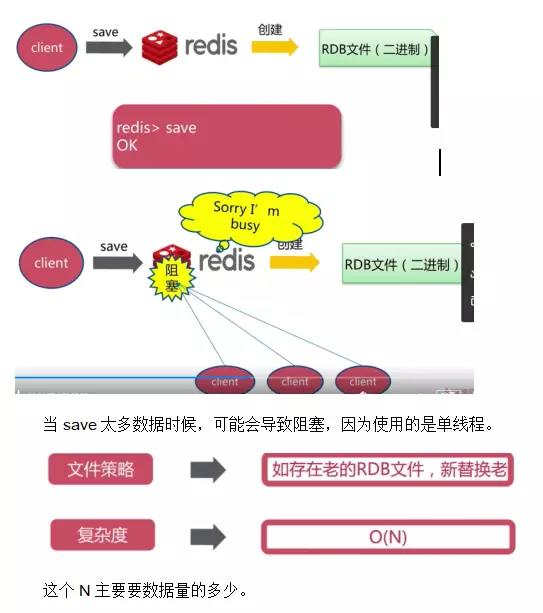
save��ʽ
bgsave��ʽ
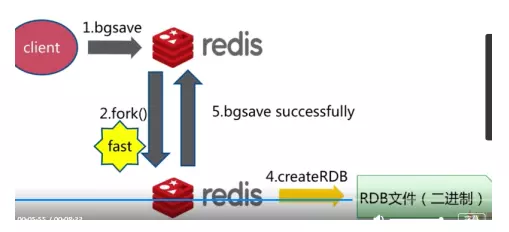
Save��bgsave�Ƚ�

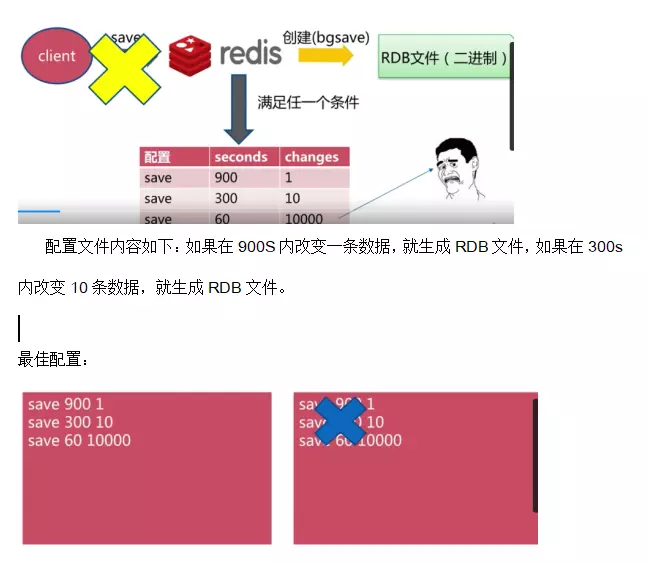
�Զ�����RDB
3.3 RDB�ܽ�

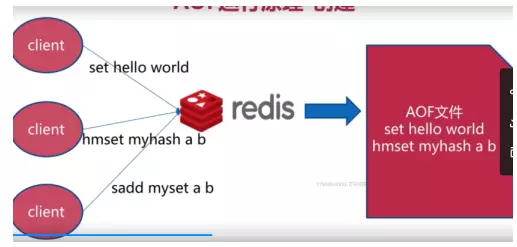
4. AOF
4.1 RDB����

��ΪRDB��Ҫ��ȫ����������RDB�ļ�������������̱ȽϺ�ʱ�������fork��bgsave�����̣���̫�������ݡ����RDB�ļ��dz�����Ӱ��IO���ܡ�
��T3-T4֮��ͻ�������ݶ�ʧ��

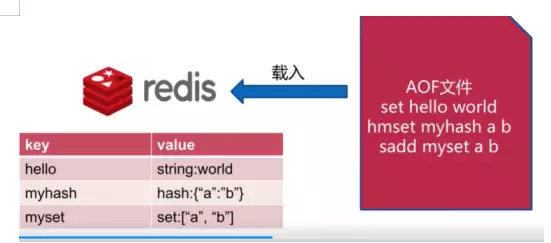
4.2 AOF�ļ������ͻָ�
����ʱ��
�ָ�ʱ��
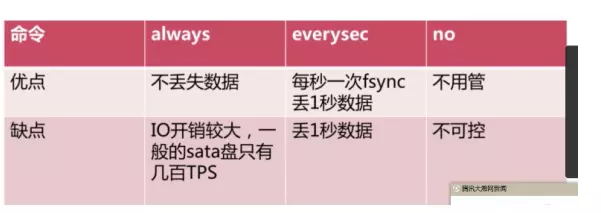
4.3 AOF���ֲ���

Always����

Everysec����
ÿ��д��һ�����ݣ��������ͻȻ�����⣬���ܶ�ʧһ������

No����
���ݲ���ϵͳ��������ѡ��

���ֲ��ԱȽ�
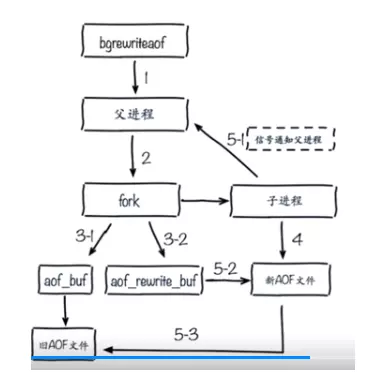
4.4 AOF��д
�ѹ��ڵģ��ظ��ģ����Ż�������л��⡣

�����

��д��ʽ

Bgrewriteaof����

AOF�����

AOF�����
5. RDB��AOFѡ��
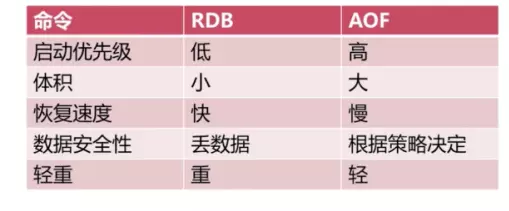
6. RedisĬ�ϵij־û�
RedisĬ�ϵij־û���ʽ��RDB������ɿ���ͼ��

����Redis�����ļ����
Redis���õ������ļ���redis.windows-service.conf���������ð������õ�¼���롢���ó־û���ʽ���־û�·���������ڴ�ռ䡢���ݿ���������־�ĵȼ�����־��·�������������ͻ������ӵ�IP�ȣ����Ӹ��ơ��߿��á���Ⱥ���������صĹ��ܽ�����һƪ���н��⡣
# redis �����ļ�ʾ��
# ������ҪΪij��������ָ���ڴ��С��ʱ����Ҫ���ϵ�λ��
# ͨ���ĸ�ʽ���� 1k 5gb 4m �Ƚ��ϣ�
#
# 1k => 1000 bytes
# 1kb => 1024 bytes
# 1m => 1000000 bytes
# 1mb => 1024*1024 bytes
# 1g => 1000000000 bytes
# 1gb => 1024*1024*1024 bytes
#
# ��λ�Dz����ִ�Сд�ģ���д 1K 5GB 4M Ҳ��
################################## INCLUDES ###################################
# ����˵����һ�����������е� redis server �ı�����ģ�壬
# �����ijЩ server ����ҪһЩ���Ի������ã�
# �����ʹ�� include ������һЩ�����������ļ����������˵�Ƿdz����õġ�
#
# ����Ҫע��Ŷ��include �Dz��ܱ� config rewrite �����д��
# ���� redis ���������ļӹ�����Ϊһ������ָ��ֵ������������ǰ� include ��������ļ�����ǰ�棬
# �Ա���������ʱ�������õĸı䣬�෴����Ͱ������ں��棨������憪�£���
#
# include /path/to/local.conf
# include /path/to/other.conf
################################ ���� #####################################
# Ĭ������� redis ������Ϊ�ػ��������еģ�������������ں�̨���У���Ͱ����ij� yes��
# ��redis��Ϊ�ػ��������е�ʱ������дһ�� pid �� /var/run/redis.pid �ļ����档
daemonize no
# ��redis��Ϊ�ػ��������е�ʱ������� pid Ĭ��д�� /var/run/redis.pid �ļ����棬
# ����������������Լ��ƶ������ļ�λ�á�
pidfile /var/run/redis.pid
# �����˿ںţ�Ĭ��Ϊ 6379���������Ϊ 0 ��redis ������ socket �ϼ����κοͻ������ӡ�
port 6379
# TCP �����������������
#
# �ڸ߲����Ļ����£�����Ҫ�����ֵ�����Ա���ͻ������ӻ��������⡣
# Linux �ں˻�һ������İ����ֵ��С�� /proc/sys/net/core/somaxconn ��Ӧ��ֵ��
# ������Ҫ��������ֵ���ܴﵽ���Ԥ�ڡ�
tcp-backlog 511
# Ĭ������£�redis �� server ��������Ч������ӿ��ϼ����ͻ������ӡ�
# �����ֻ��������һ������ӿ��ϼ���������Ͱ�һ��IP���߶��IP��
#
# ʾ�������IP�ÿո����:
#
# bind 192.168.1.100 10.0.0.1
# bind 127.0.0.1
# ָ�� unix socket ��·����
#
# unixsocket /tmp/redis.sock
# unixsocketperm 755
# ָ����һ�� client ���ж�����֮��ر����ӣ�0 ���Dz�������
timeout 0
# tcp ��������
#
# �������Ϊ���㣬������ͻ���ȱ��ͨѶ��ʱ��ʹ�� SO_KEEPALIVE ���� tcp acks ���ͻ��ˡ�
# ���֮�������ã���Ҫ������ԭ��
#
# 1) ��ֹ���� peers
# 2) Take the connection alive from the point of view of network
# equipment in the middle.
#
# On Linux, the specified value (in seconds) is the period used to send ACKs.
# Note that to close the connection the double of the time is needed.
# On other kernels the period depends on the kernel configuration.
#
# A reasonable value for this option is 60 seconds.
# �Ƽ�һ��������ֵ����60��
tcp-keepalive 0
# ������־����
# �������������Щֵ��
# debug (�����ڿ�������Խ�)
# verbose (many rarely useful info, but not a mess like the debug level)
# notice (��������������)
# warning (����һЩ��Ҫ����Ϣ����¼)
loglevel notice
# ָ����־�ļ���λ��
logfile ""
# Ҫ�����־��¼��ϵͳ��־���Ͱ����ij� yes��
# Ҳ���Կ�ѡ���Եĸ���������syslog �����Դﵽ���Ҫ��
# syslog-enabled no
# ���� syslog �� identity��
# syslog-ident redis
# ���� syslog �� facility�������� USER ������ LOCAL0-LOCAL7 ֮���ֵ��
# syslog-facility local0
# �������ݿ����Ŀ��
# Ĭ�����ݿ��� DB 0���������ÿ��������ʹ�� select <dbid> ����ѡ��һ����ͬ�����ݿ⣬
# ���� dbid ������һ������ 0 �� databasees - 1 ֮���ֵ
databases 16
################################ ���� ################################
#
# �� DB �����̣�
#
# ��ʽ��save <���ʱ�䣨�룩> <д�����>
#
# ���ݸ�����ʱ������д����������ݱ��浽����
#
# ��������ӵ���˼�ǣ�
# 900 ������������� 1 �� key ��ֵ�仯����
# 300 ������������� 10 �� key ��ֵ�仯����
# 60 ������������� 10000 �� key ��ֵ�仯����
#����
# ע�⣺�����ע�͵����е� save ����ͣ�ñ��湦�ܡ�
# Ҳ����ֱ��һ�����ַ�����ʵ��ͣ�ã�
# save ""
save 900 1
save 300 10
save 60 10000
# Ĭ������£���� redis ���һ�εĺ�̨����ʧ�ܣ�redis ��ֹͣ����д������
# ������һ��ǿӲ�ķ�ʽ���û�֪�����ݲ�����ȷ�ij־û������̣�
# ����ͻ�û��ע����ѵķ�����
#
# �����̨��������������������ˣ�redis Ҳ���Զ�������д������
#
# Ȼ����Ҫ�ǰ�װ�˿��ļ�أ�����ܲ�ϣ�� redis ������������ij� no ���ˡ�
stop-writes-on-bgsave-error yes
# �Ƿ��� dump .rdb ���ݿ��ʱ��ʹ�� LZF ѹ���ַ���
# Ĭ�϶���Ϊ yes
# �����ϣ�������ӽ��̽�ʡ�� cpu �����������Ϊ no ��
# ����������ݼ����ܾͻ�Ƚϴ�
rdbcompression yes
# �Ƿ�У��rdb�ļ�
rdbchecksum yes
# ���� dump ���ļ�λ��
dbfilename dump.rdb
# ����Ŀ¼
# ��������� dbfilename ָֻ�����ļ�����
# ��������д�뵽���Ŀ¼�¡����������һ���Ǹ�Ŀ¼�����������ļ�����
dir ./
################################# ���Ӹ��� #################################
# ���Ӹ��ơ�ʹ�� slaveof ����һ�� redis ʵ����Ϊ��һ��reids ʵ���ĸ�����
# ע�����ֻ��Ҫ�� slave �����á�
#
# slaveof <masterip> <masterport>
# ��� master ��Ҫ������֤��������������
# masterauth <master-password>
# ��һ�� slave �� master ʧȥ��ϵ�����߸������ڽ��е�ʱ��
# slave ���ܻ������ֱ��֣�
#
# 1) ���Ϊ yes ��slave ��Ȼ��Ӧ��ͻ����������ص����ݿ����ǹ�ʱ��
# �������ݿ����ǿյ��ڵ�һ��ͬ����ʱ��
#
# 2) ���Ϊ no ������ִ�г��� info he salveof ֮�����������ʱ��
# slave ��������һ�� "SYNC with master in progress" �Ĵ���
#
slave-serve-stale-data yes
# ���������һ�� slave ʵ���Ƿ����д�������
# ͨ��д��������洢һЩ���ݵ����ݶ���һ�� slave ʵ����˵���������õģ�
# ��Ϊ��Դ� master ����ͬ�������ԣ�������д�뵽 slave ������ױ�ɾ����
# ��������ͻ�����Ϊһ�����������д�룬Ҳ���ܻᵼ��һЩ���⡣
#
# �� redis 2.6 ����Ĭ�� slaves ����ֻ���ġ�
#
# Note: read only slaves are not designed to be exposed to untrusted clients
# on the internet. It's just a protection layer against misuse of the instance.
# Still a read only slave exports by default all the administrative commands
# such as CONFIG, DEBUG, and so forth. To a limited extent you can improve
# security of read only slaves using 'rename-command' to shadow all the
# administrative / dangerous commands.
# ע�⣺ֻ���� slaves û�б���Ƴ��� internet �ϱ�¶���������εĿͻ��ˡ�
# ��������һ���������ʵ����һ�������㡣
slave-read-only yes
# Slaves ��һ��Ԥ�����ʱ�����ڷ��� ping ��� server ��
# ����Ըı����ʱ������Ĭ��Ϊ 10 �롣
#
# repl-ping-slave-period 10
# The following option sets the replication timeout for:
# �������Ӹ��ƹ���ʱ��
#
# 1) Bulk transfer I/O during SYNC, from the point of view of slave.
# 2) Master timeout from the point of view of slaves (data, pings).
# 3) Slave timeout from the point of view of masters (REPLCONF ACK pings).
#
# It is important to make sure that this value is greater than the value
# specified for repl-ping-slave-period otherwise a timeout will be detected
# every time there is low traffic between the master and the slave.
# ���ֵһ��Ҫ�� repl-ping-slave-period ��
#
# repl-timeout 60
# Disable TCP_NODELAY on the slave socket after SYNC?
#
# If you select "yes" Redis will use a smaller number of TCP packets and
# less bandwidth to send data to slaves. But this can add a delay for
# the data to appear on the slave side, up to 40 milliseconds with
# Linux kernels using a default configuration.
#
# If you select "no" the delay for data to appear on the slave side will
# be reduced but more bandwidth will be used for replication.
#
# By default we optimize for low latency, but in very high traffic conditions
# or when the master and slaves are many hops away, turning this to "yes" may
# be a good idea.
repl-disable-tcp-nodelay no
# �������Ӹ���������С����� backlog ��һ�������� slaves ���Ͽ�����ʱ
# ��� slave ���ݵ� buffer�����Ե�һ�� slave ��Ҫ�������ӣ�ͨ����ϣ��ȫ������ͬ����
# ֻ�Dz���ͬ�����ˣ��������� slave �ڶϿ�����ʱ��ʧ���ⲿ�����ݡ�
#
# The biggest the replication backlog, the longer the time the slave can be
# disconnected and later be able to perform a partial resynchronization.
# ���ֵԽ��salve ���ԶϿ����ӵ�ʱ���Խ����
#
# The backlog is only allocated once there is at least a slave connected.
#
# repl-backlog-size 1mb
# After a master has no longer connected slaves for some time, the backlog
# will be freed. The following option configures the amount of seconds that
# need to elapse, starting from the time the last slave disconnected, for
# the backlog buffer to be freed.
# ��ijЩʱ��master �������� slaves��backlog �����ͷš�
#
# A value of 0 means to never release the backlog.
# �������Ϊ 0 ����ζ�ž����ͷ� backlog ��
#
# repl-backlog-ttl 3600
# �� master ��������������ʱ��Redis Sentinel ��� slaves ��ѡ��һ���µ� master��
# ���ֵԽС����Խ�ᱻ����ѡ�У���������� 0 �� ������ζ����� slave �����ܱ�ѡ�С�
#
# Ĭ�����ȼ�Ϊ 100��
slave-priority 100
# It is possible for a master to stop accepting writes if there are less than
# N slaves connected, having a lag less or equal than M seconds.
#
# The N slaves need to be in "online" state.
#
# The lag in seconds, that must be <= the specified value, is calculated from
# the last ping received from the slave, that is usually sent every second.
#
# This option does not GUARANTEES that N replicas will accept the write, but
# will limit the window of exposure for lost writes in case not enough slaves
# are available, to the specified number of seconds.
#
# For example to require at least 3 slaves with a lag <= 10 seconds use:
#
# min-slaves-to-write 3
# min-slaves-max-lag 10
#
# Setting one or the other to 0 disables the feature.
#
# By default min-slaves-to-write is set to 0 (feature disabled) and
# min-slaves-max-lag is set to 10.
################################## ��ȫ ###################################
# Require clients to issue AUTH <PASSWORD> before processing any other
# commands. This might be useful in environments in which you do not trust
# others with access to the host running redis-server.
#
# This should stay commented out for backward compatibility and because most
# people do not need auth (e.g. they run their own servers).
#
# Warning: since Redis is pretty fast an outside user can try up to
# 150k passwords per second against a good box. This means that you should
# use a very strong password otherwise it will be very easy to break.
#
# ������֤����