
【从零开始搭建自己的.NET Core Api框架】(一)…
2018-06-24 00:12:40来源:未知 阅读 ()

前一章我们在项目中初步集成了swagger插件,但是还有一些问题和需要改善的地方需要解决,所以这一章要做的,就是完善swagger的相关设置。
一、设置swagger ui页面为启动页
在前一章的末尾,我们通过在域名后面输入/swagger后,成功访问到swagger ui页,但是我们发现每次运行项目,都会默认访问api/values这个接口,我想要将启动页设为swagger(或者是你画好的任一个html页),那应该怎么设置呢?
位置就在Properties下的launchSettings.json文件里,只要将profiles下的launchUrl改成你需要的地址就可以
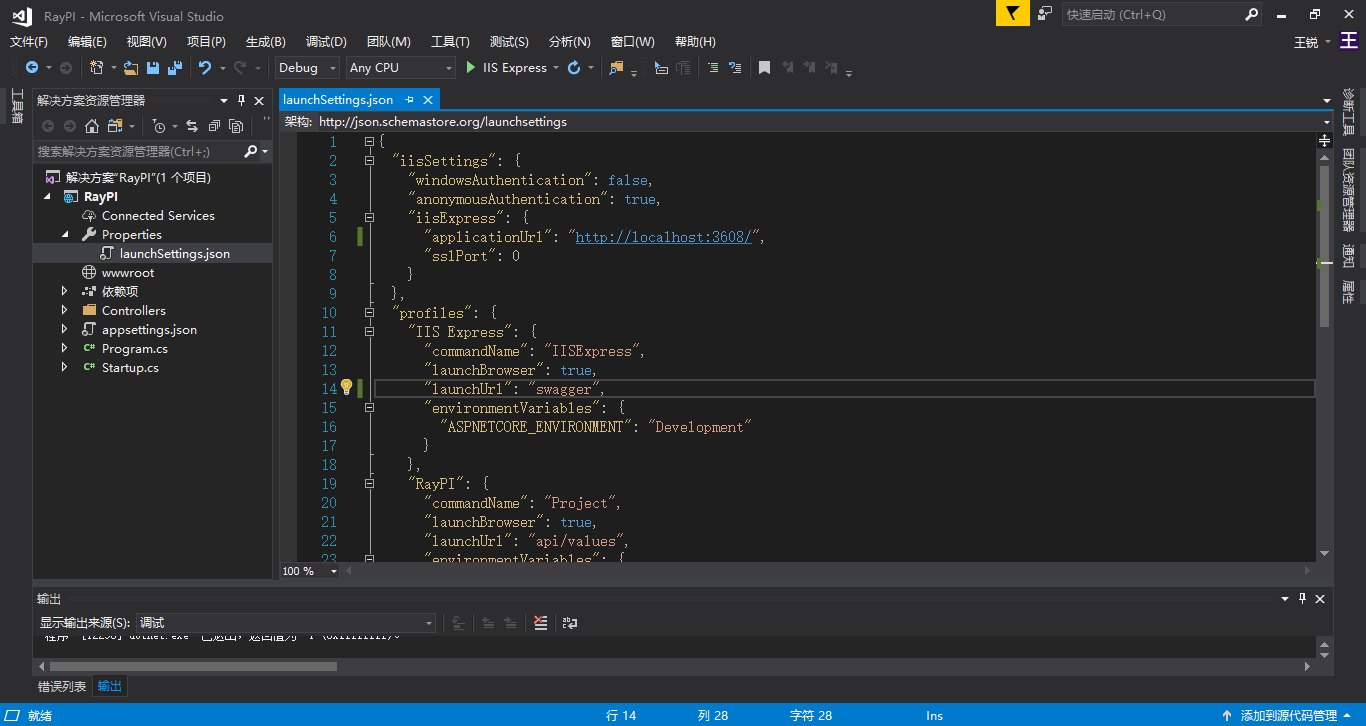
当然,文件里还有其他一些基本设置,比如端口设置,就不一一说了。
二、注释问题
swagger很重要的一个功能,就是将我们接口的注释信息和参数(包括实体类)的注释信息显示到页面上,现在我们分别将控制器、函数和参数添加相应的注释(添加方式是在类或函数的上一行敲三下“/”)
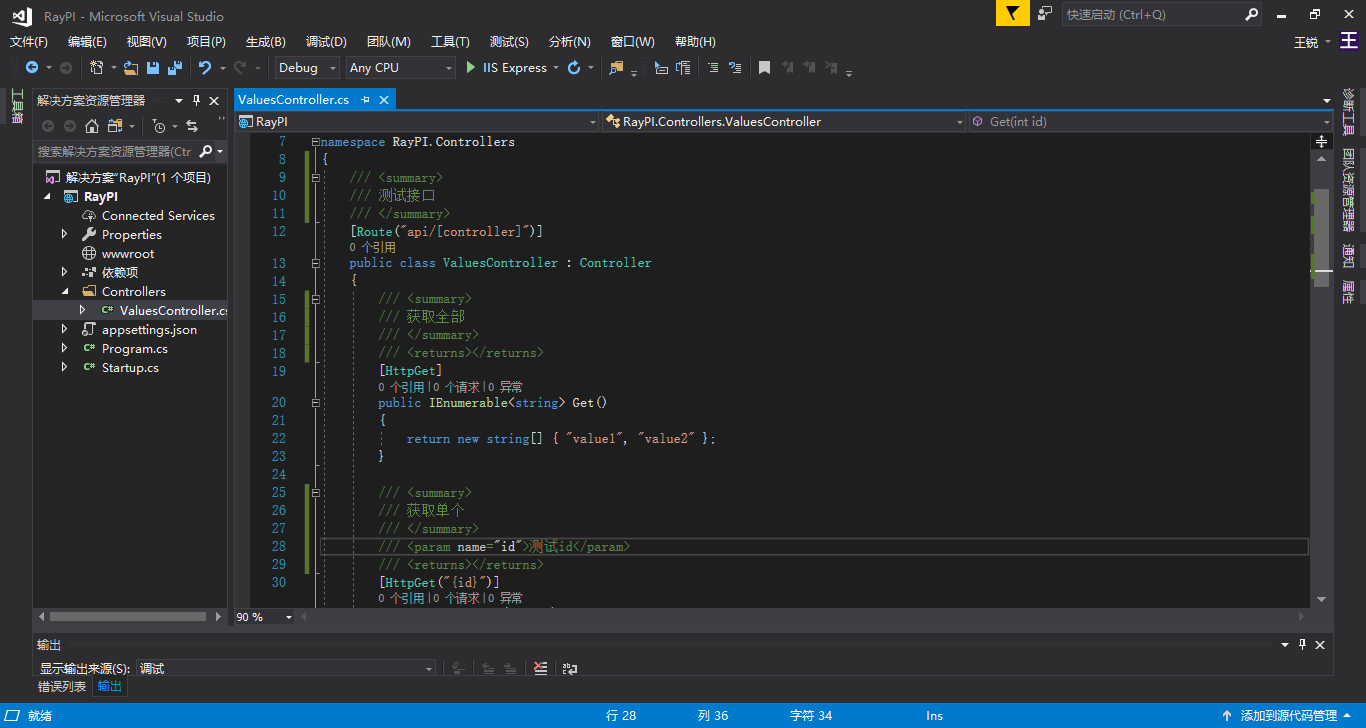
F5运行,发现swagger ui上并没有将它们显示出来。那是因为还缺少两步
A:项目生成xml注释文件
右键项目名称=>属性=>生成
勾选“输出”下面的“生成xml文档文件”,后面填写保存该文档的地址(xml文件的名字可以修改,但是不建议修改保存的路径,然后记住这个地址,待会会用到)
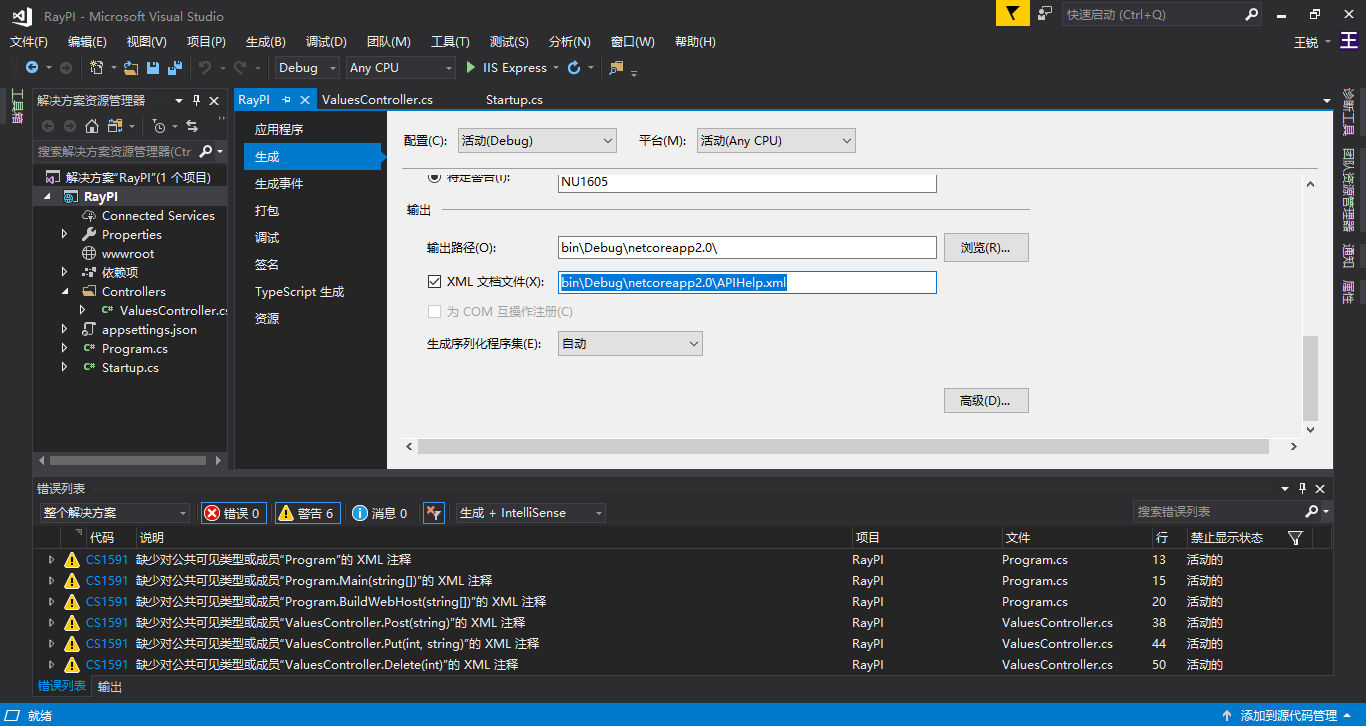
操作完之后,我们会发现错误列表会多出很多黄色的警告,提示“缺少XML注释”。这时只需要像之前那样,在类或函数的上面一行添加注释即可。(当然,如果强迫症的话,装作没看到也是不影响的~)
如果我们按照刚才记住的地址去文件夹查看,也能看到对应xml文件。
B. 启动类中添加swagger服务来读取这个xml文件
重新编辑Startup.cs,修改ConfigureServices函数:
     /// <summary>
        /// This method gets called by the runtime. Use this method to add services to the container.
        /// </summary>
        /// <param name="services"></param>
        public void ConfigureServices(IServiceCollection services)
        {
            services.AddMvc();

            #region Swagger
            services.AddSwaggerGen(c =>
            {
                c.SwaggerDoc("v1", new Info
                {
                    Version = "v1.1.0",
                    Title = "Ray WebAPI",
                    Description = "框架集合",
                    TermsOfService = "None",
                    Contact = new Swashbuckle.AspNetCore.Swagger.Contact { Name = "RayWang", Email = "2271272653@qq.com", Url = "http://www.cnblogs.com/RayWang" }
                });
                //添加读取注释服务
                var basePath = PlatformServices.Default.Application.ApplicationBasePath;
                var xmlPath = Path.Combine(basePath, "APIHelp.xml");
                c.IncludeXmlComments(xmlPath);
            });
            #endregion
        }
以上两步完成之后,F5运行调试:
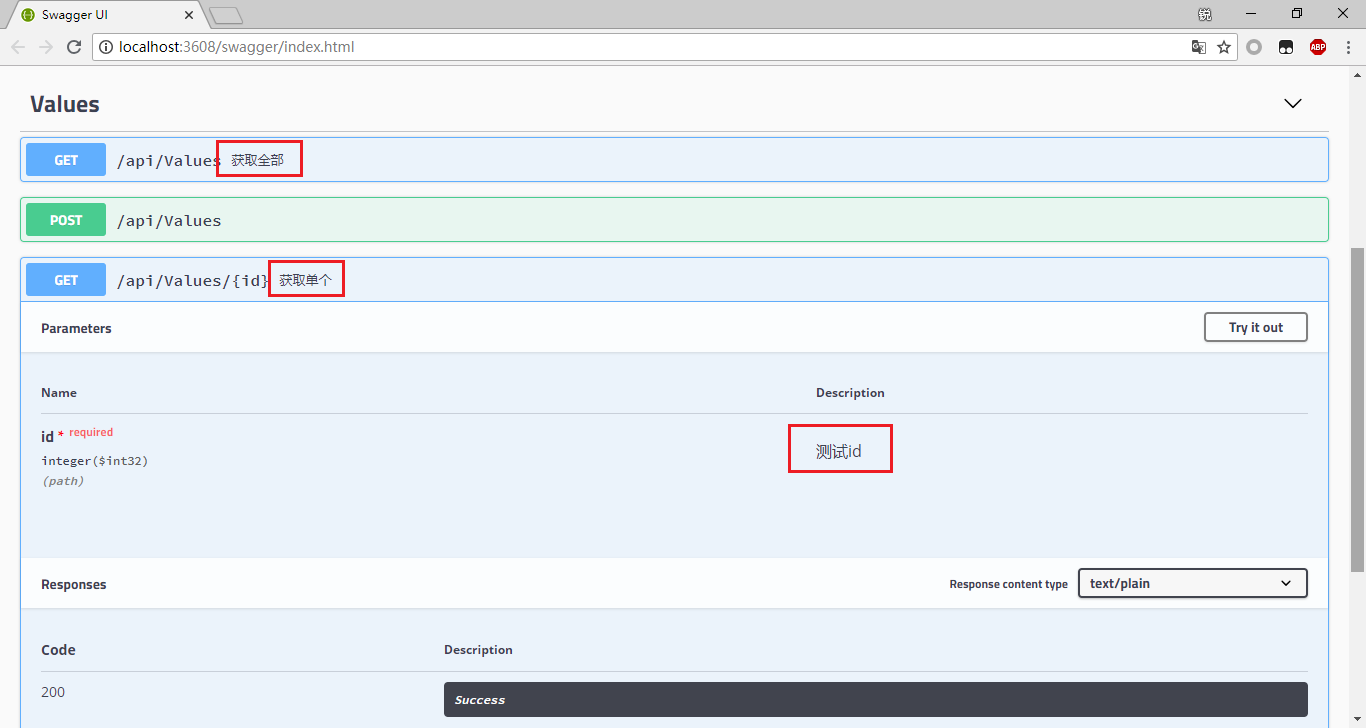
我们之前添加的注释就全部都出来了。
现在是不是突然觉得swagger很有用处了?
其实到这儿,细心的人都会发现,有一个地方还是没有显示注释,就是控制器的名称(在这个例子里就是values),我们之前在代码里明明也添加了注释,这里却没有显示出来,为什么?
好,接下来要放我个人私藏的大招了~
解决办法是:在项目中添加一个文件夹“SwaggerHelp”,在该文件加下添加类“SwaggerDocTag”,这个类的作用是根据控制器的名称向swagger ui额外附加注释,代码如下:
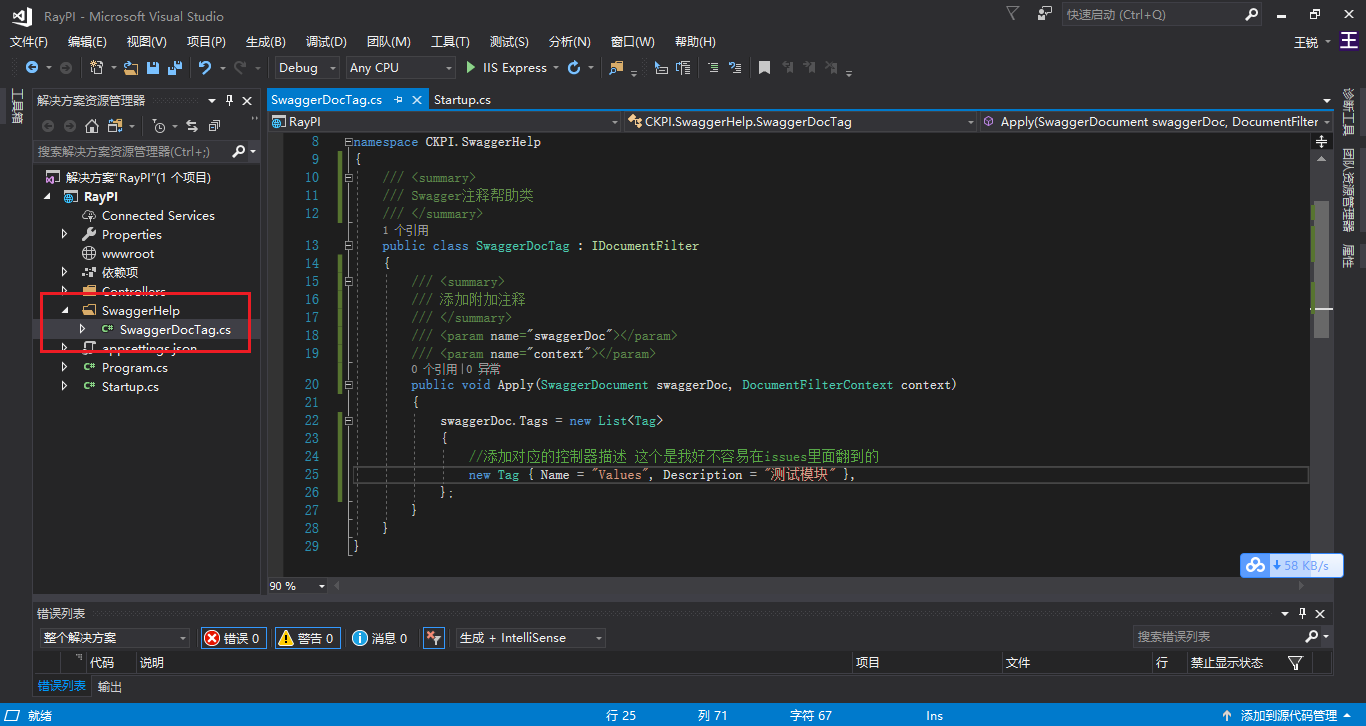
using Swashbuckle.AspNetCore.Swagger;
using Swashbuckle.AspNetCore.SwaggerGen;
using System;
using System.Collections.Generic;
using System.Linq;
using System.Threading.Tasks;

namespace CKPI.SwaggerHelp
{
    /// <summary>
    /// Swagger注释帮助类
    /// </summary>
    public class SwaggerDocTag : IDocumentFilter
    {
        /// <summary>
        /// 添加附加注释
        /// </summary>
        /// <param name="swaggerDoc"></param>
        /// <param name="context"></param>
        public void Apply(SwaggerDocument swaggerDoc, DocumentFilterContext context)
        {
            swaggerDoc.Tags = new List<Tag>
            {
                //添加对应的控制器描述 这个是我好不容易在issues里面翻到的
                new Tag { Name = "Values", Description = "测试模块" },
            };
        }
    }
}
接下来要去Startup.cs添加相应的服务:
using System;
using System.Collections.Generic;
using System.IO;
using System.Linq;
using System.Threading.Tasks;
using CKPI.SwaggerHelp;
using Microsoft.AspNetCore.Builder;
using Microsoft.AspNetCore.Hosting;
using Microsoft.Extensions.Configuration;
using Microsoft.Extensions.DependencyInjection;
using Microsoft.Extensions.Logging;
using Microsoft.Extensions.Options;
using Microsoft.Extensions.PlatformAbstractions;
using Swashbuckle.AspNetCore.Swagger;

namespace RayPI
{
    /// <summary>
    ///
    /// </summary>
    public class Startup
    {
        /// <summary>
        ///
        /// </summary>
        /// <param name="configuration"></param>
        public Startup(IConfiguration configuration)
        {
            Configuration = configuration;
        }
        /// <summary>
        ///
        /// </summary>
        public IConfiguration Configuration { get; }

        /// <summary>
        /// This method gets called by the runtime. Use this method to add services to the container.
        /// </summary>
        /// <param name="services"></param>
        public void ConfigureServices(IServiceCollection services)
        {
            services.AddMvc();

            #region Swagger
            services.AddSwaggerGen(c =>
            {
                c.SwaggerDoc("v1", new Info
                {
                    Version = "v1.1.0",
                    Title = "Ray WebAPI",
                    Description = "框架集合",
                    TermsOfService = "None",
                    Contact = new Swashbuckle.AspNetCore.Swagger.Contact { Name = "RayWang", Email = "2271272653@qq.com", Url = "http://www.cnblogs.com/RayWang" }
                });
                //添加注释服务
                var basePath = PlatformServices.Default.Application.ApplicationBasePath;
                var xmlPath = Path.Combine(basePath, "APIHelp.xml");
                c.IncludeXmlComments(xmlPath);
                //添加对控制器的标签(描述)
                c.DocumentFilter<SwaggerDocTag>();
            });
            #endregion
        }

        /// <summary>
        /// This method gets called by the runtime. Use this method to configure the HTTP request pipeline.
        /// </summary>
        /// <param name="app"></param>
        /// <param name="env"></param>
        public void Configure(IApplicationBuilder app, IHostingEnvironment env)
        {
            if (env.IsDevelopment())
            {
                app.UseDeveloperExceptionPage();
            }

            app.UseMvc();

            #region Swagger
            app.UseSwagger();
            app.UseSwaggerUI(c =>
            {
                c.SwaggerEndpoint("/swagger/v1/swagger.json", "ApiHelp V1");
            });
            #endregion
        }
    }
}
现在再次运行调试,你会发现,控制器的注释就可以显示了

这儿的“测试模块”的注释,其实是从SwaggerDocTag类中读取出来的,并不是控制器本身的注释。
然后,这只是我个人目前为止发现的最好好用的方法,如果有人有什么其他更好的解决办法,欢迎大家指教,一起学习进步~
BTW,这里插一句可能遇到的问题:如果项目发布之后,或是上线服务器之后,发现注释又没了,十有八九是生成的xml文件路径的问题。可以按照之前的步骤,依次排查,重新修改路径就可以了。
到这,我们的第一章的内容“搭建项目和集成sawgger”就结束了,如果有问题,欢迎留言一起讨论,互相学习。
本来想着代码比较简单,就不放源码,但是考虑之后,还是决定上传一下。正好也定个规矩,这个系列后面每完成一个大的章节之后,都上传一份源码。这样也是给自己一个交代吧。
源码下载:
下一章的内容是项目架构的搭建和集成SqlSugar
标签:aspnet
版权申明:本站文章部分自网络,如有侵权,请联系:west999com@outlook.com
特别注意:本站所有转载文章言论不代表本站观点,本站所提供的摄影照片,插画,设计作品,如需使用,请与原作者联系,版权归原作者所有

- 理解content(二) 2020-06-07
- 如何在博客园添加自己的头像 2020-05-27
- 想自学前端,该怎么开始学,从哪学起呢? 2020-05-25
- Hexo如何快速搭建个人博客 2020-05-19
- Hugo博客搭建 2020-04-22
IDC资讯: 主机资讯 注册资讯 托管资讯 vps资讯 网站建设
网站运营: 建站经验 策划盈利 搜索优化 网站推广 免费资源
网络编程: Asp.Net编程 Asp编程 Php编程 Xml编程 Access Mssql Mysql 其它
服务器技术: Web服务器 Ftp服务器 Mail服务器 Dns服务器 安全防护
软件技巧: 其它软件 Word Excel Powerpoint Ghost Vista QQ空间 QQ FlashGet 迅雷
网页制作: FrontPages Dreamweaver Javascript css photoshop fireworks Flash
